Self-Study Encyclopedia

It's been a few weeks since I went to a bookstore, so when I came across a book that contains 55 methods of self-studying, I was delighted. Unfortunately, it's in Japanese, so I do have to translate it. But they say that the more you work to understand something, the more likely it is to stick. So here is my translation and personal commentary below.
I want to treat this blog post like an evergreen note. This means that I will come back to it with additional commentary of how I’ve applied each of the techniques in real life.
You might realize that I did not translate all 55 techniques. The book is very thick, and it does take time to get through them all, so I will come back to update this from time to time.
Originally, I wanted this to be a self-contained wikipedia page within my website, but unfortunately squarespace has a limited number of pages I can create, so I will have to put everything here. I am sorry for the length in advance. 🙇🏻♂️
Table of Contents:
Part 1: Why Self Learn?
Chapter 1: Controlling Aspirations
Technique 1: Inspiration Map
A way to map out your course before starting is to think about an event that had an impact on you. Take for example, a child who meets a biologist during one of his elementary school talks. The biologist recounts how he went into his field. He started off being interested in insects and then after using those insects for fishing, he also became interested in fishing as well. He then became interested in all types of animals and that's why he started pursuing biology.
There is a multi-step process that the author recommends. This process helps you make the most out of this interaction.
Write down the event that had an impact on you. In this case, it might be encountering the biologist
Write down all the influences that this encounter or event had on you. You should do this in one go. Write down as much as you can in a map diagram (shown below).
You should think about how your actions, habits and way of thinking changed from this encounter.
What things made an impression on you?
After writing out multiple influences, you have to evaluate these influences whether they had a positive or negative impact on you. For example, this biologist wanders around different fields inside of biology, but eventually all of them diffuses into each other and helps him do his job well. This might lead you to think that your current position as a generalist is a good thing.
Ask yourself why you evaluate something a certain way. For example, you might be attracted to the idea that following one's interests will eventually connect what one can work on professionally. You are attracted to this idea because it justifies your belief that one can follow one's interests even if other people find it trivial in the present.
Go back to the salient points that you came up in step 1 to 4 and try to connect them to other events. You can also comment on why that point is salient to you.

Chapter 2: Drawing Out Objectives
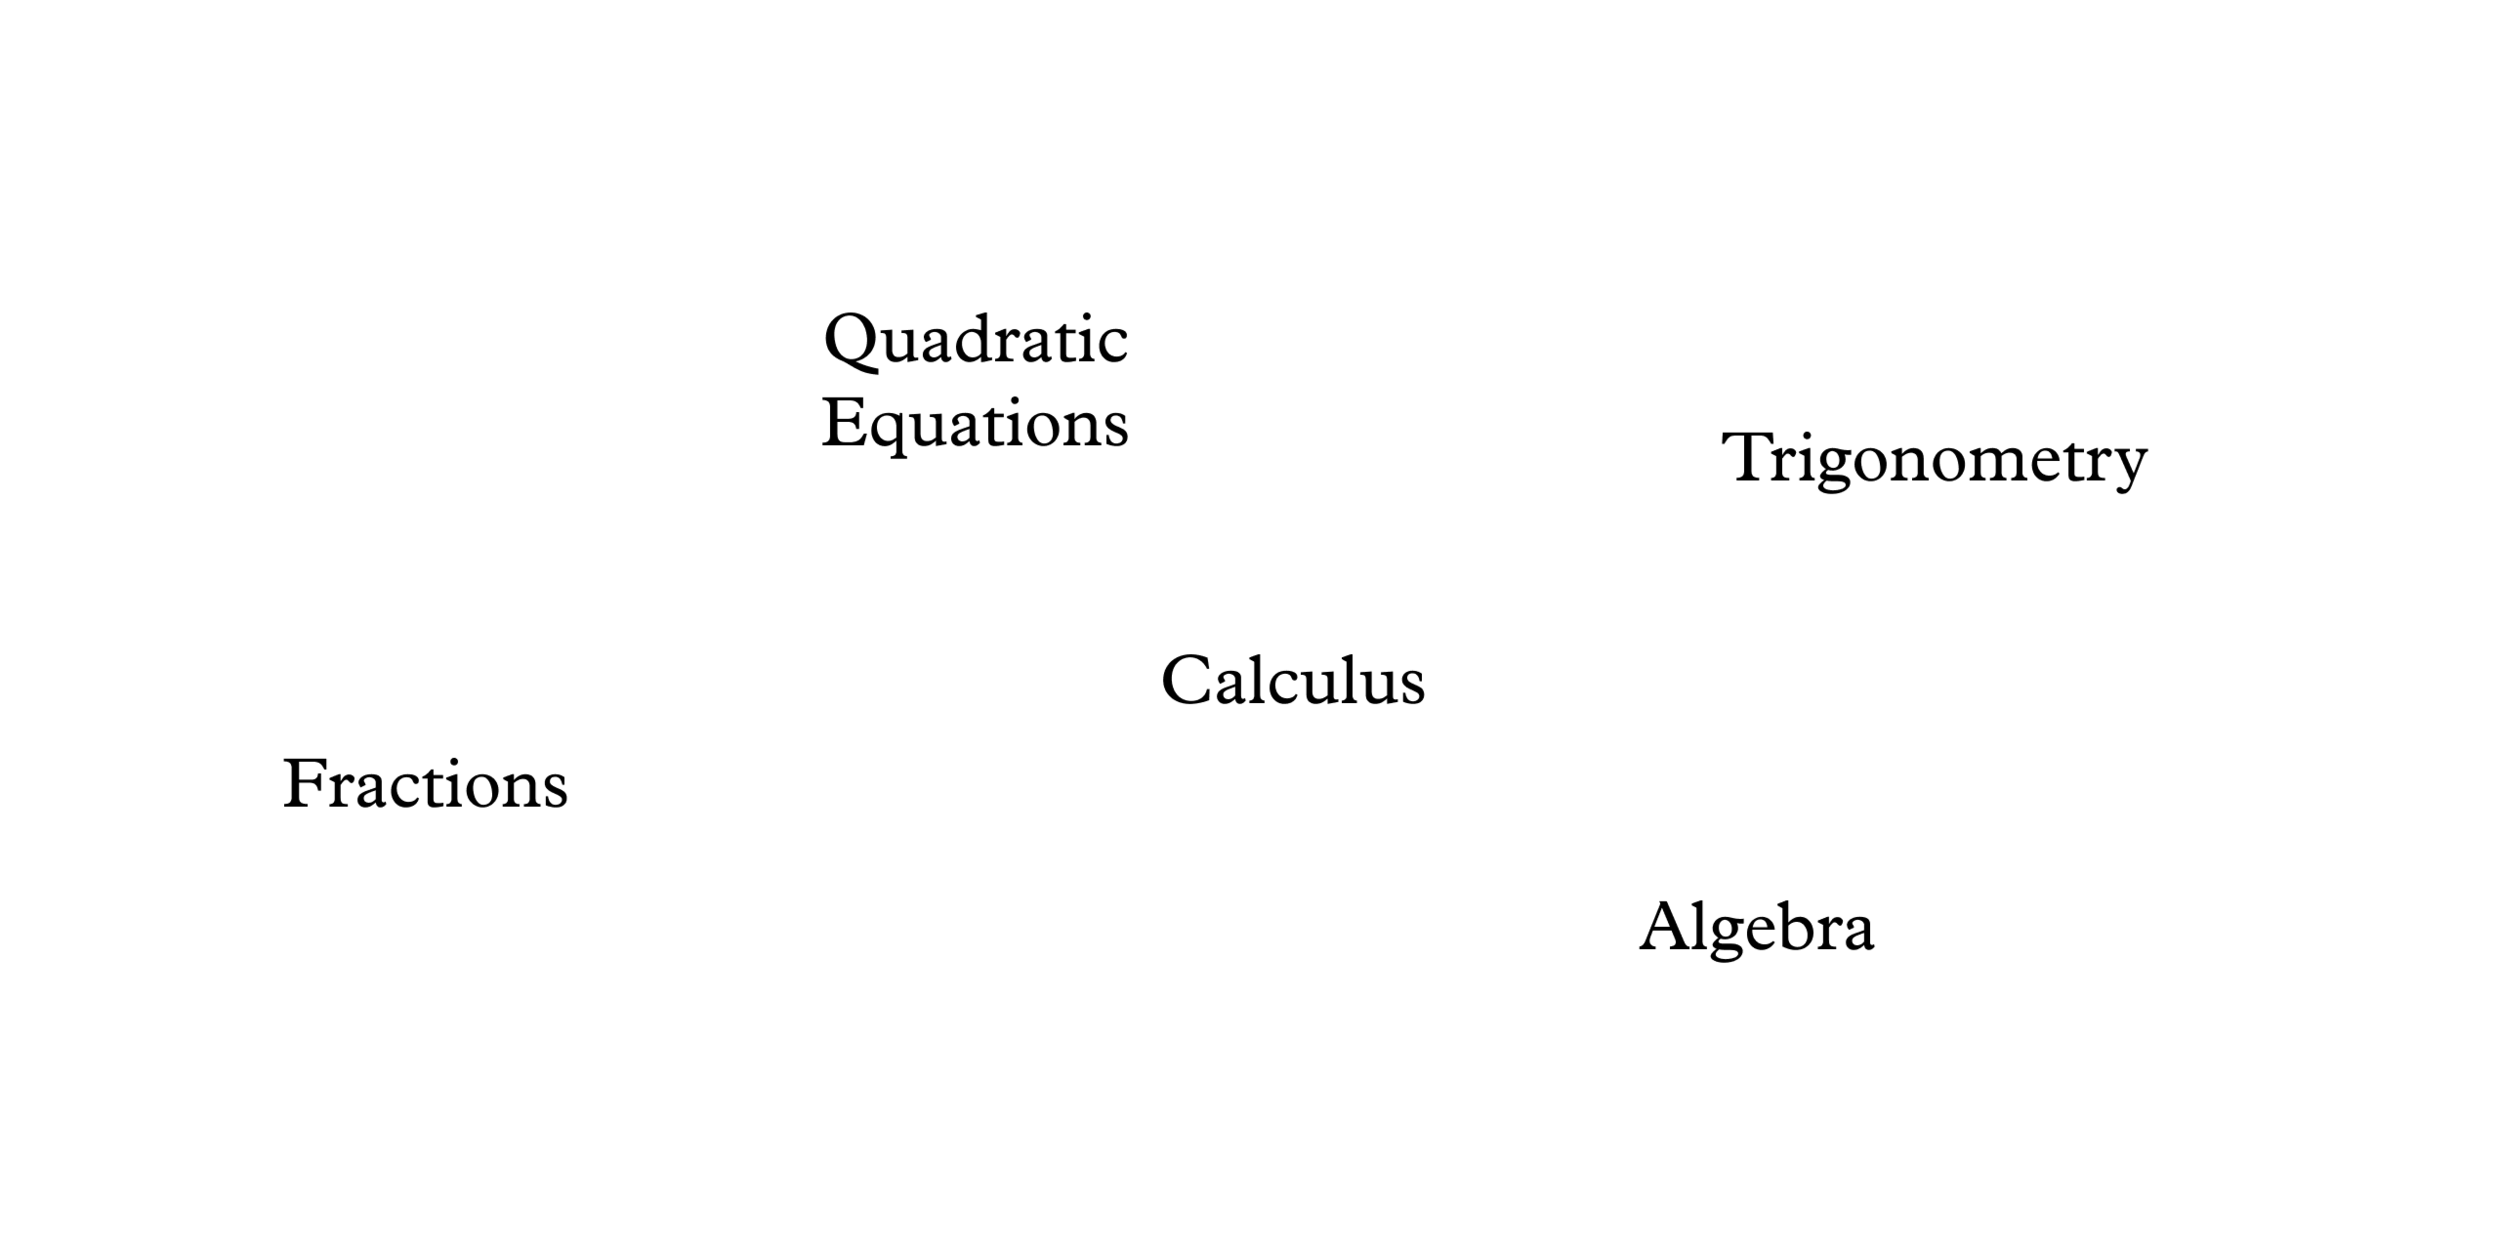
Technique 2: Staircase Method
List out everything you can do or know about in the present. Example: you are trying to learn mathematics
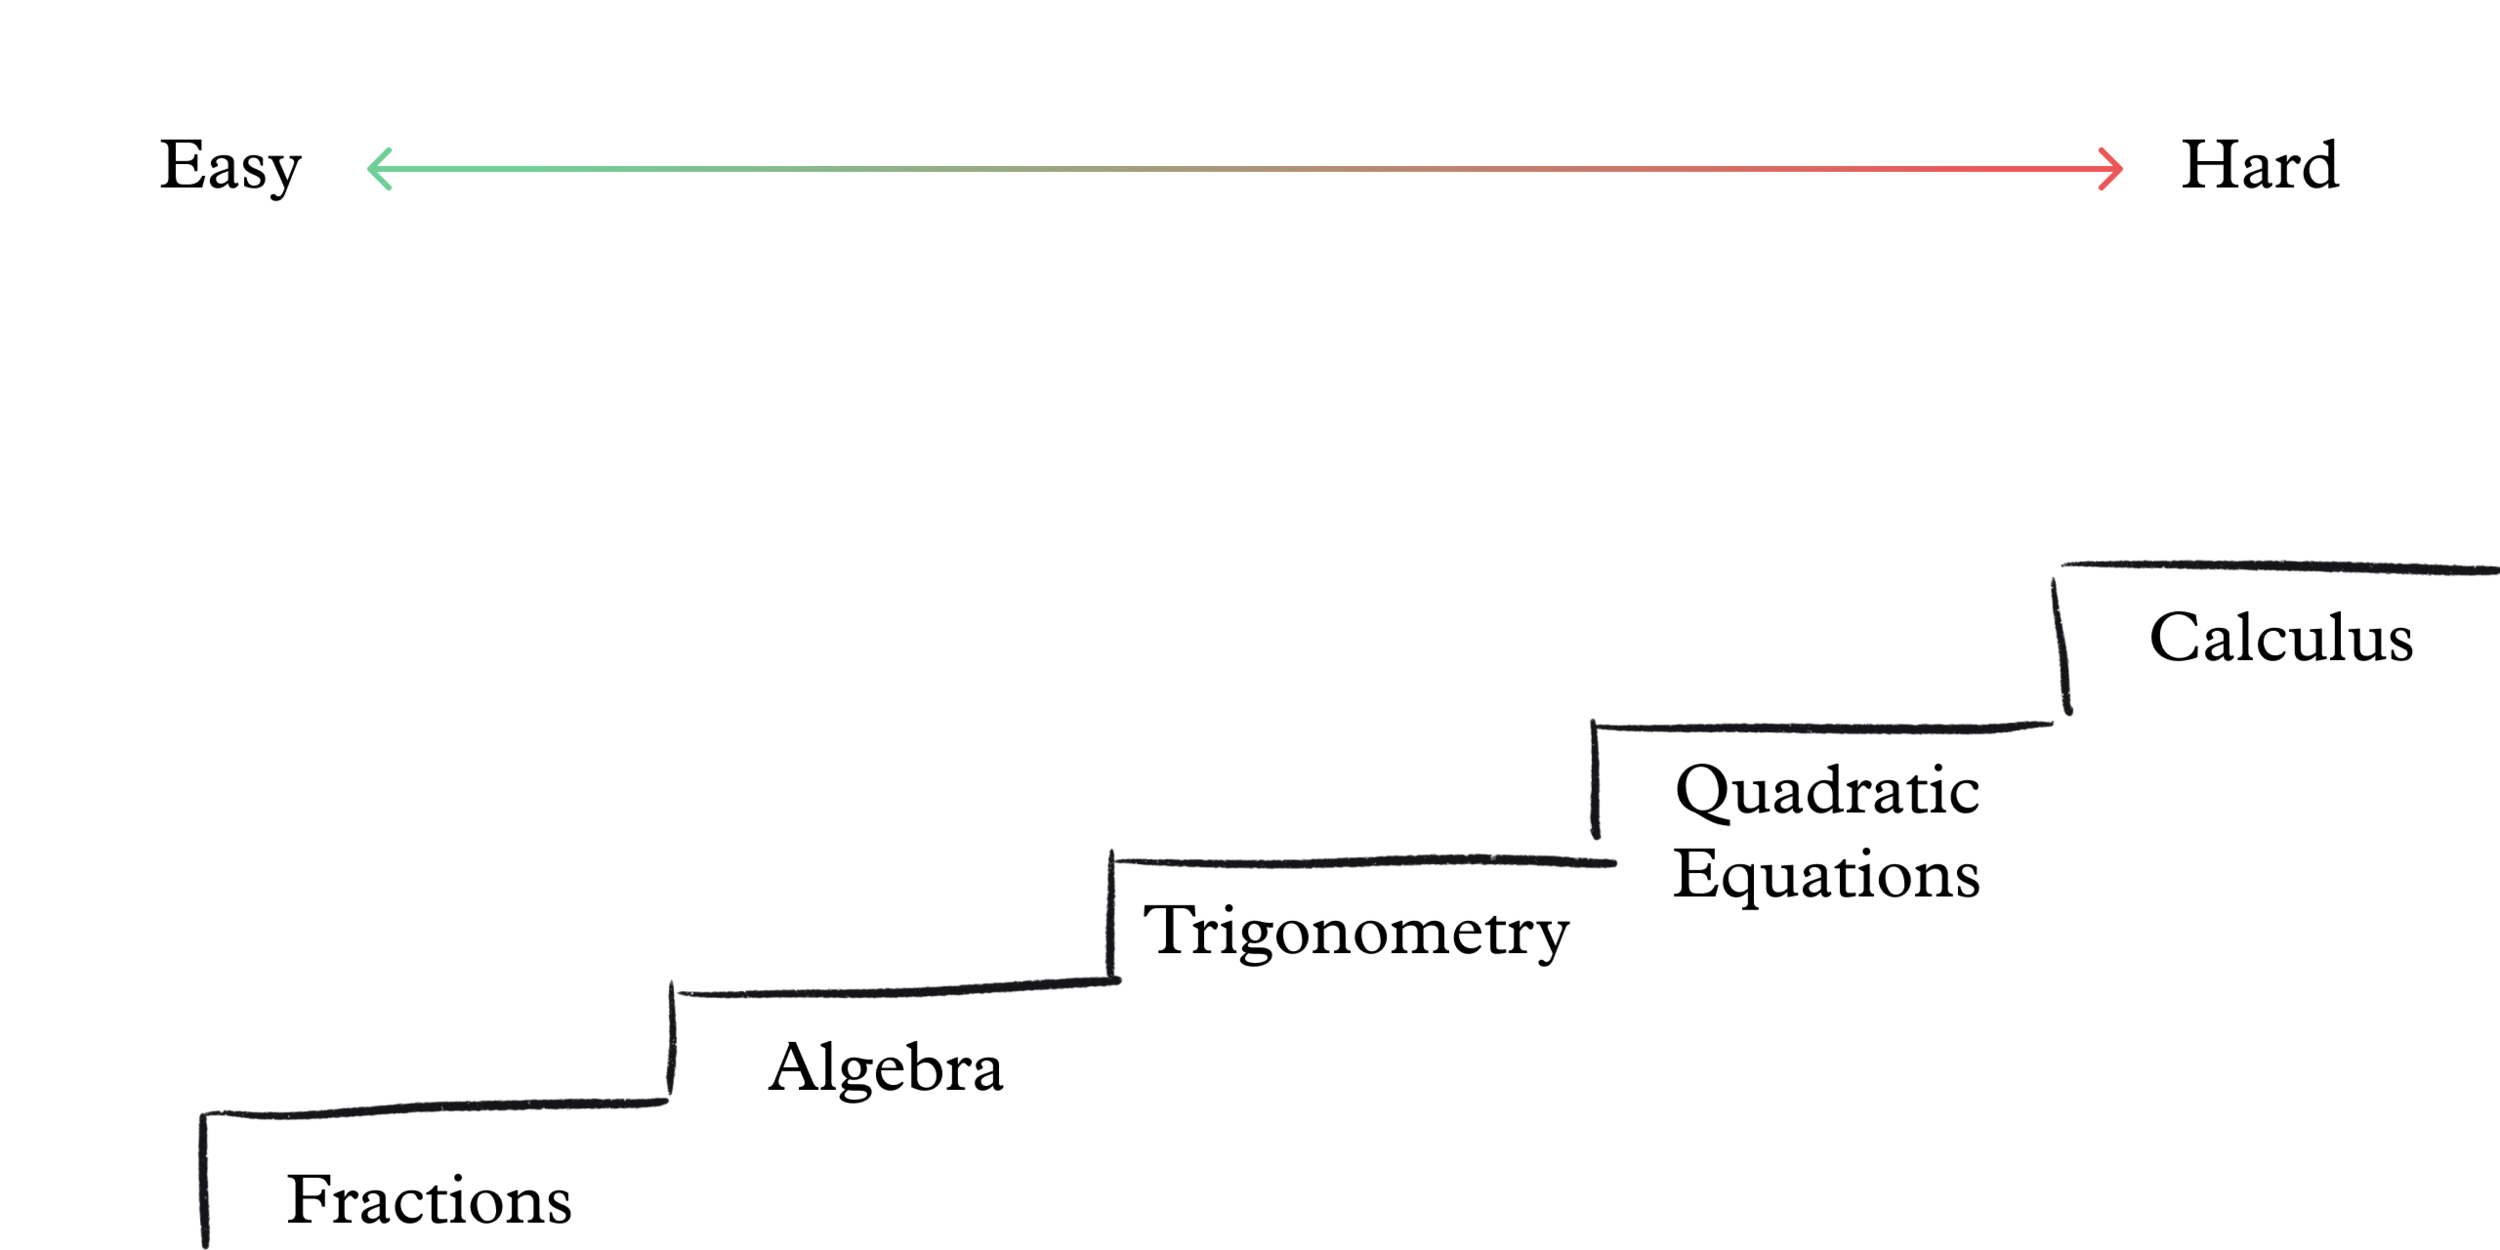
Lay it out like a staircase from the easiest to hardest
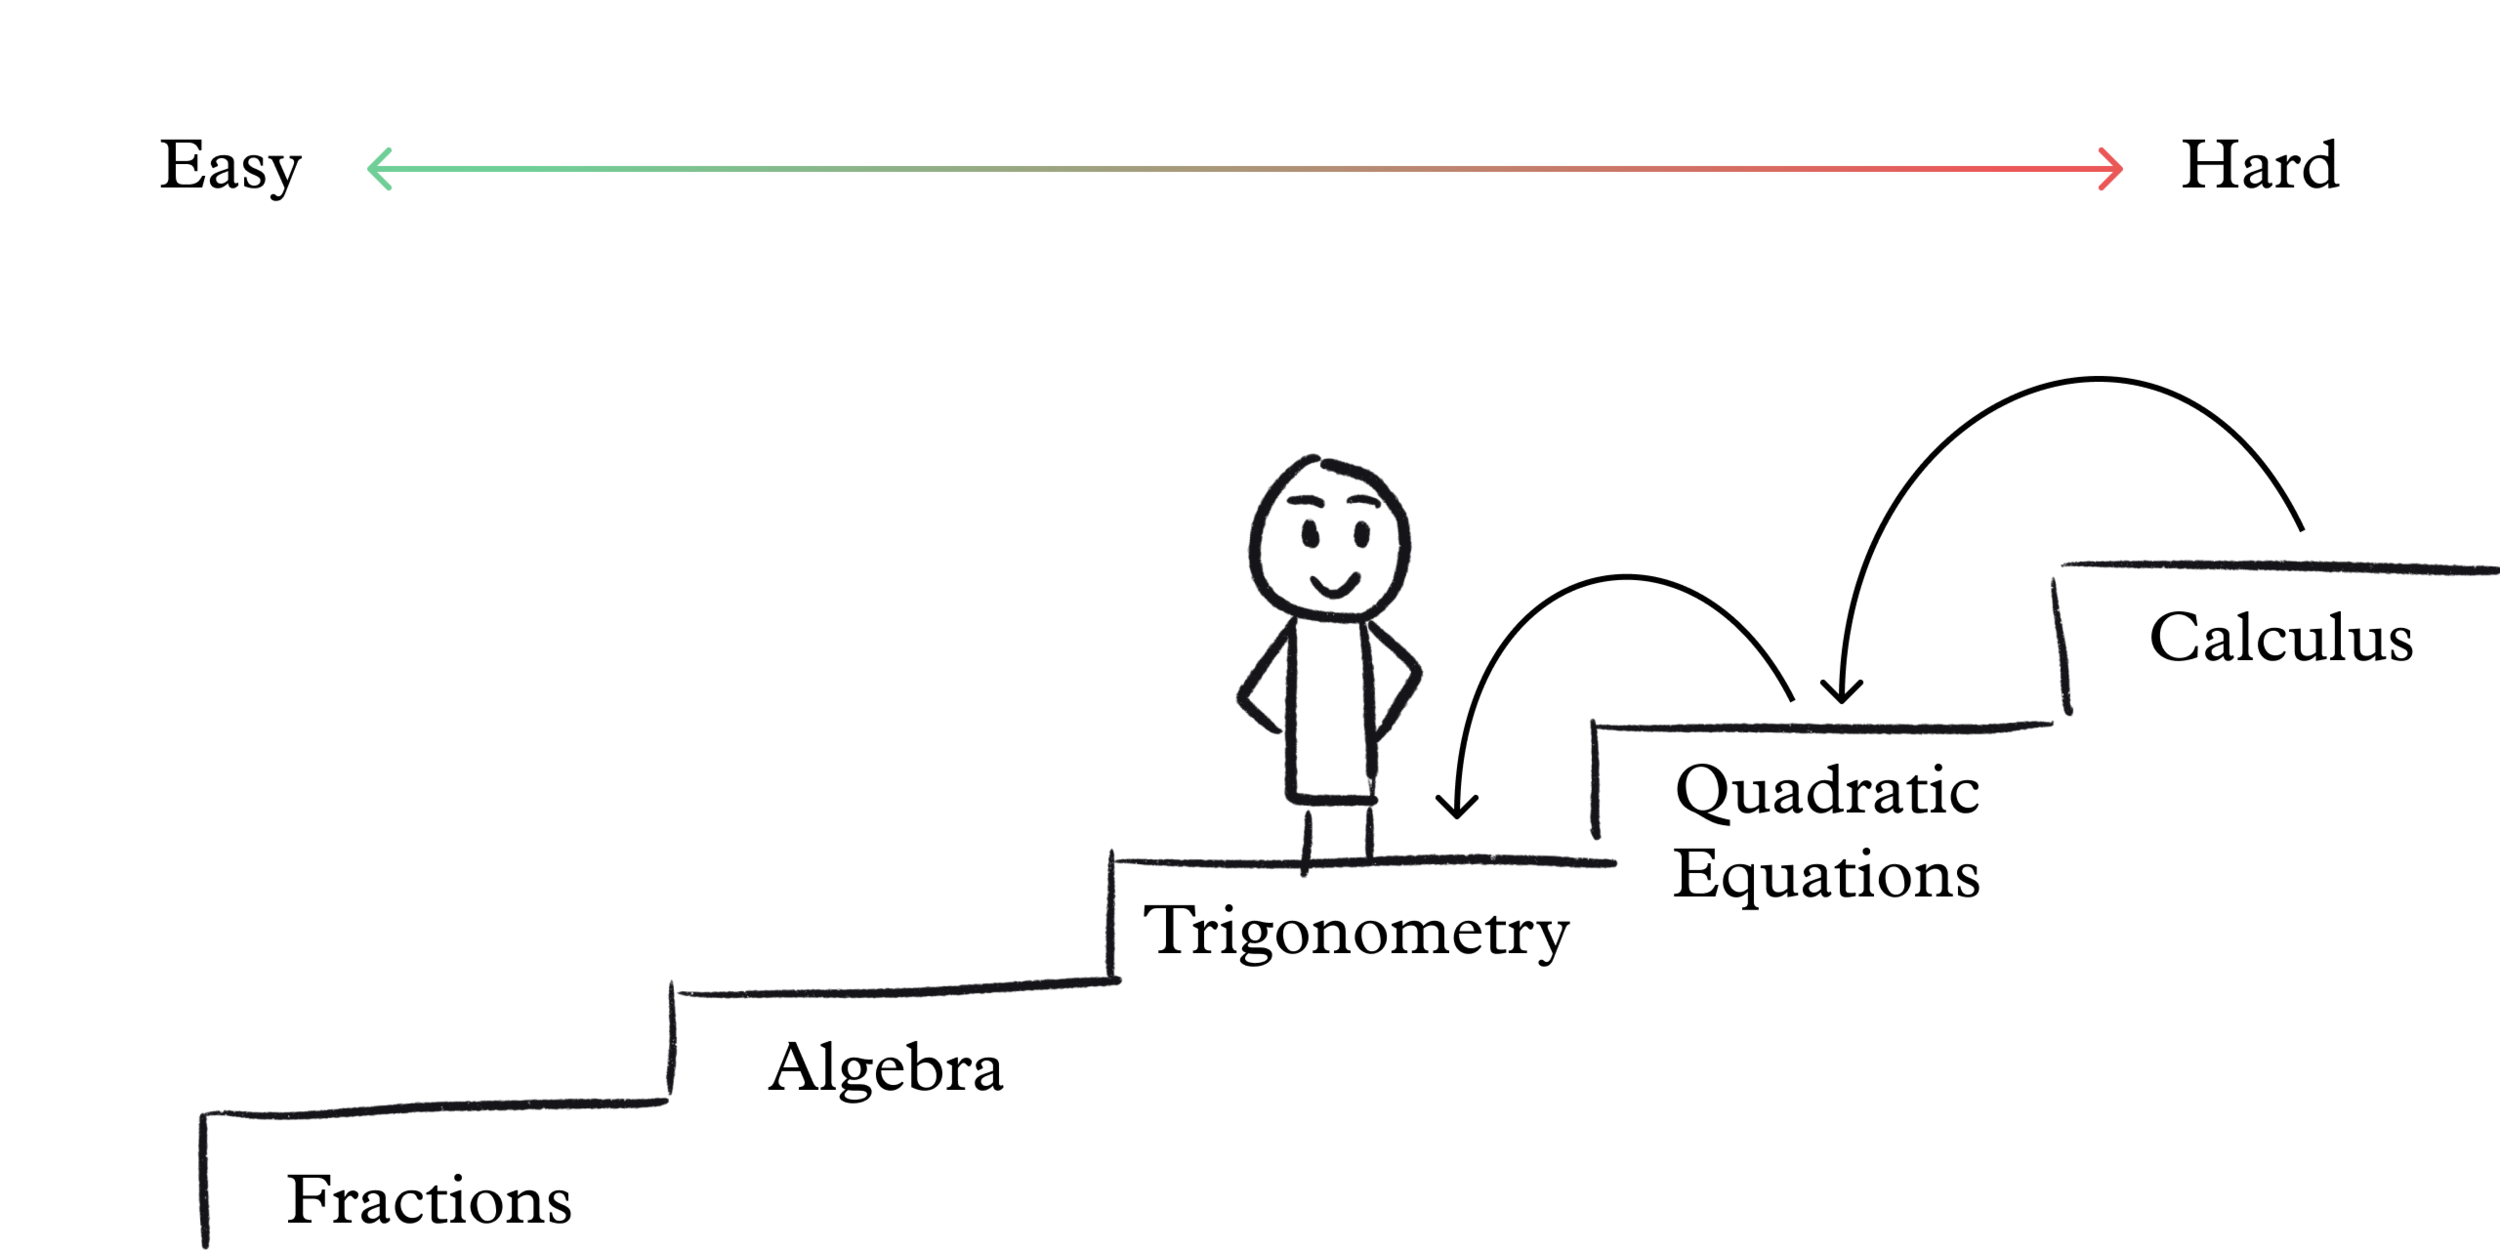
Identify the starting point. That is the place where you feel like you can do it, but have forgotten a little bit of it. It can be something you kind of learned but then are still uncomfortable about the material
Drop yourself two steps from where you identify your starting point. This way, you have to make sure that you are comfortable with the prerequisites first.
Constraints:
You might lose motivation quickly when you have to learn something far away from your ultimate goal.
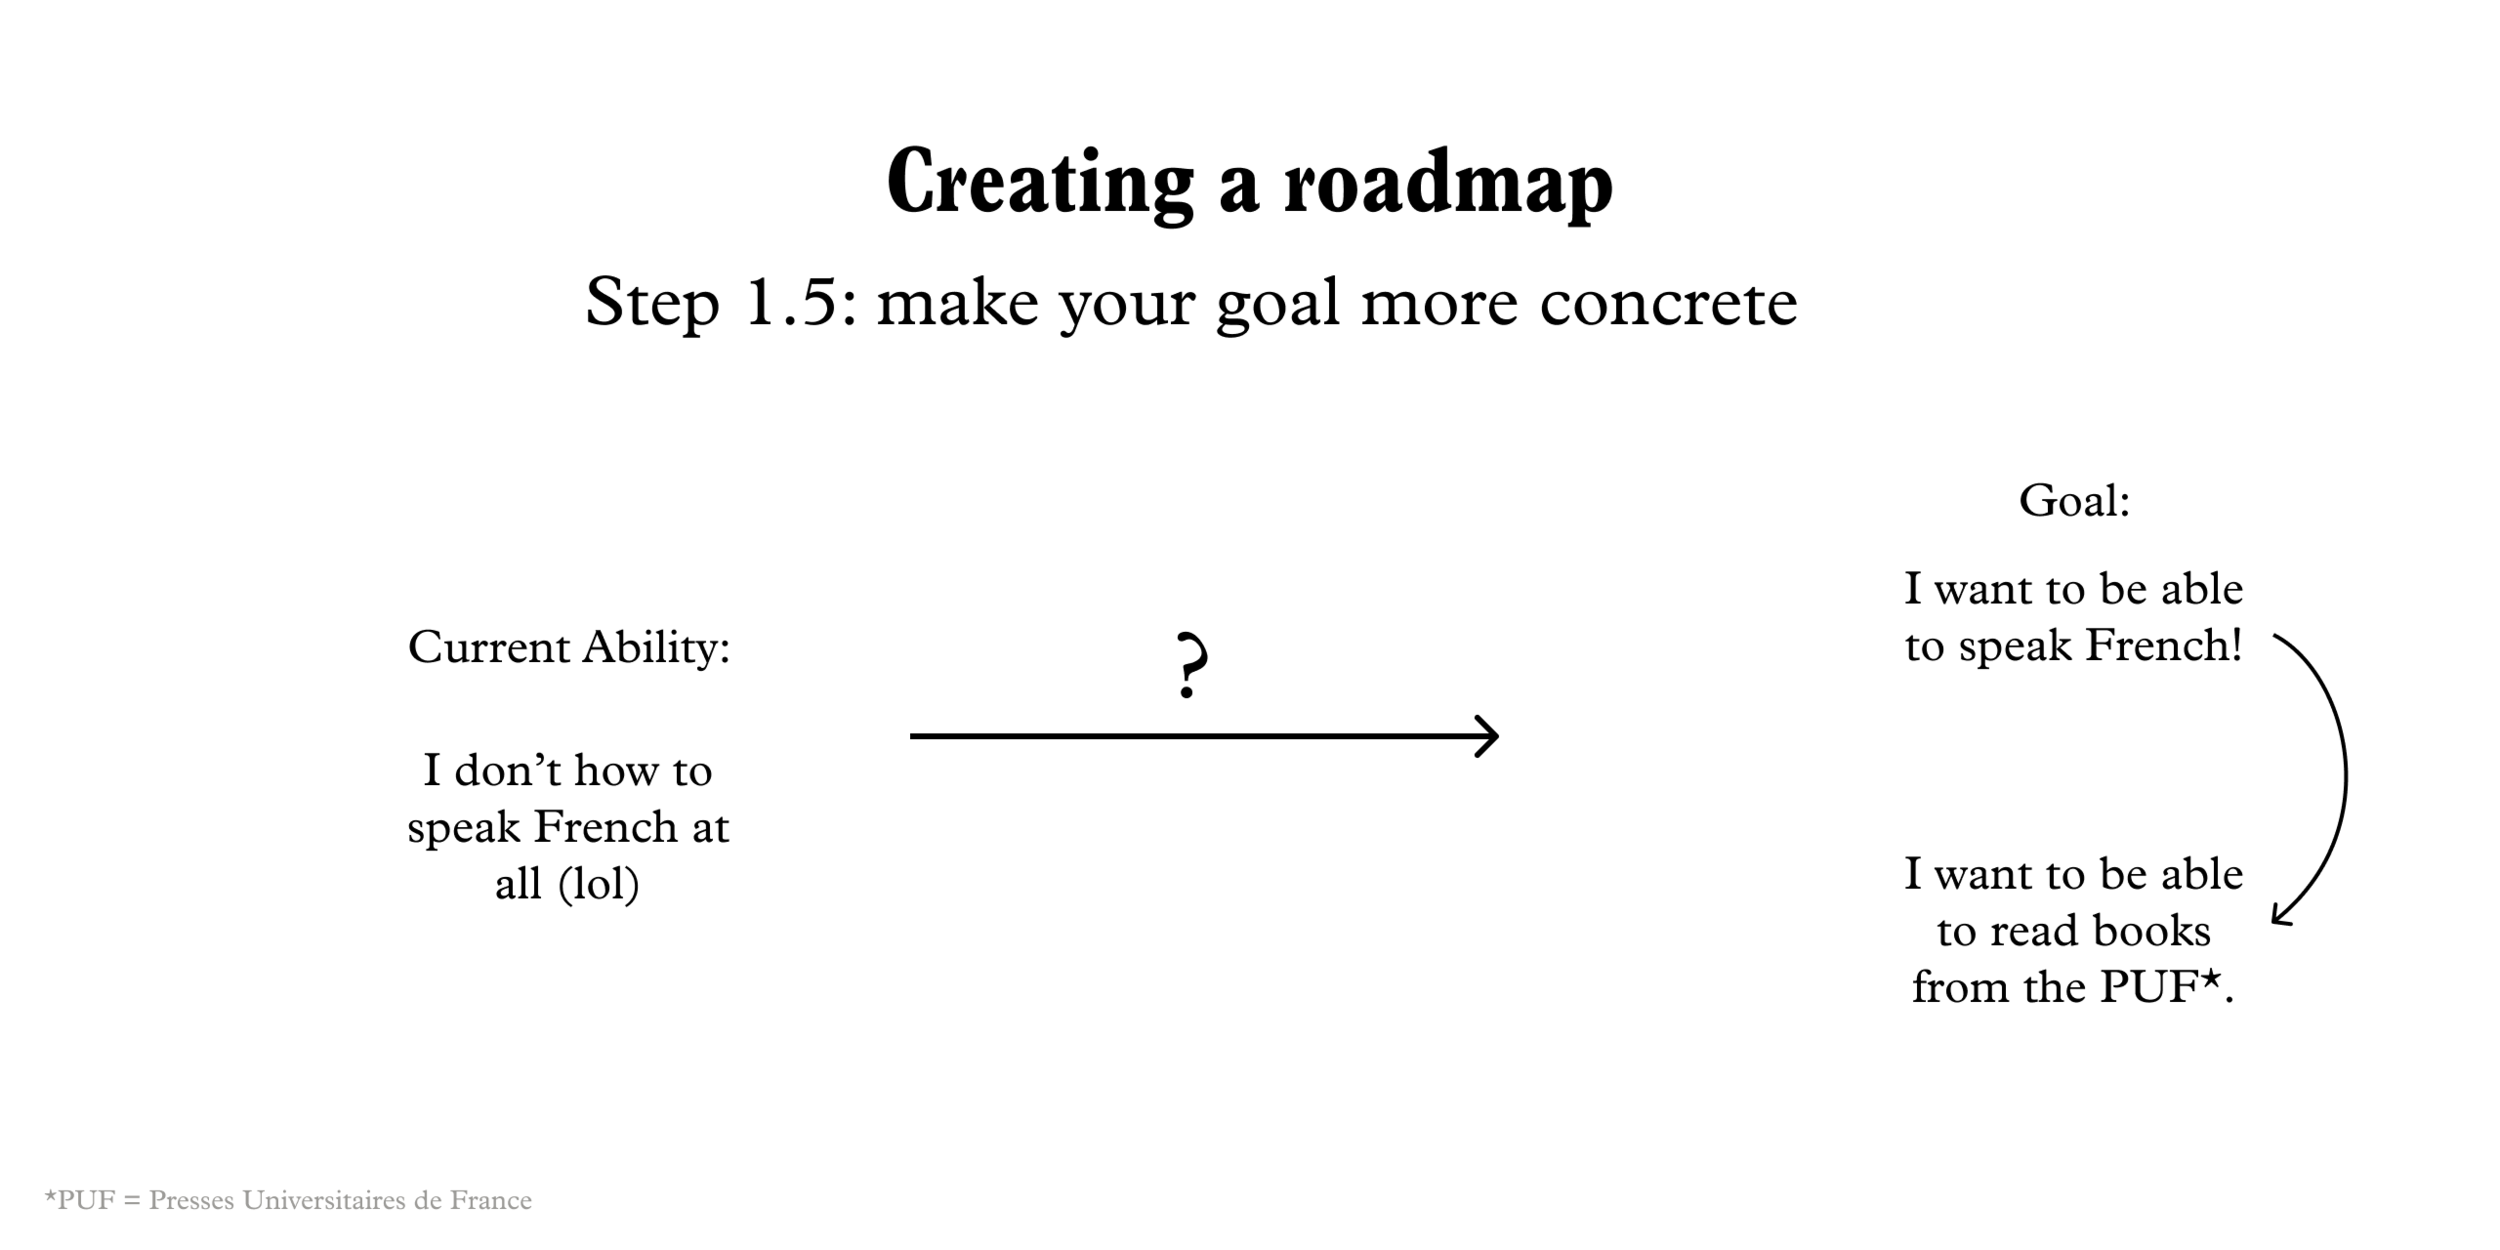
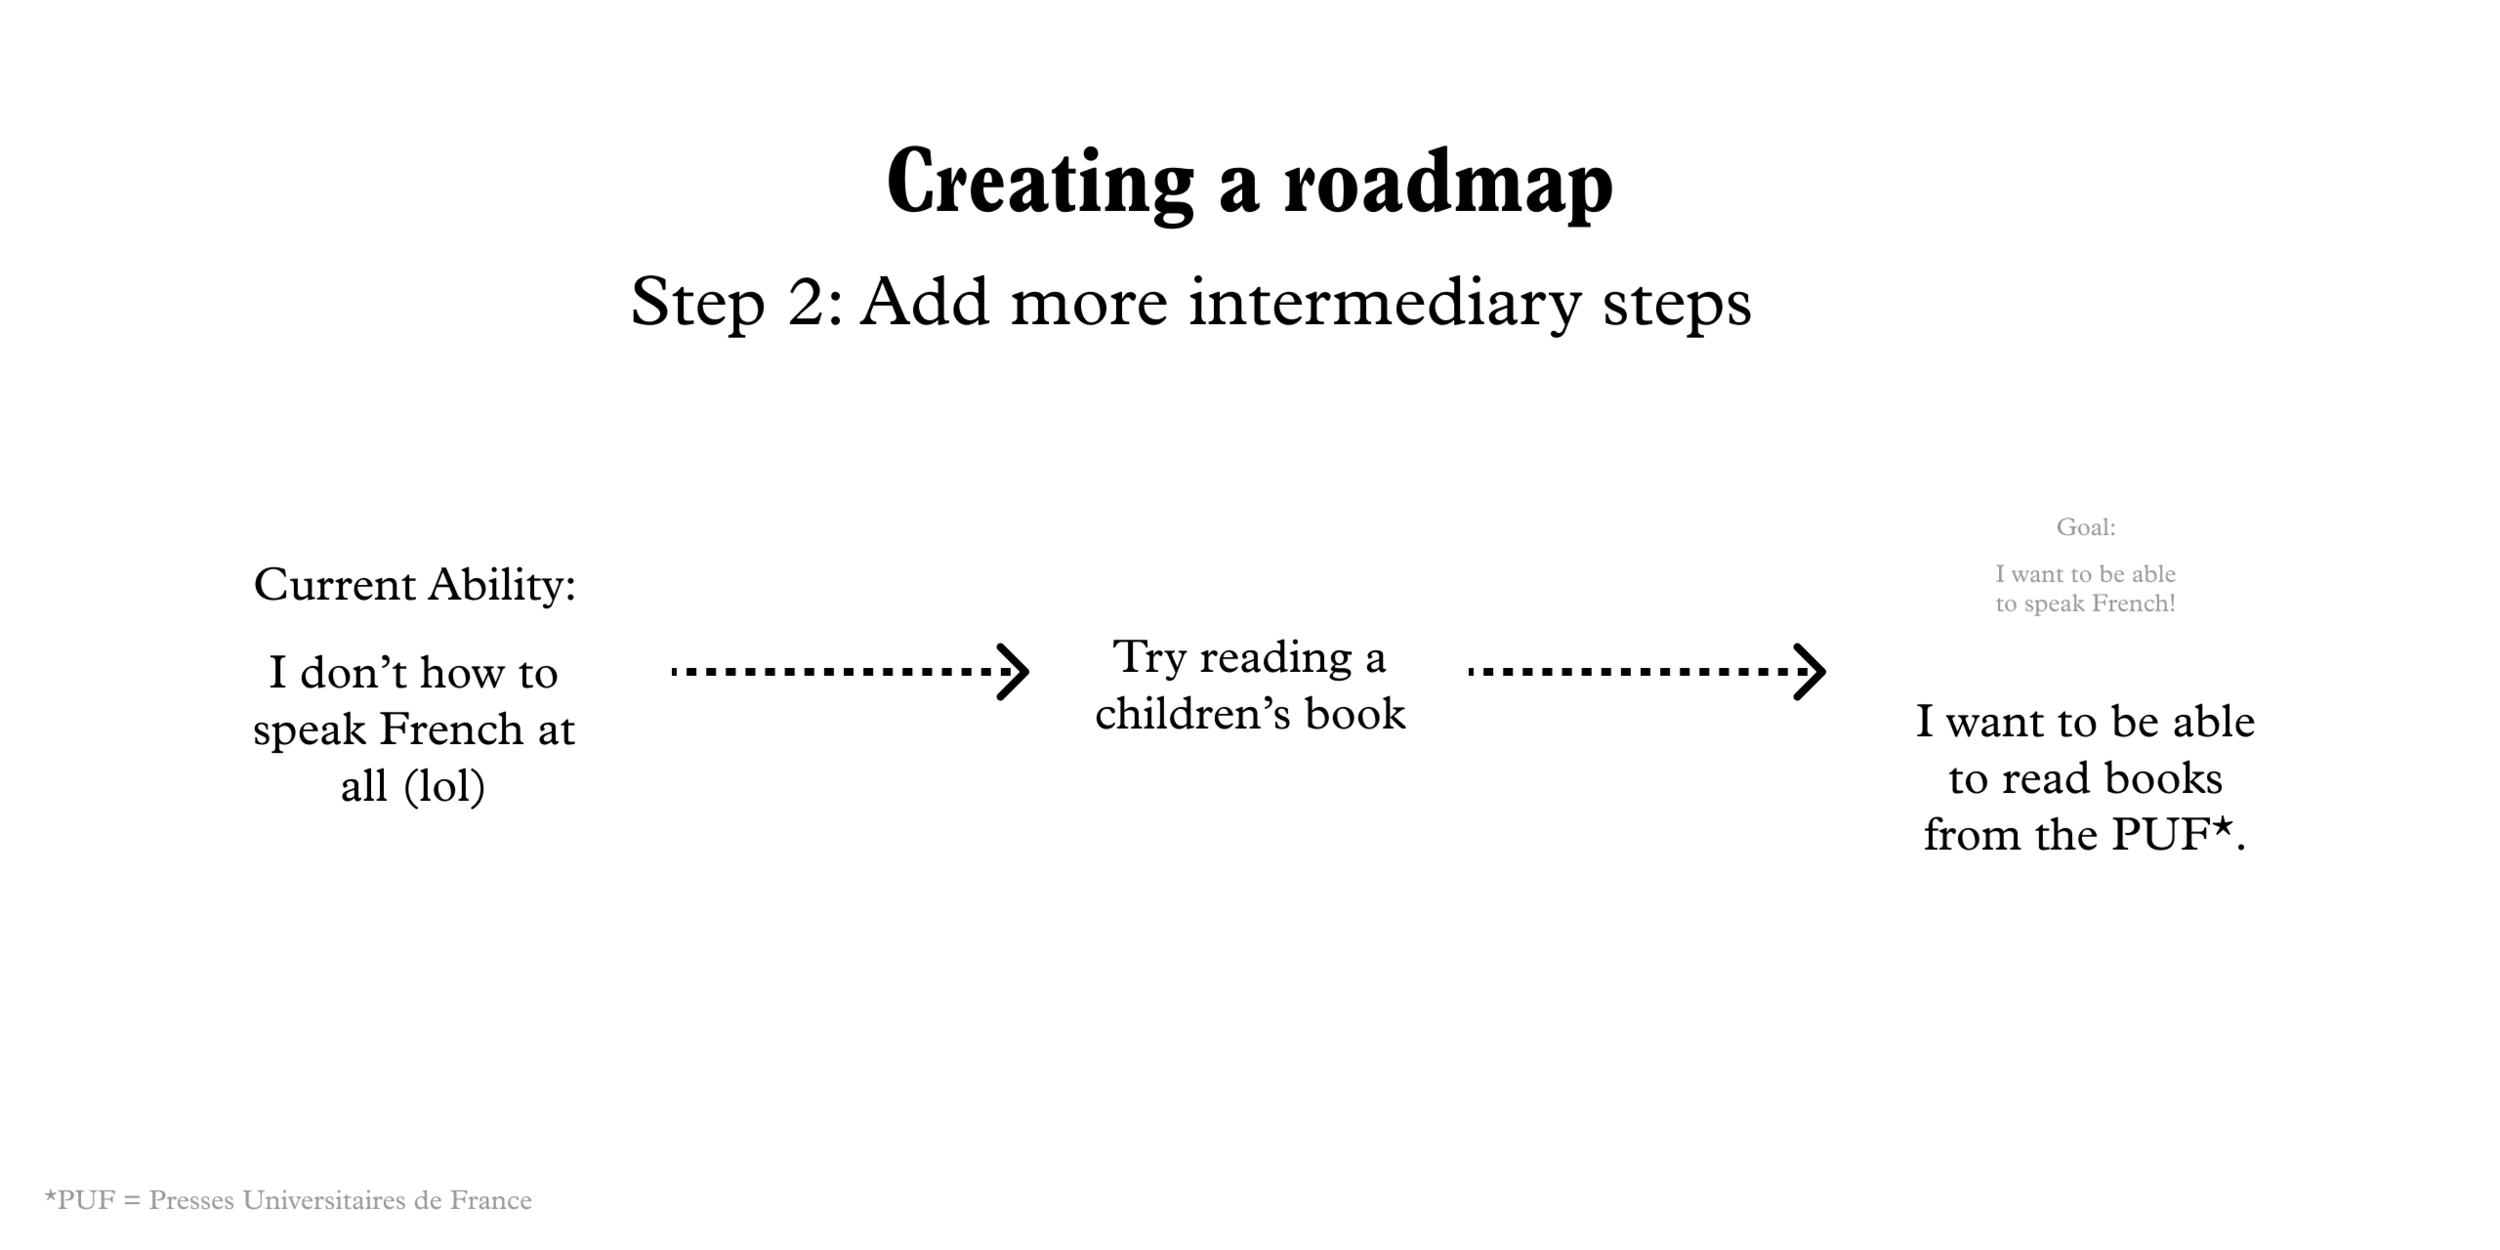
Technique 3: Route Creation Method
Write goals that you want to achieve on a piece of paper
Write what you already know
Write what you cannot do
Write out vaguely what you want
Rework the vague goal you had in Step 1
Add more intermediary step
Make sure the steps are executable
Generally you want to lay out the big steps first before adding in the smaller steps
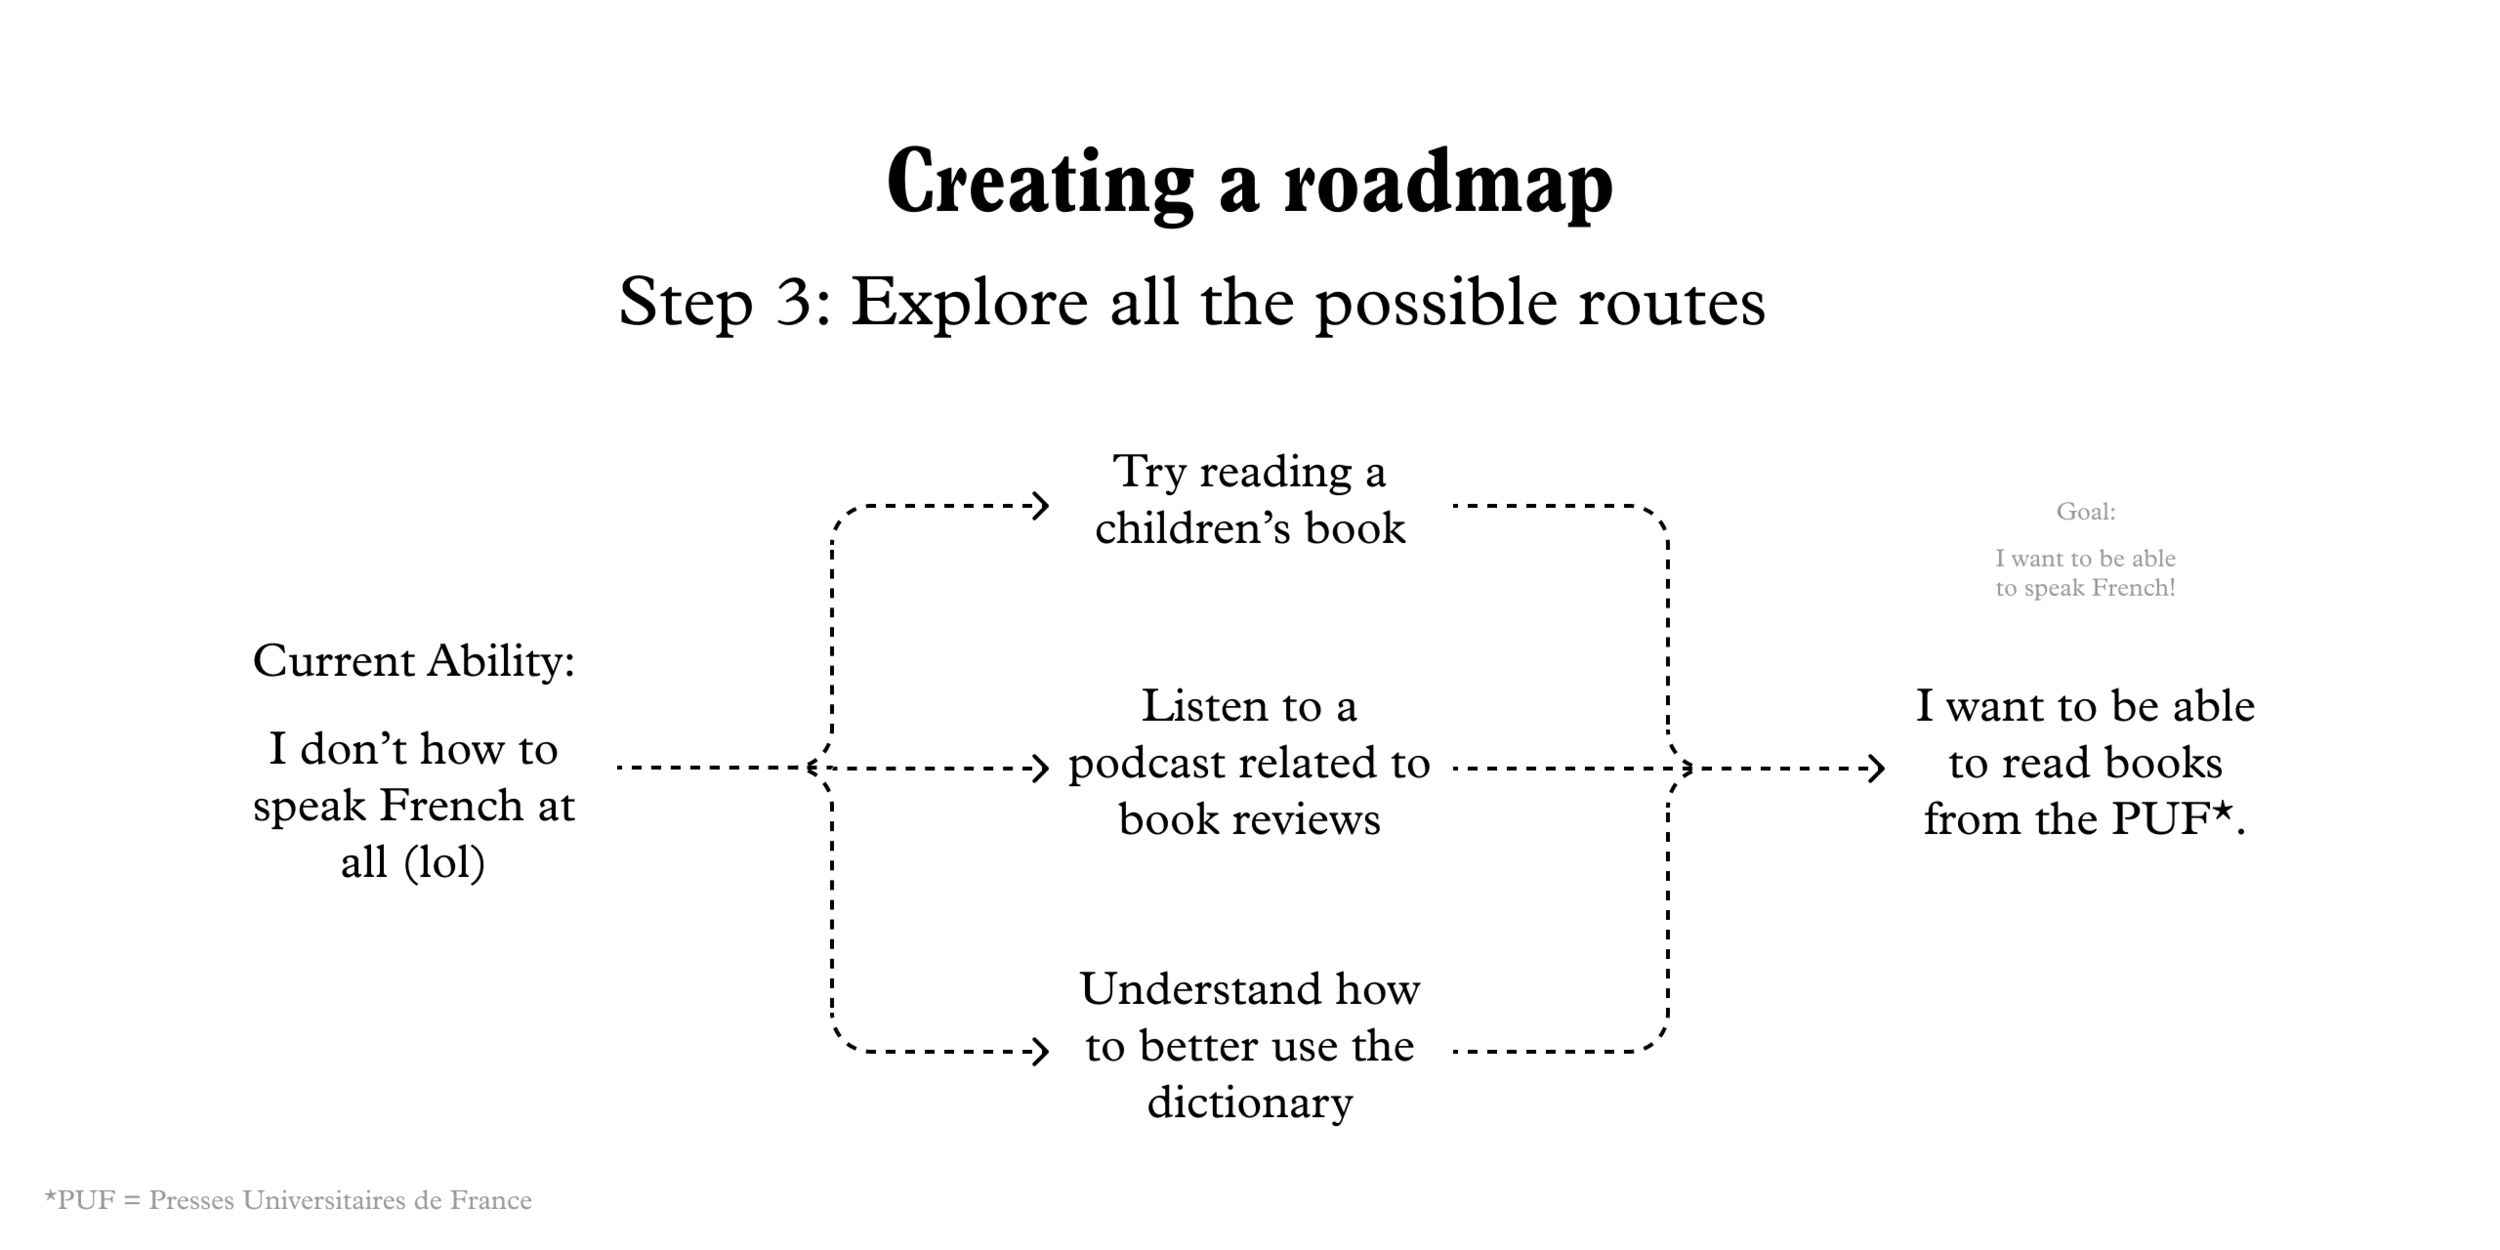
Explore all the possible routes. Create alternatives and think about their pros and cons.
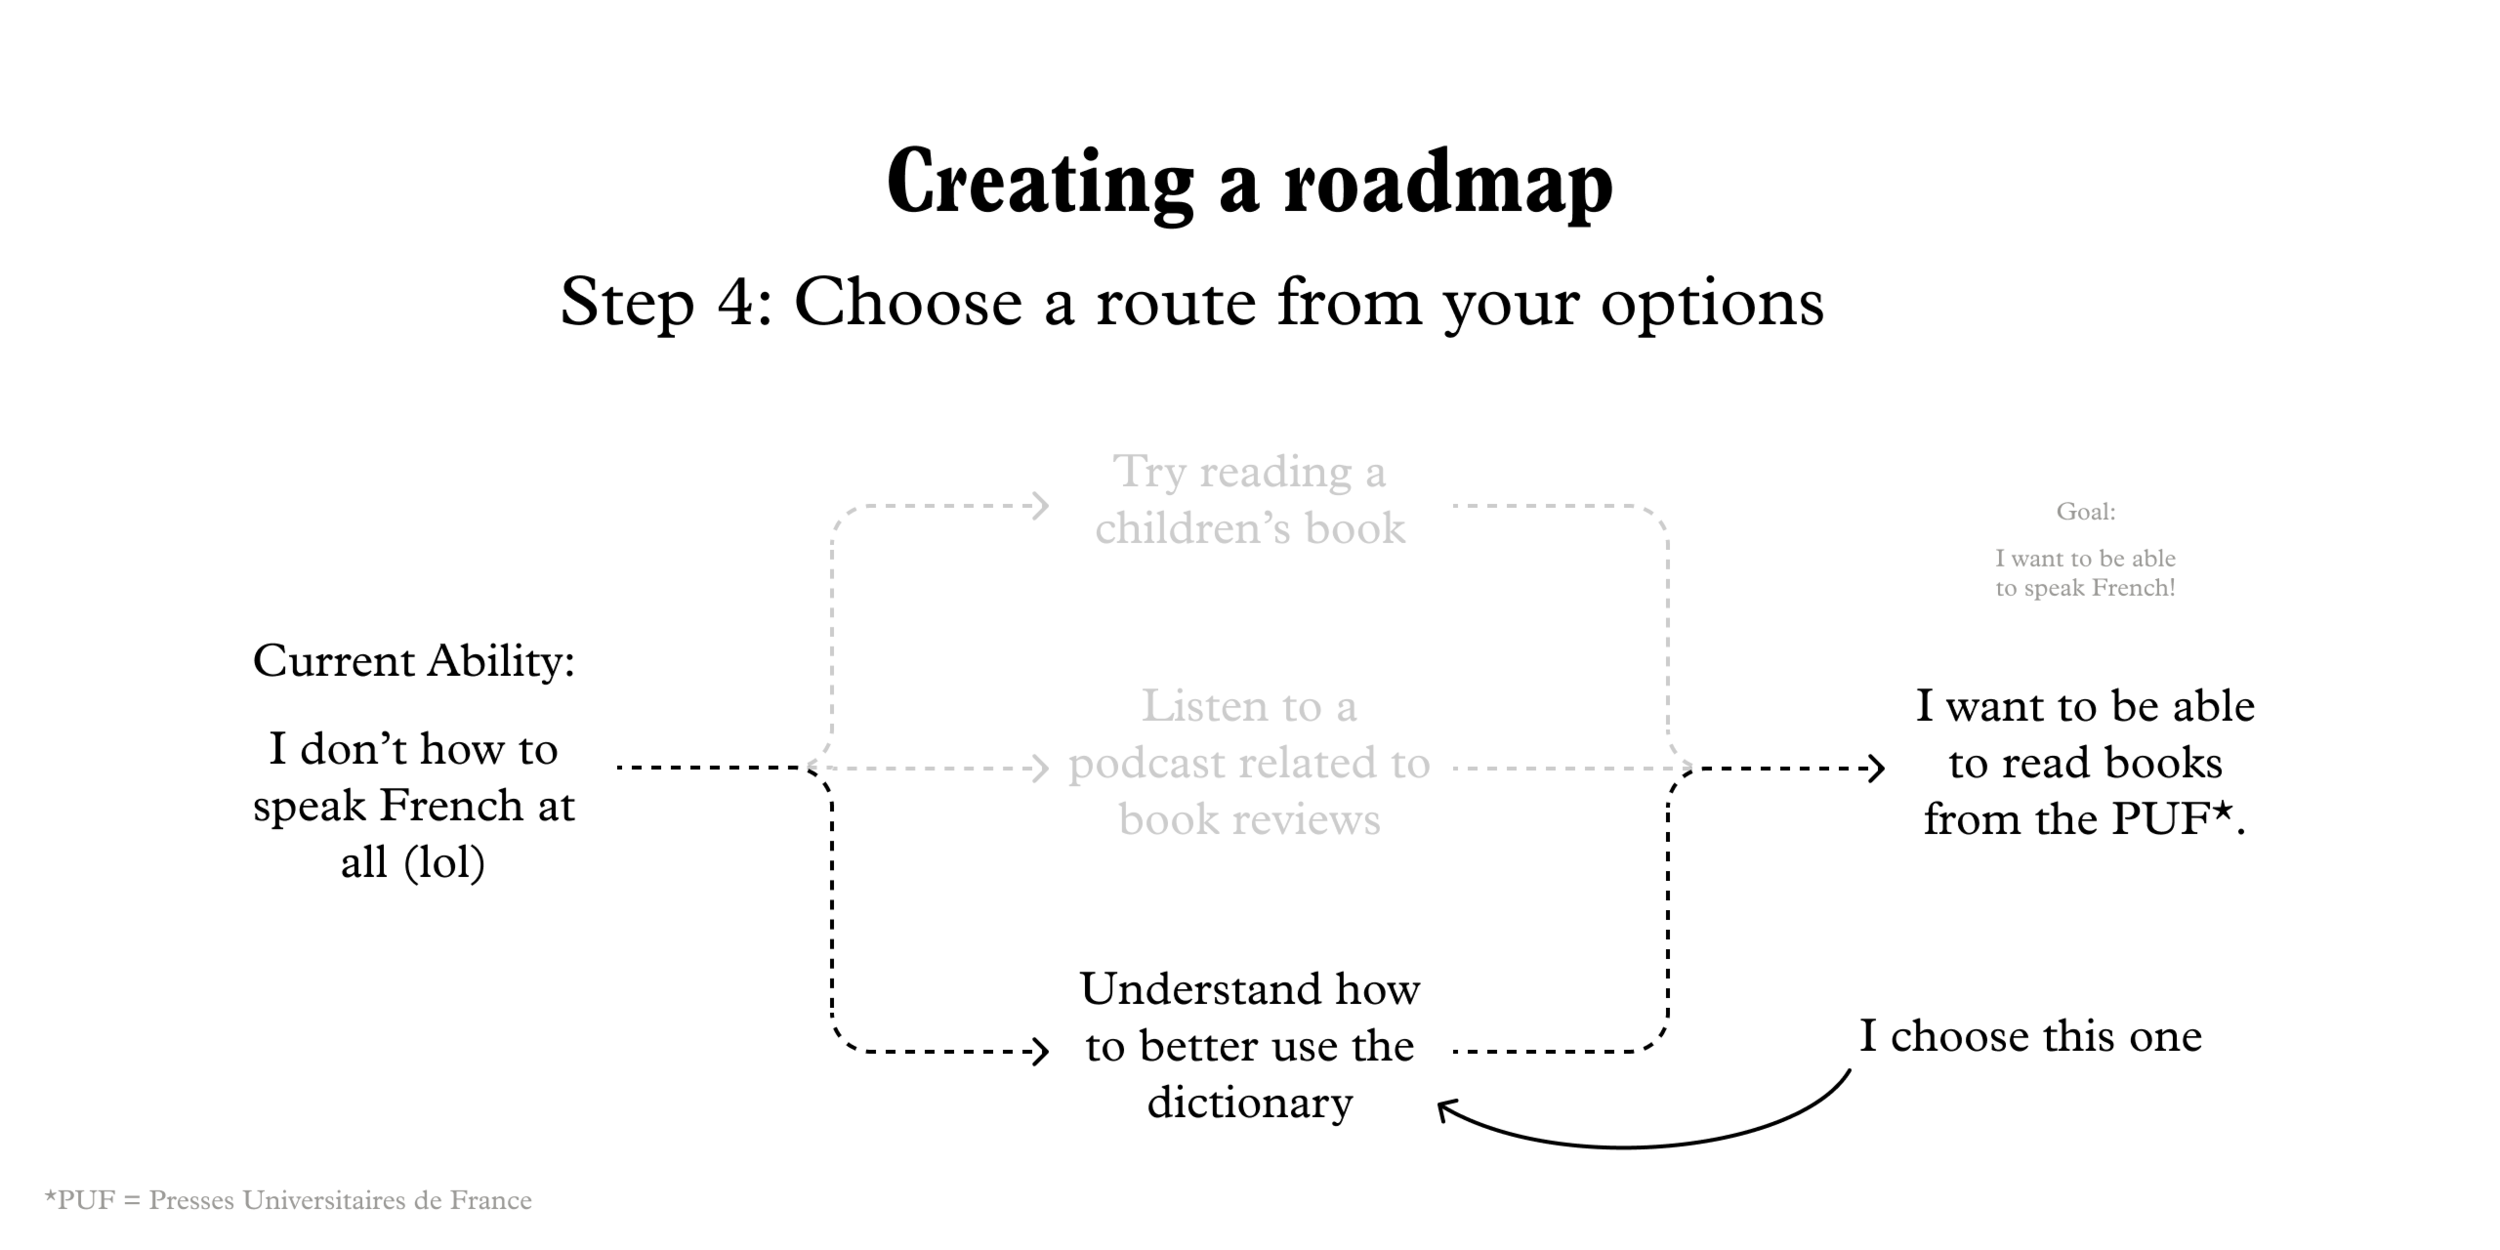
Choose a route from the options that you create for yourself.
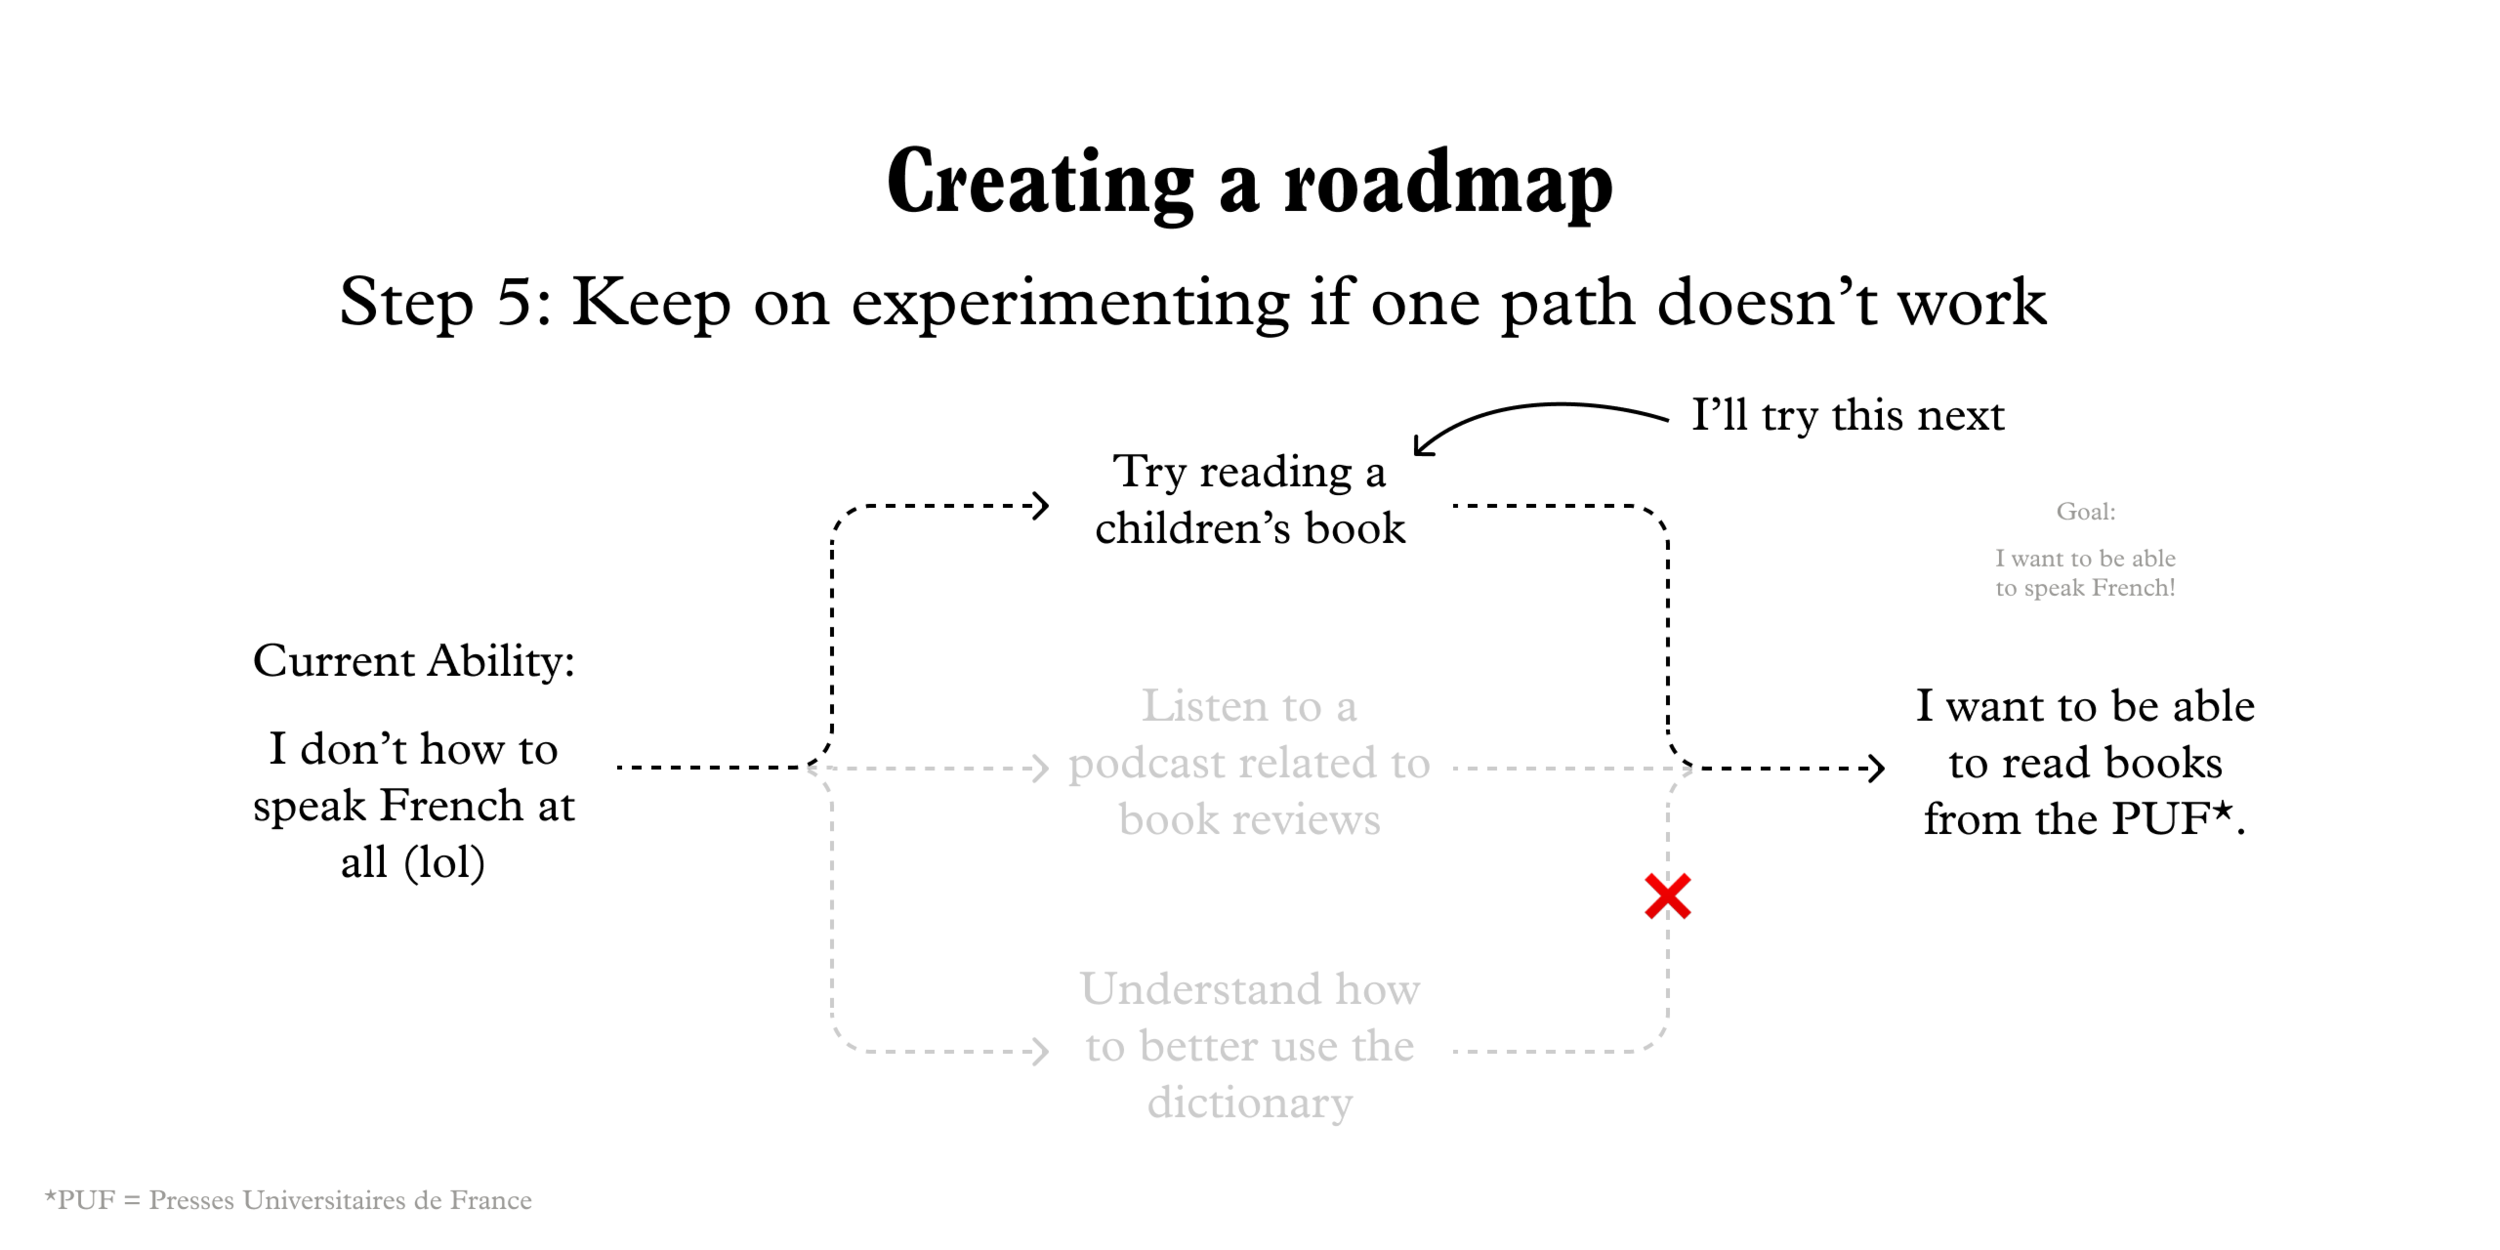
Continually adjust

Extra: Parachuting Method

Determine your ultimate goal out of learning something
Jump into nearby areas/problems of that ultimate goal.
See what you can do and slowly back up when you cannot do it. Eventually, you will end up at a place where you feel comfortable to work your way up to your ultimate goal.
Advantages of the parachute method
It's easy to maintain motivation when it's close to your ultimate goal
Can easily detect what you know and what you don't
Since you only focus on what you need to tackle for the ultimate goal, you minimize wasted time.
Chapter 3: Increasing Motivation
Technique 4: 1/100 Division Method
Count the amount of work or problems you need to tackle. This can be the number of problems in a problem set or the number of pages in a book (e.g. 1000 problems or 1000 pages).
Divide this amount by 100. This would leave you with something like 10 problems or pages a day. It will also tell you the amount of time it will take you to finish it: 5 months.
If it's still a big problem and you find yourself lacking the motivation to do it, then try dividing it into smaller pieces. Divide it by 10 again (so this is 1/1000 of the whole). In the example above, you will now be tackling one page a day.

The reason we fail at this 1/100 planning is because we think that it will take forever. Doing nothing is worse than doing the minimal amount of work. It's better to think "anyways, let's start doing something today."

Technique 5: Two-Minute Time Cap
When the task seems heavy or that you have low motivation to do it:
Set the timer for two minutes
Start the timer and start working
Stop working once the timer is finished. Here you have three options:
Continue working? If you do, you will continue without a time limit.
Do different work?
Take a break?

The underlying theory that holds up this method is called the Ovsiankina Effect. This theory argues that people tend to pick up interrupted action again when it has not been completed. In our heads, unfinished work will hang around like a splinter. Soon, it becomes a quasi-need for us to finish it. Not finishing it strains our mental energy. So in a way, you're forcing yourself to do something you had low motivation to do in the first place because now it creates a strain on your mental energy supply.
So all you need to do is to just start. But this is often the most difficult step
Chapter 4: Time Preservation
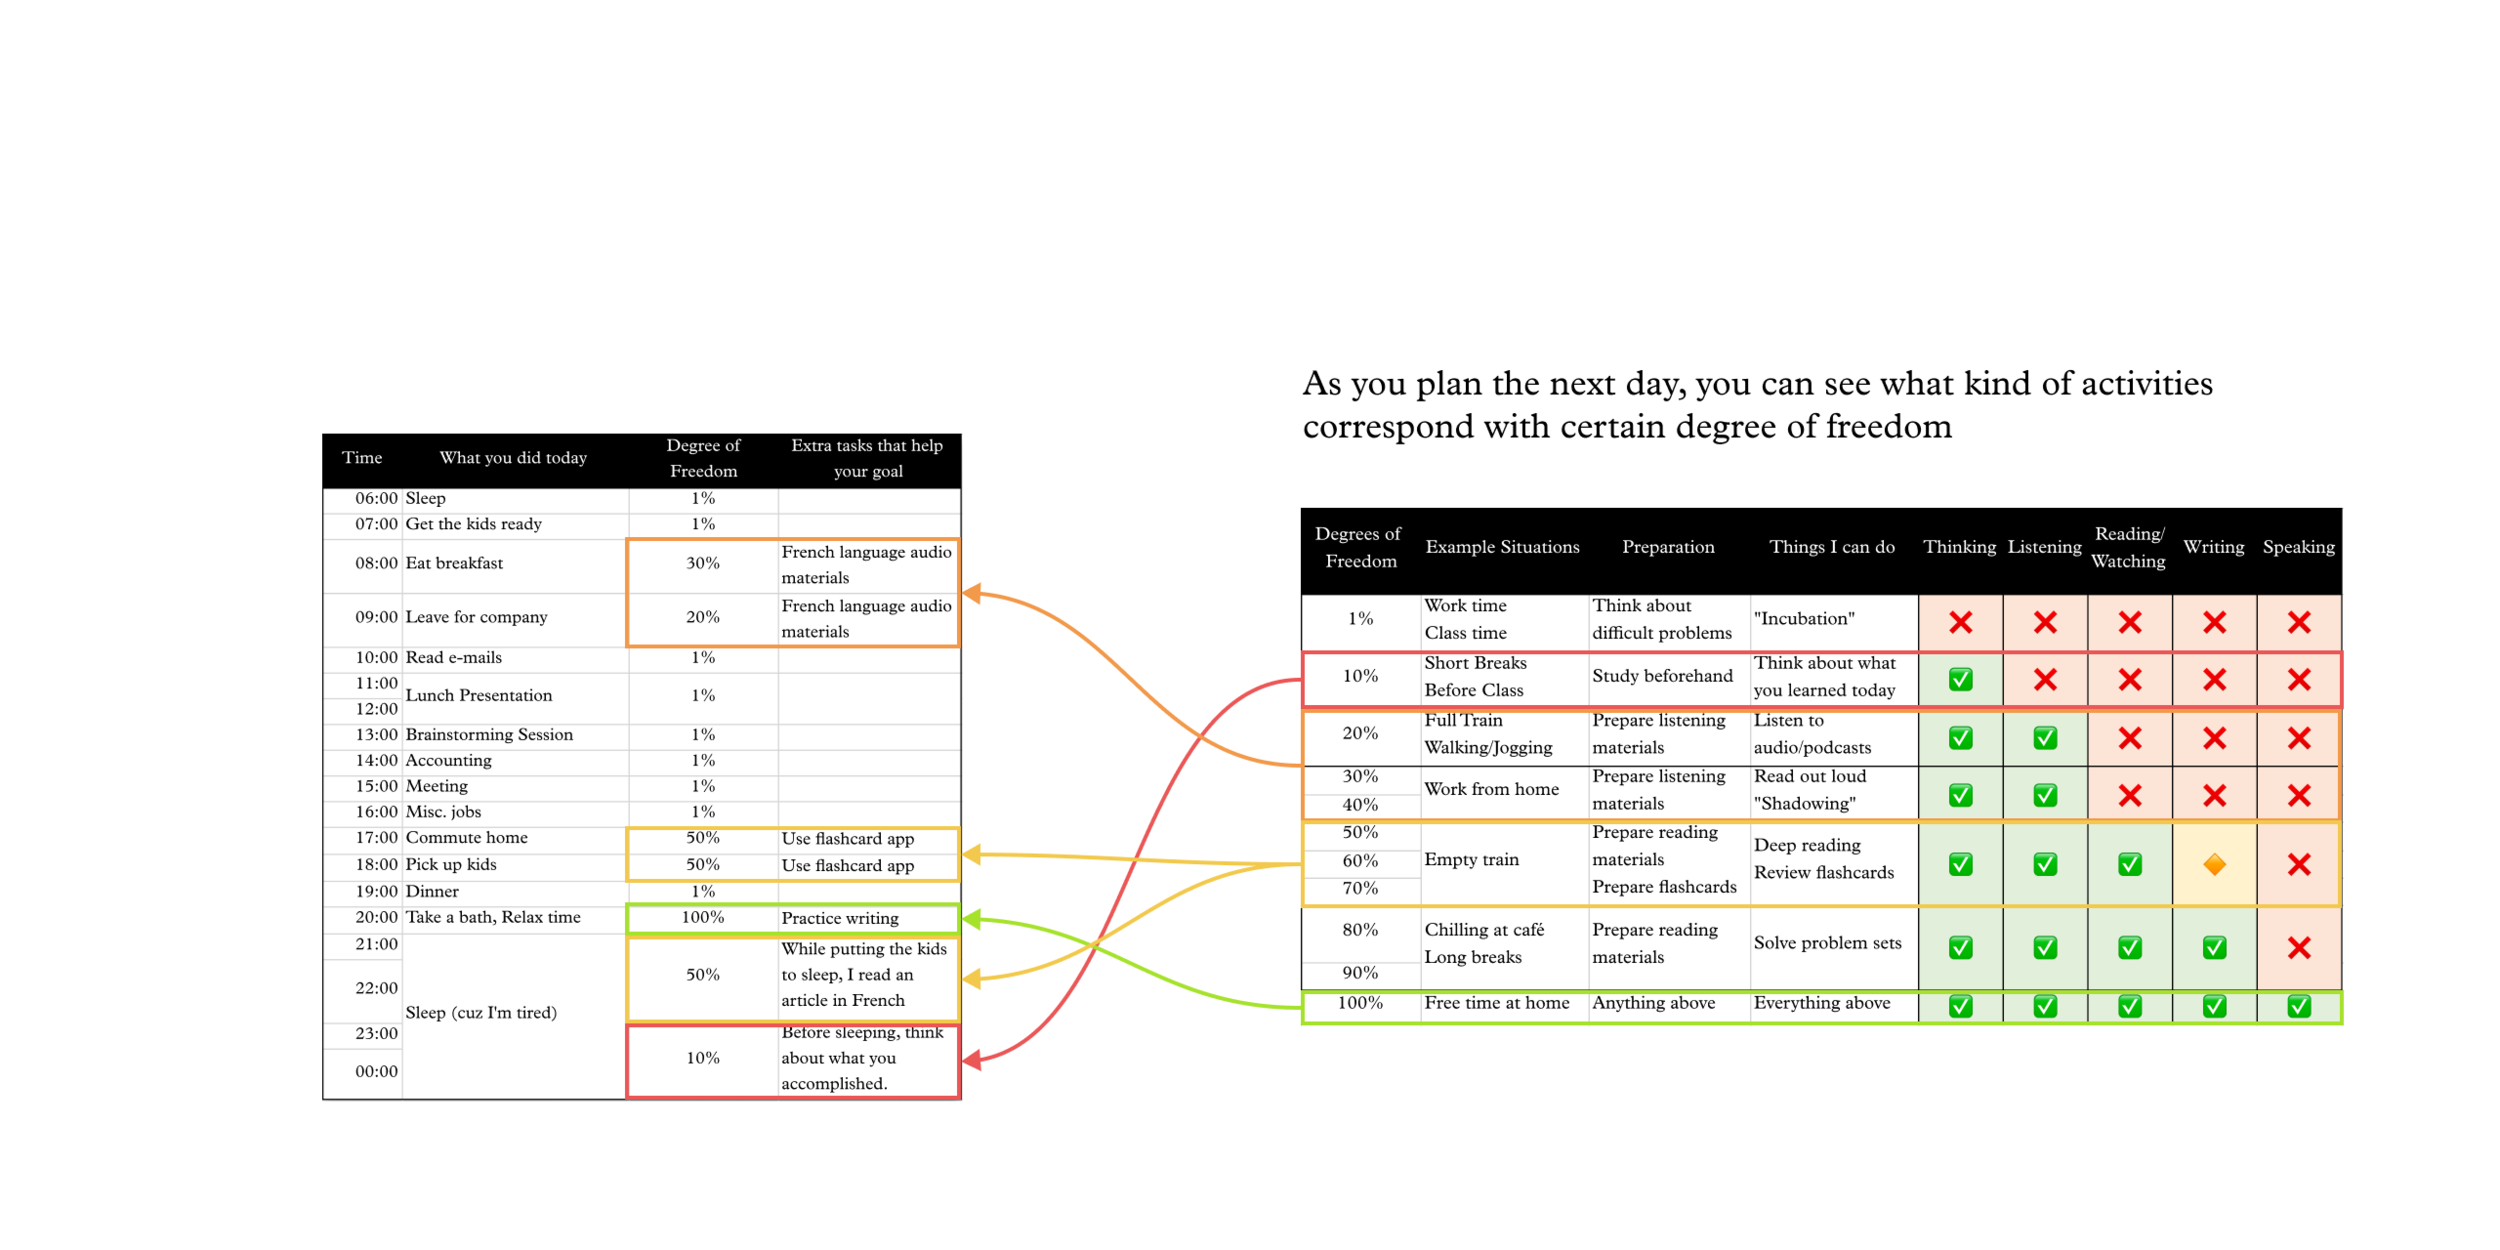
Technique 6: Time Tracking
Write out the plan for the day
Actually record what you did
Compare the day with your plan
The thing is that a lot of people like to plan, but not a lot of people actually record what they do. Because of this, they don't know whether they are following their plans or not.

Technique 7: Maximizing Grey Time Blocks
The purpose of this technique is to increase the utility of your daily schedule. In other words, it will try to finesse more learning into what you already have or are constrained to.
Think of it like Recovery Driving (previous entry). There are ways in which you can create time out of nothing.
Use the time record you already have
Measure each activity with a degree of freedom. Hours of the days can be categorized into three categories:
White: completely free
Grey: constrained, but some freedom
Black: no freedom
Even in black time, there is still something you can do to support your learning goals.
Think about what kinds of things you can do beforehand to prepare for these additional activities that you will be adding to your schedule. In the table below, you will see the degree of freedom matched with the types of activity you can do.
Insert preparation and self-learning activities (e.g. review flashcards, listen to foreign language audio) into your current schedule. Imagine the table below to be your recorded day. You can see that each activity will have a degree of freedom as well as possible activities that you can do.

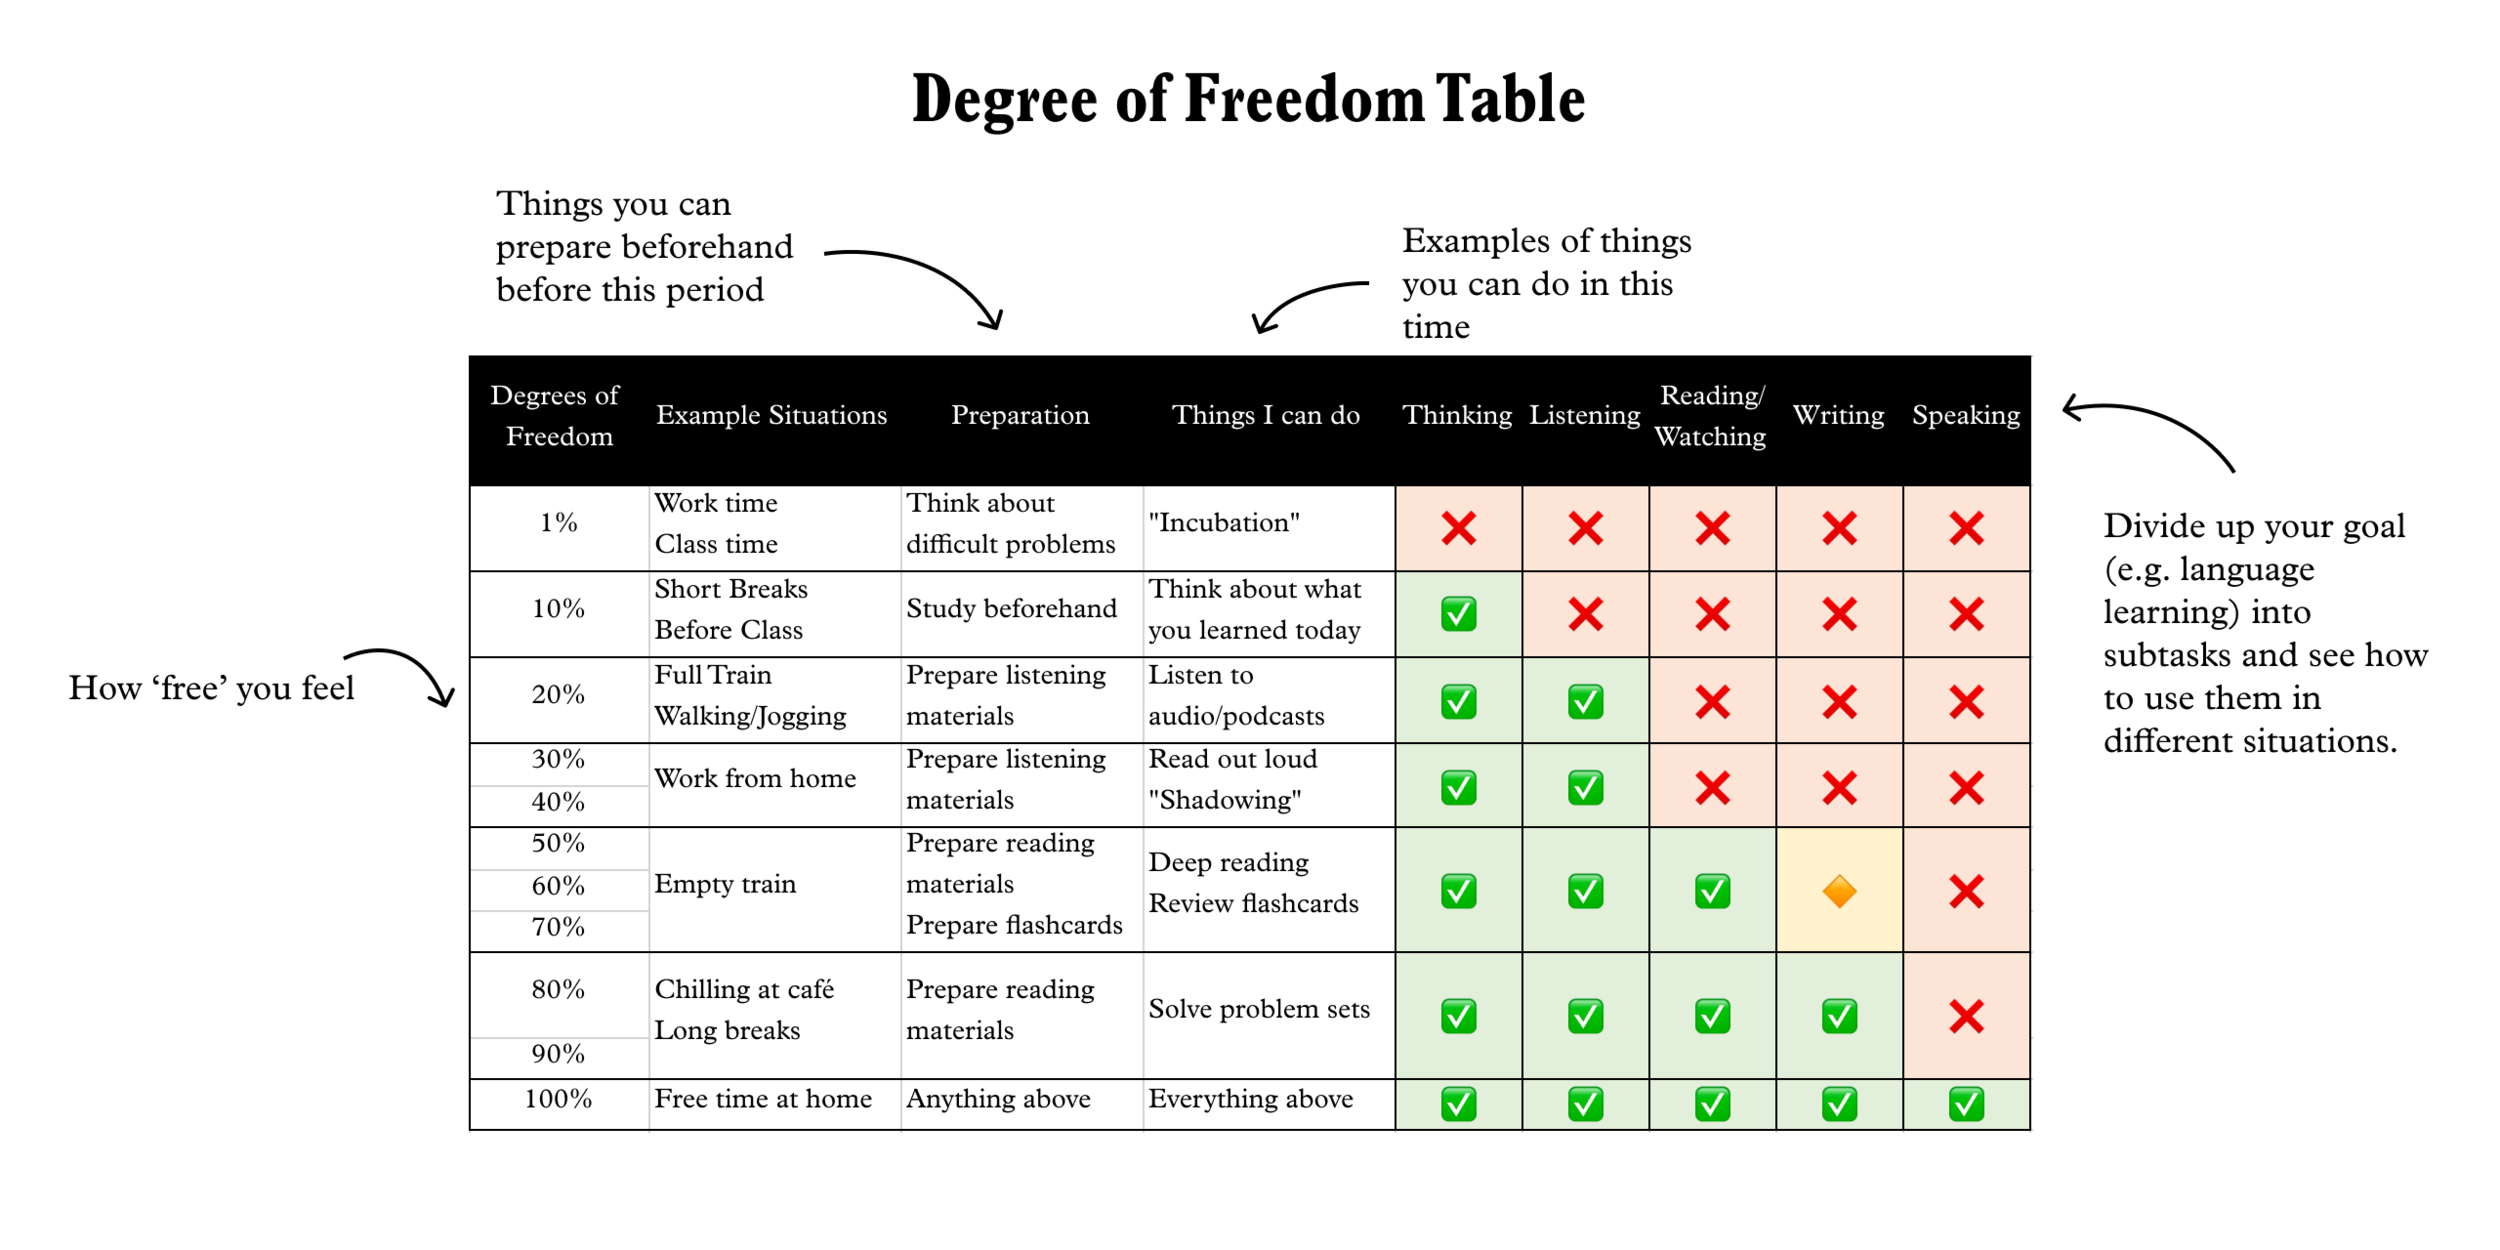
On "Incubation Time"
This idea was thought of by Jules-Henri Poincaré, a French mathematician. He said that when we're away from our task, we are still thinking about that task (often unfinished) at the back of our heads. When we cannot solve something, our subconscious works hard to try to figure it out. Then, suddenly out of nowhere, we are able to solve it. An extreme example might be when you finish an exam, not being able to do a question, but you figure out the answer right after you finish.
The implication here is that we can work on some problems beforehand and let the incubation period set in during our 'black' hours.
Chapter 5: How to Continue
Technique 10: Leveraging Old Habits
Choose an existing habit (e.g. check twitter)
Put a new habit right before or after that habit. Make that new habit as small as you can.
You can slowly increase the weight or length of that new habit after maintaining it (by attaching to existing ones) for a week. For example, you can increase it by 5 or 10 minutes if it's a time-related habit.

This is supported by the "Relativity Theory of Reinforcement" or the Premack Principle. The theory states that more probable behavior (our current habit) will enforce less probable behavior (our new habits). If rewarding activities are made conditional on less-rewarding activities, the person is more likely to do that less-rewarding activity first.
In my case, I only allowed myself to watch The Crown only after practicing piano for 15 minutes.
In the case of a child, he or she might be promised ice cream only after that child eats vegetables.
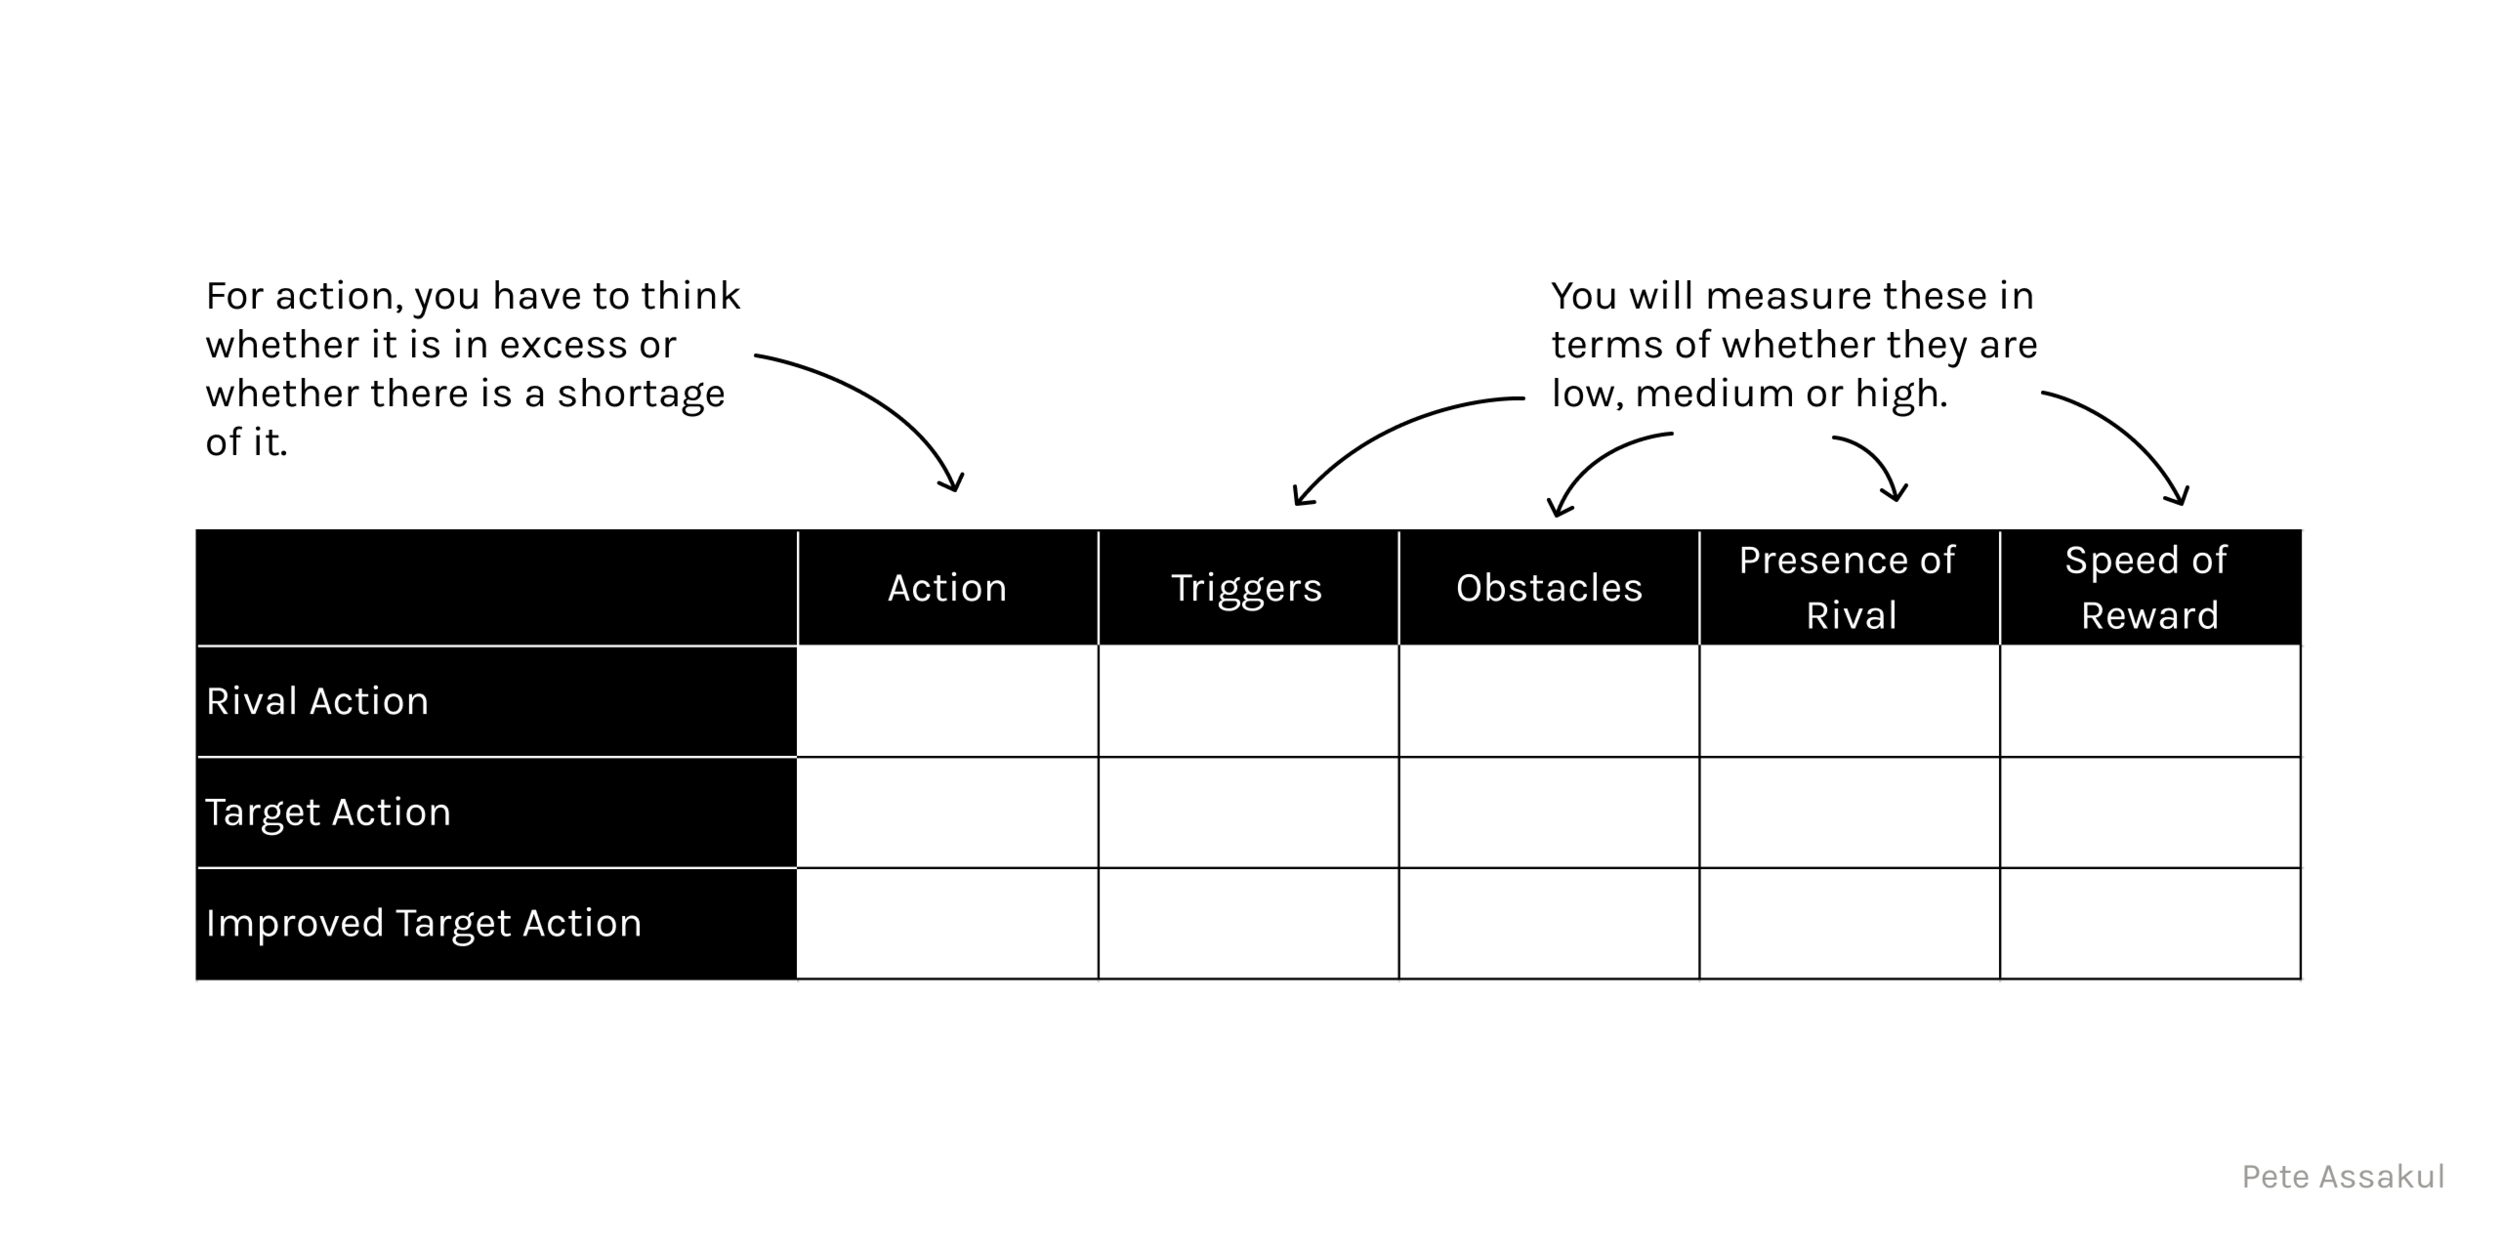
Technique 11: Action Design Sheet
Target an action that you want to add or decrease. Find its rival: an action that prevents you from doing your target action.
Make this table below:
Activities that are in shortage tend to...
have no or little trigger/catalyst
have high barriers
lose to rival action
have delayed results (cannot see the benefit of the action right away)
doesn't have any immediate reward
Activities that are excessive tend to...
have high trigger
have low barrier
wins over rival action
have immediate results
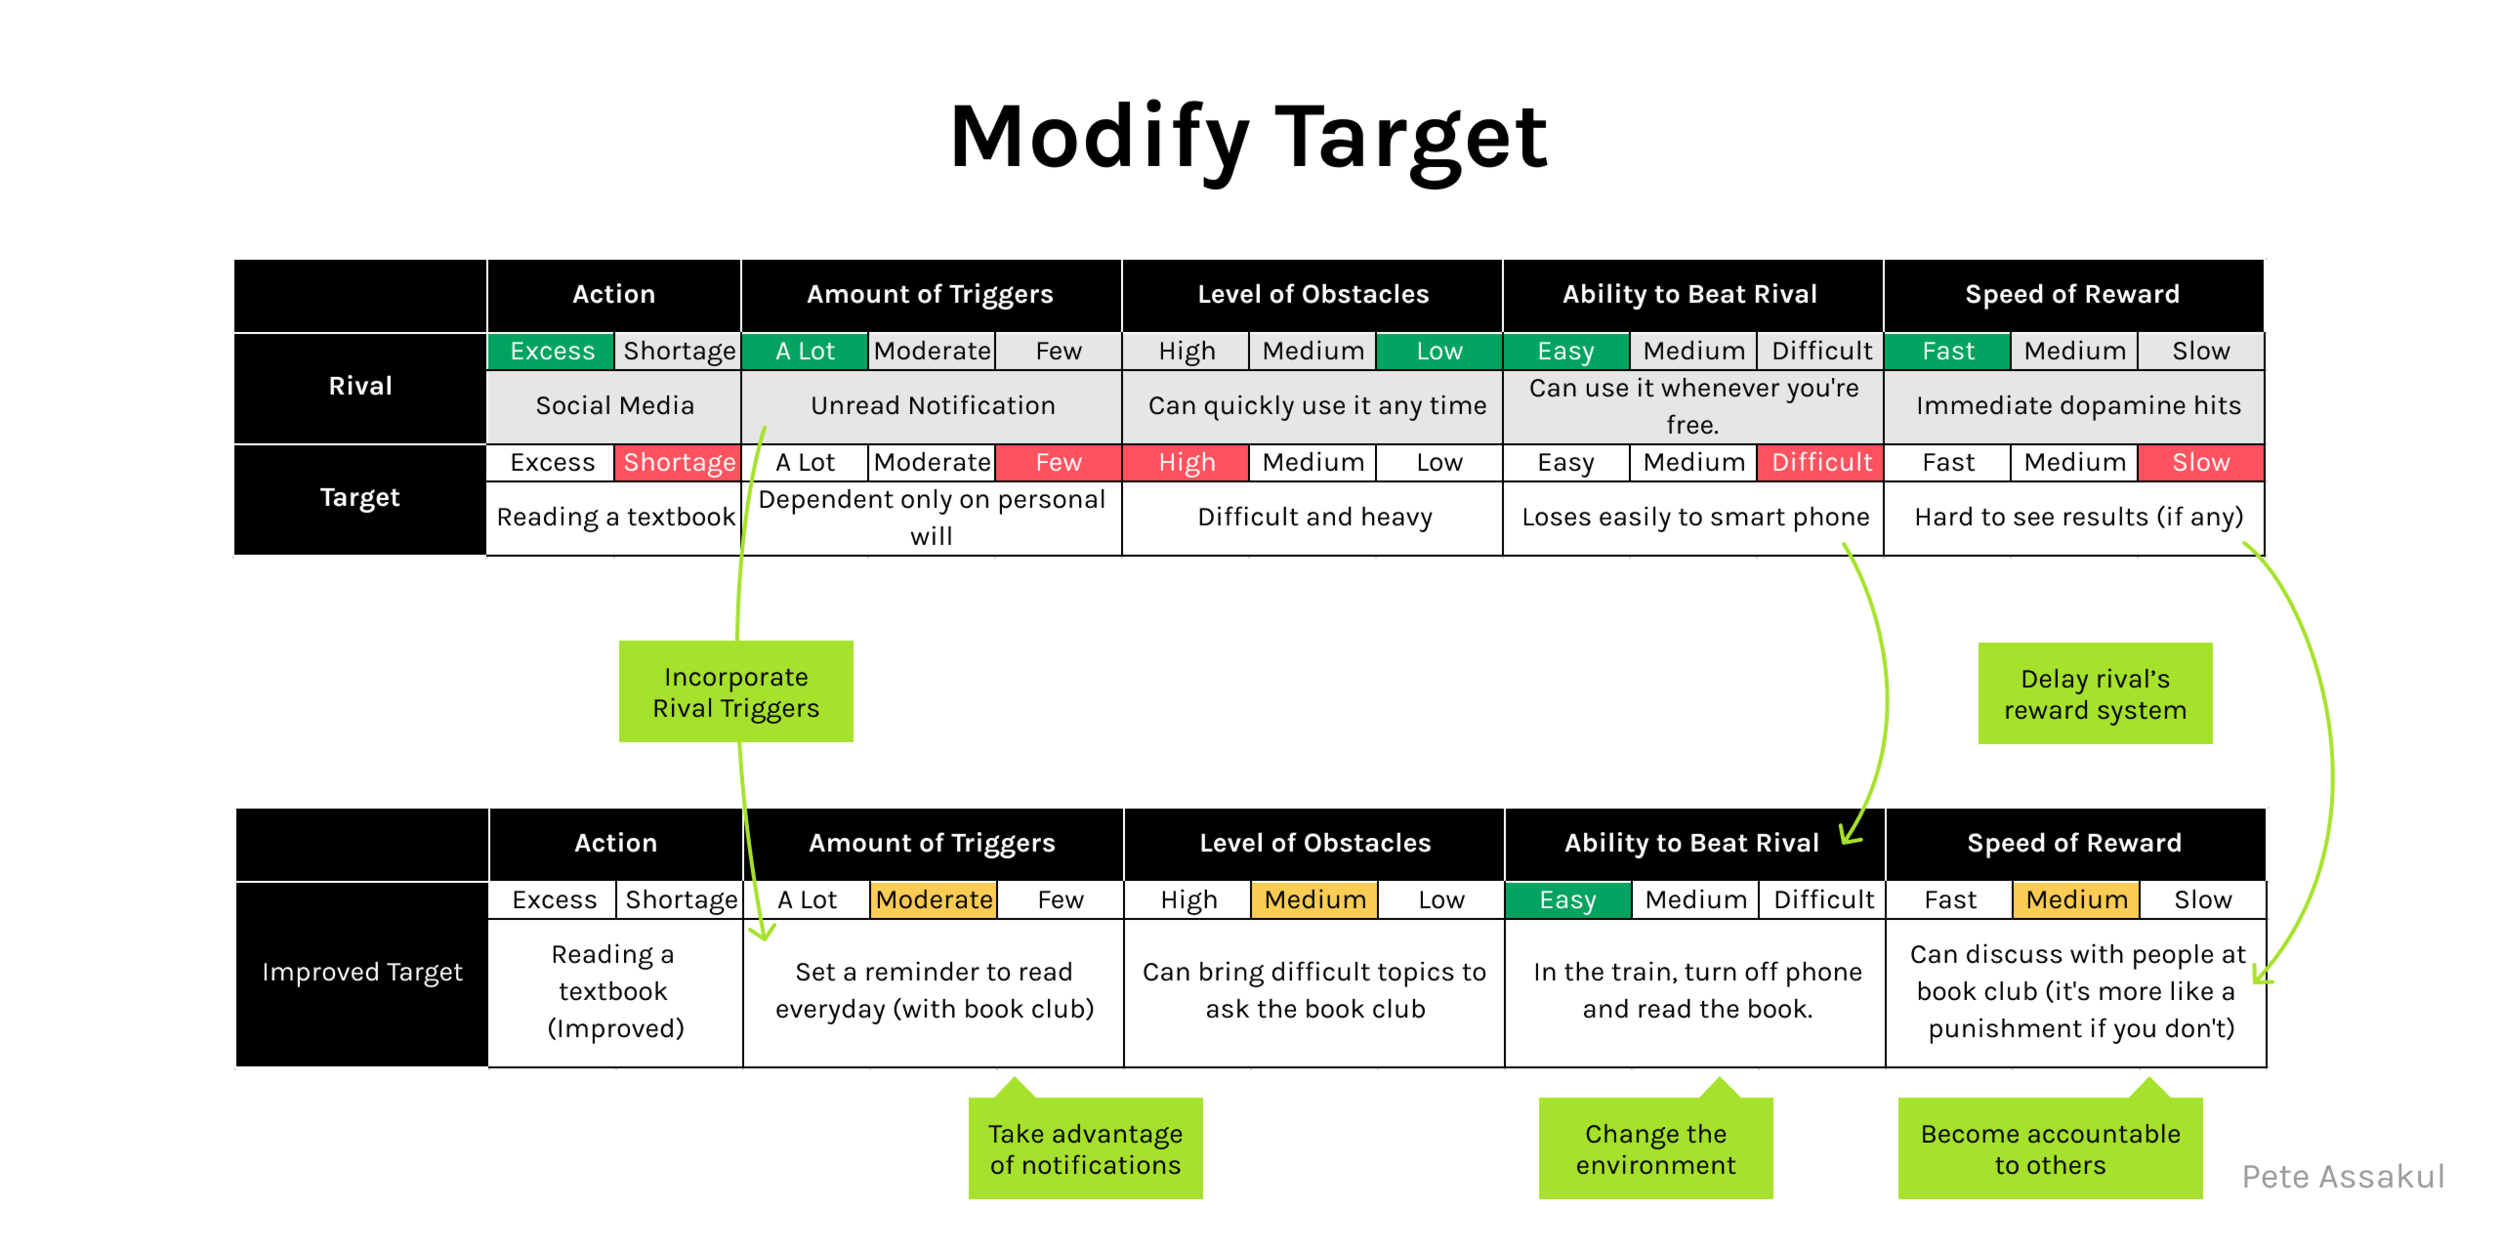
You have to borrow the attributes of a rival to improve your target.

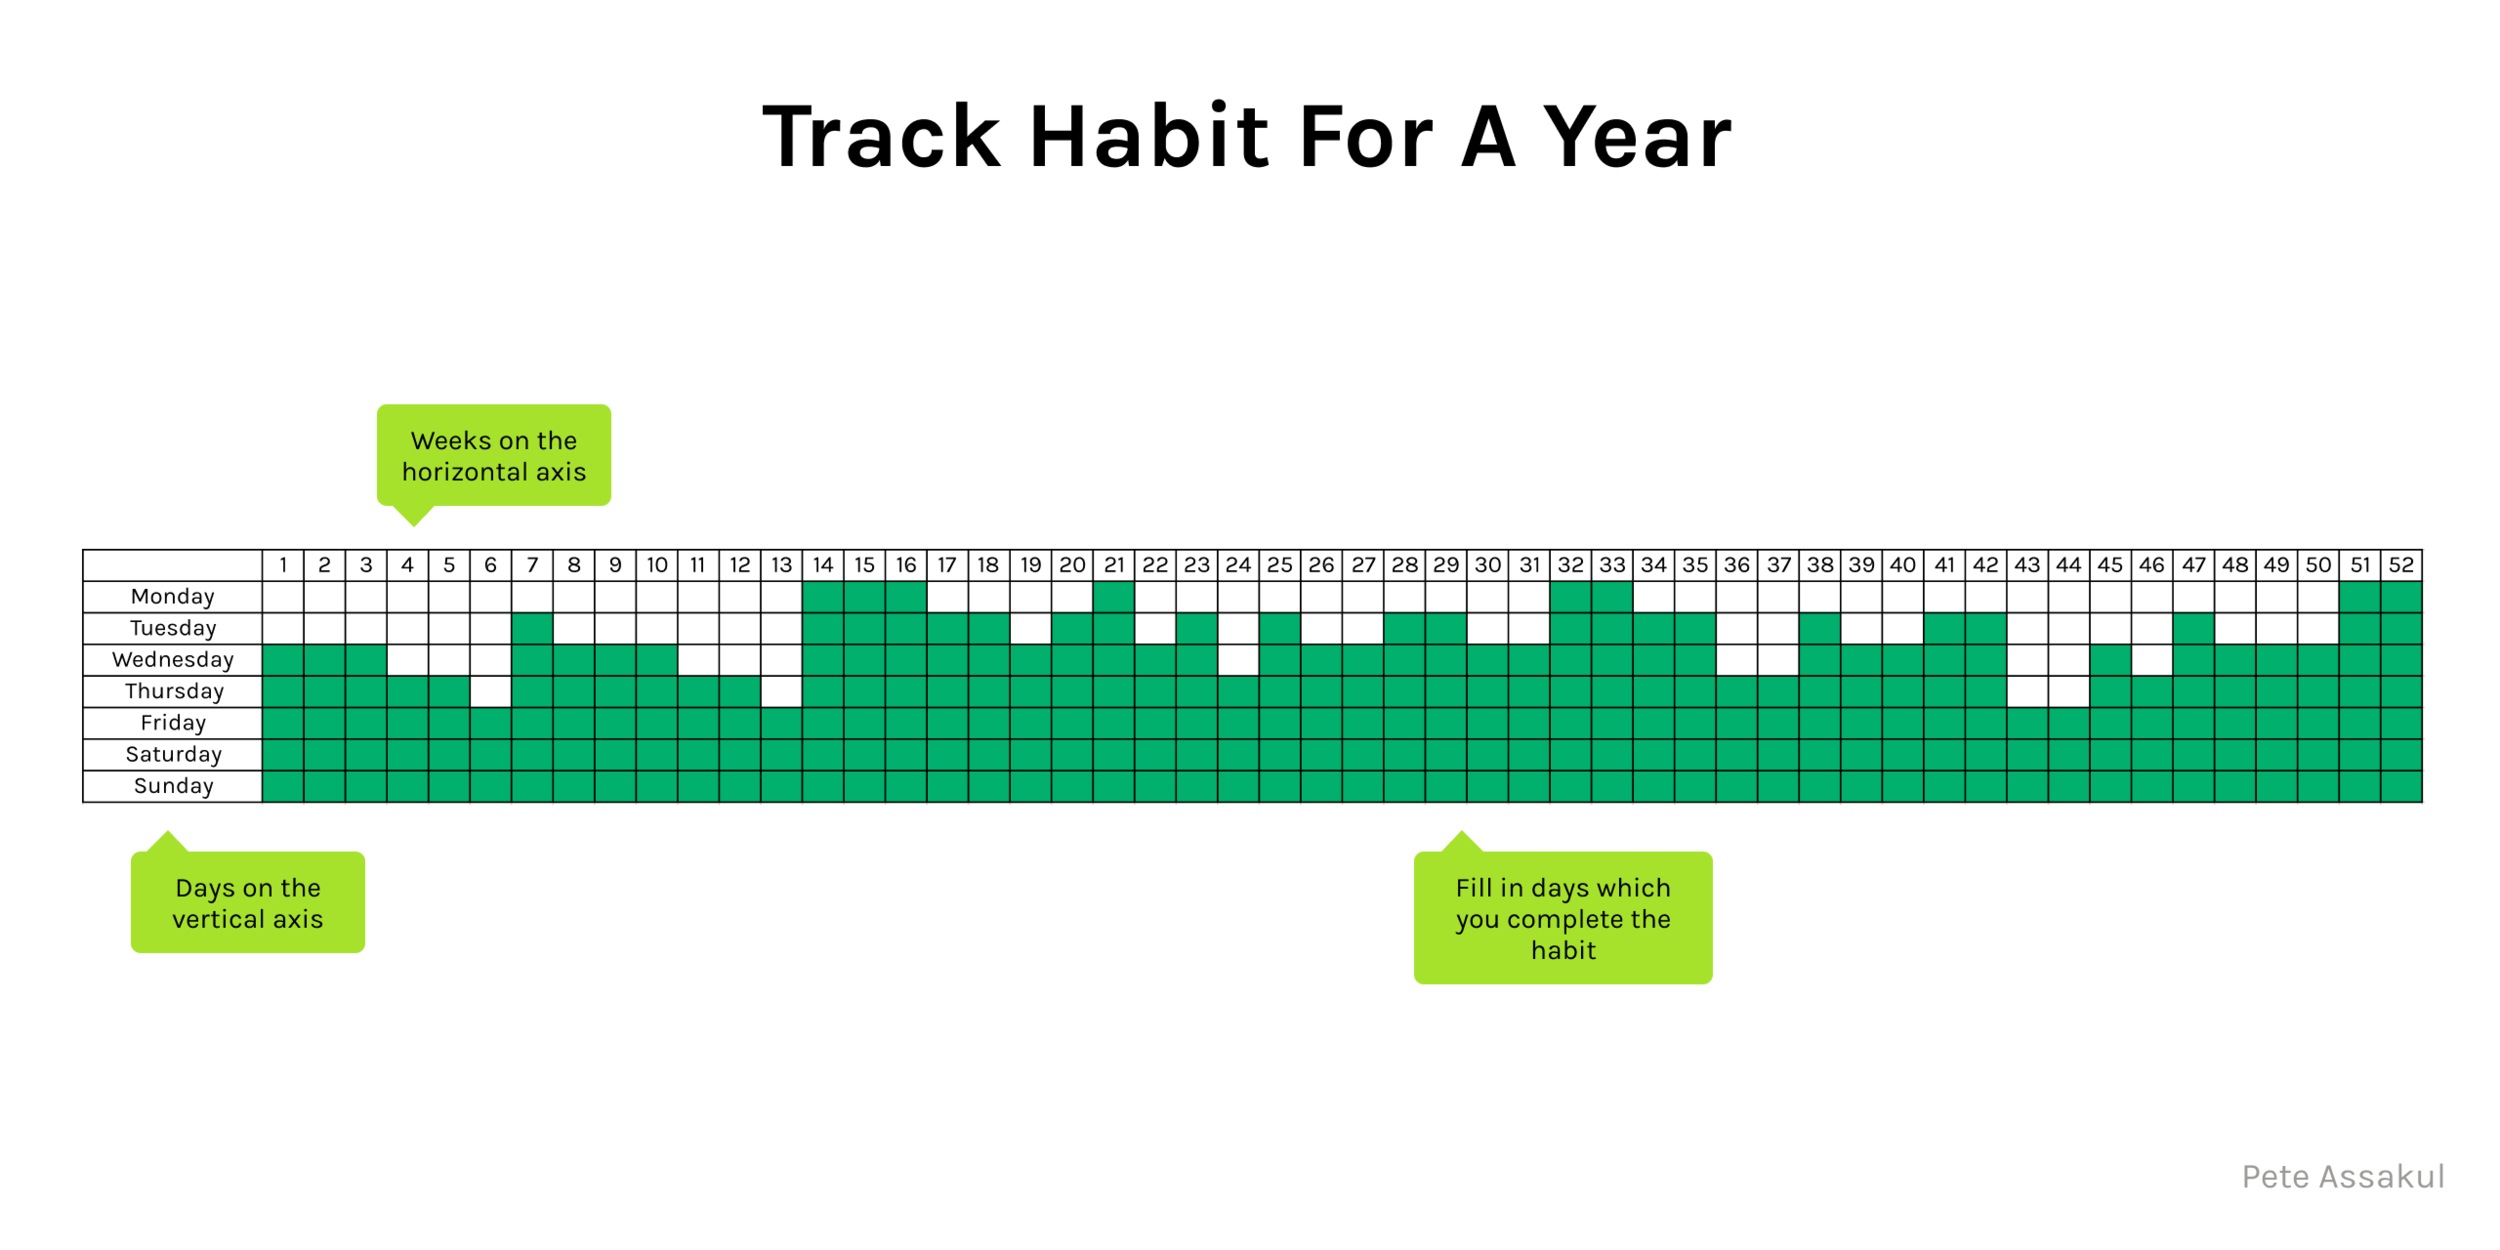
Technique 12: Running Log
Open a text file or start a new page on your notebook.
Write down goals you want to achieve.
Decide on the recording method. This can be an abbreviation of the book title or number of pages.
Once you start reading or doing the task, record right away.
Return to read previous logs often.
Essentially, it is like a habit tracker.
Extra: Intermediate Trap

The intermediate trap is the period when we feel like we reached a plateau. When we were just starting out, we were able to pick things up really fast because we were basically starting from 0. It's easy to see the change from 0 to 1. But after some time when we reach the intermediate level, our rate of learning slows down and the amount of work we put in gets diminishing returns. On the other hand, we still believe that our learning progress is linear – meaning that we should get a constant increase in our abilities per, for example, one hour of time spent. The gap between what you expect and what it actually is leads to frustration which can take you out of the game completely.
Chapter 6: Enabling the Environment
Technique 13: Gatekeeper
This method forces you to commit to another person by drafting up a contract. You have to give the people you're accountable to a list of goals you want to achieve in a week.

Part 2: What Should I Learn?
Chapter 7: Discovering what to learn
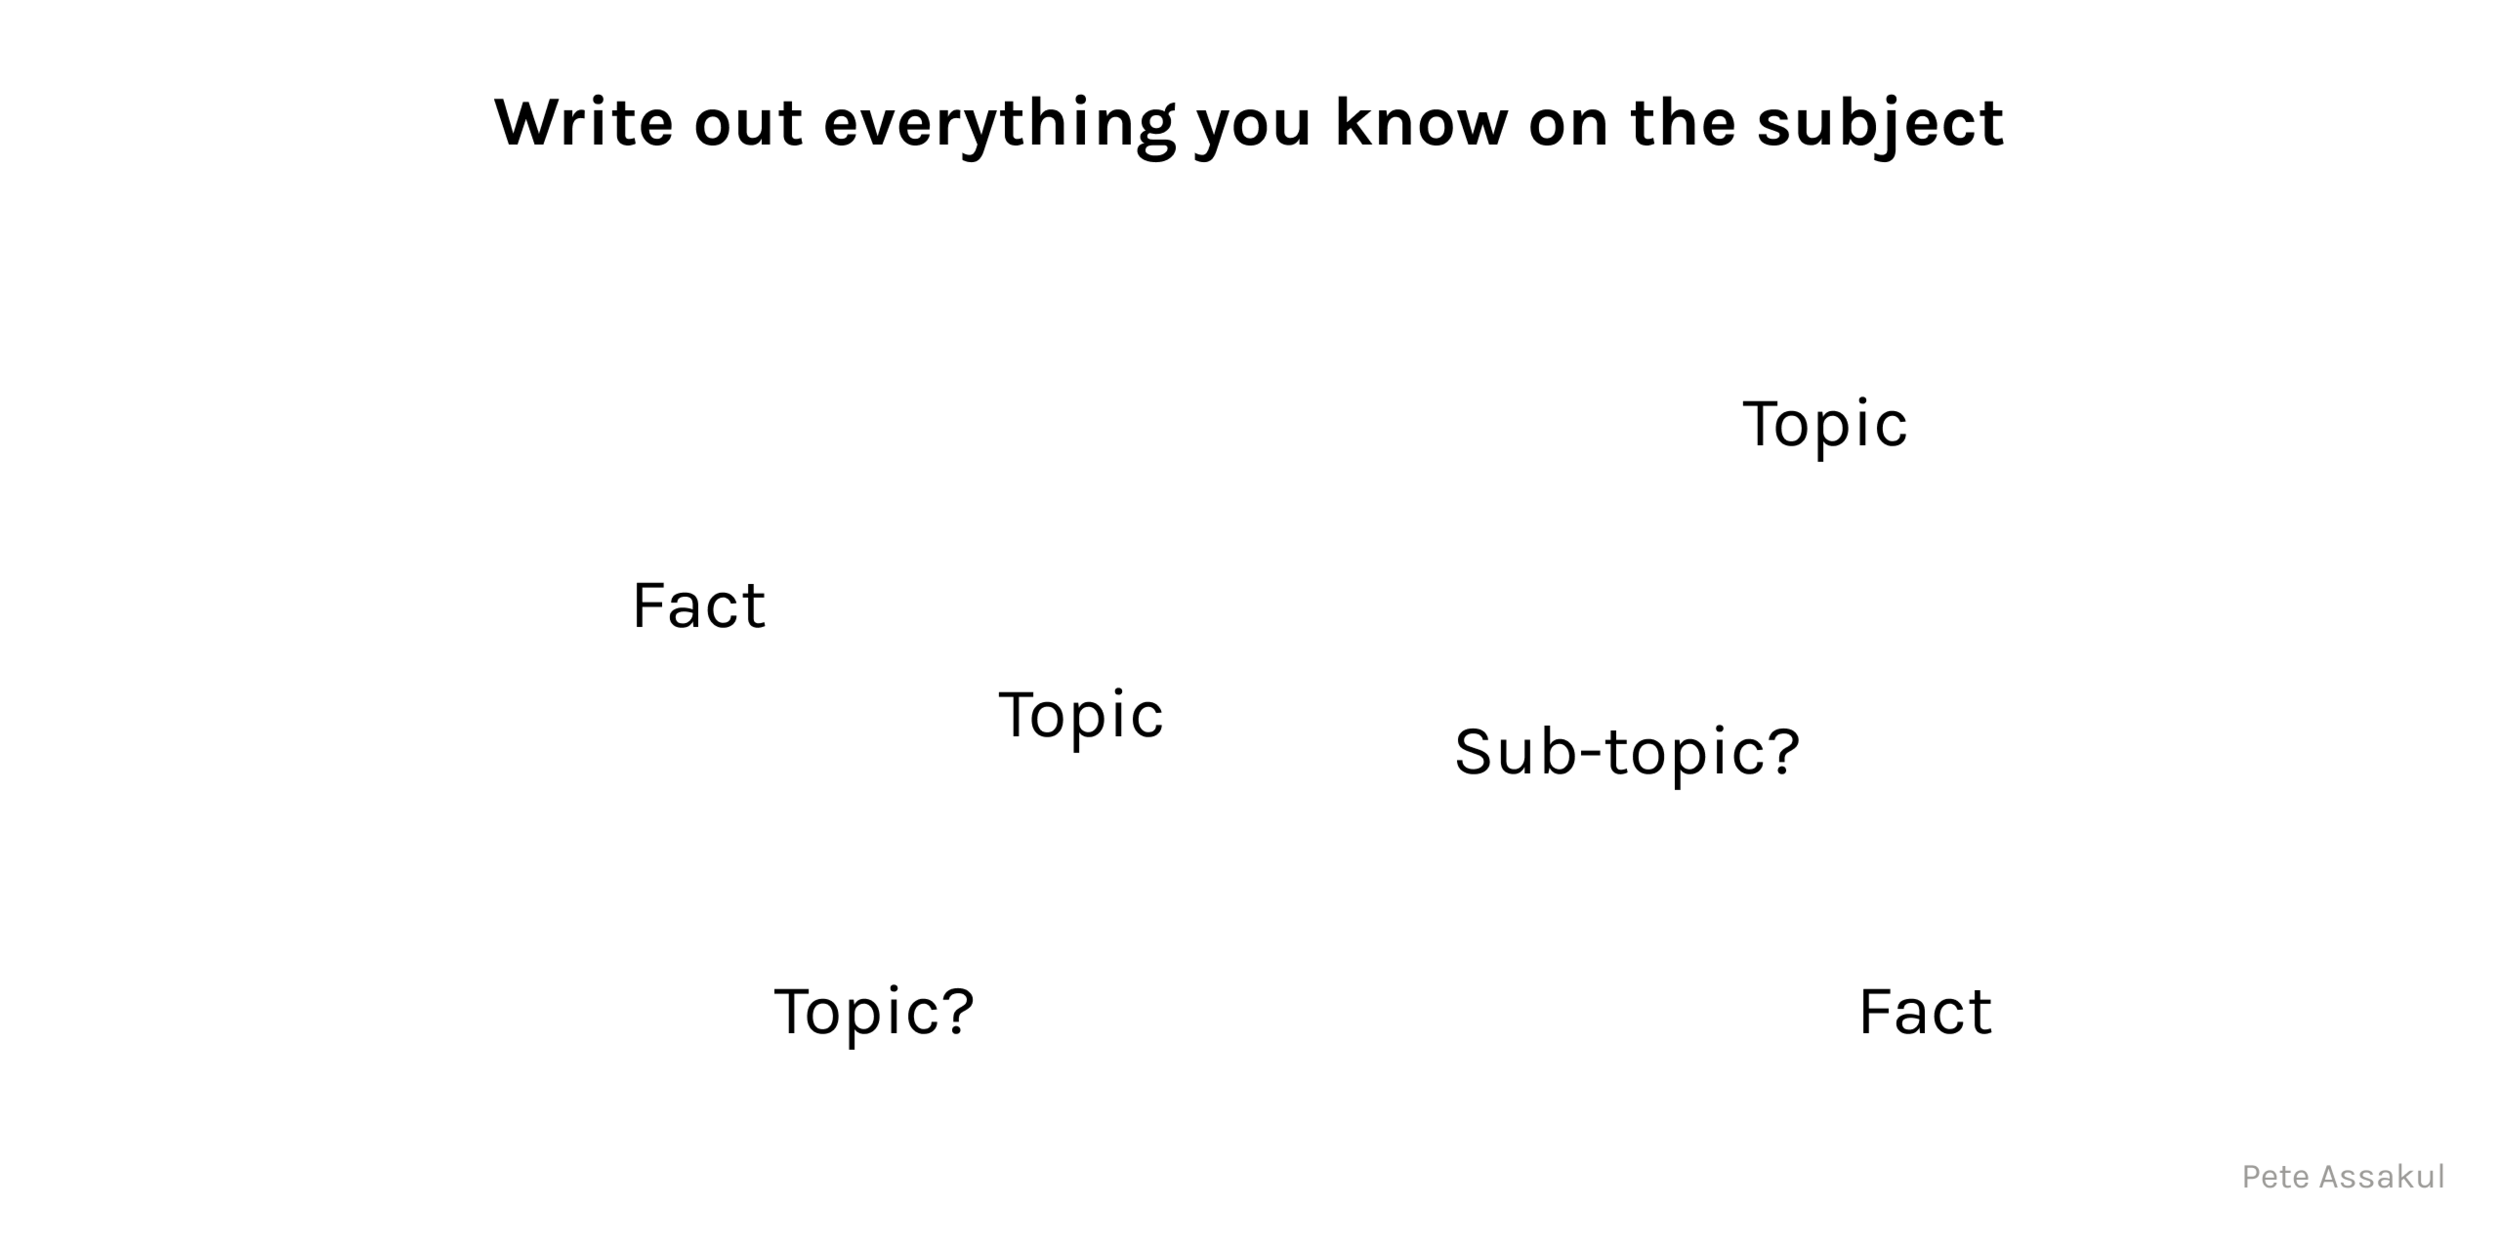
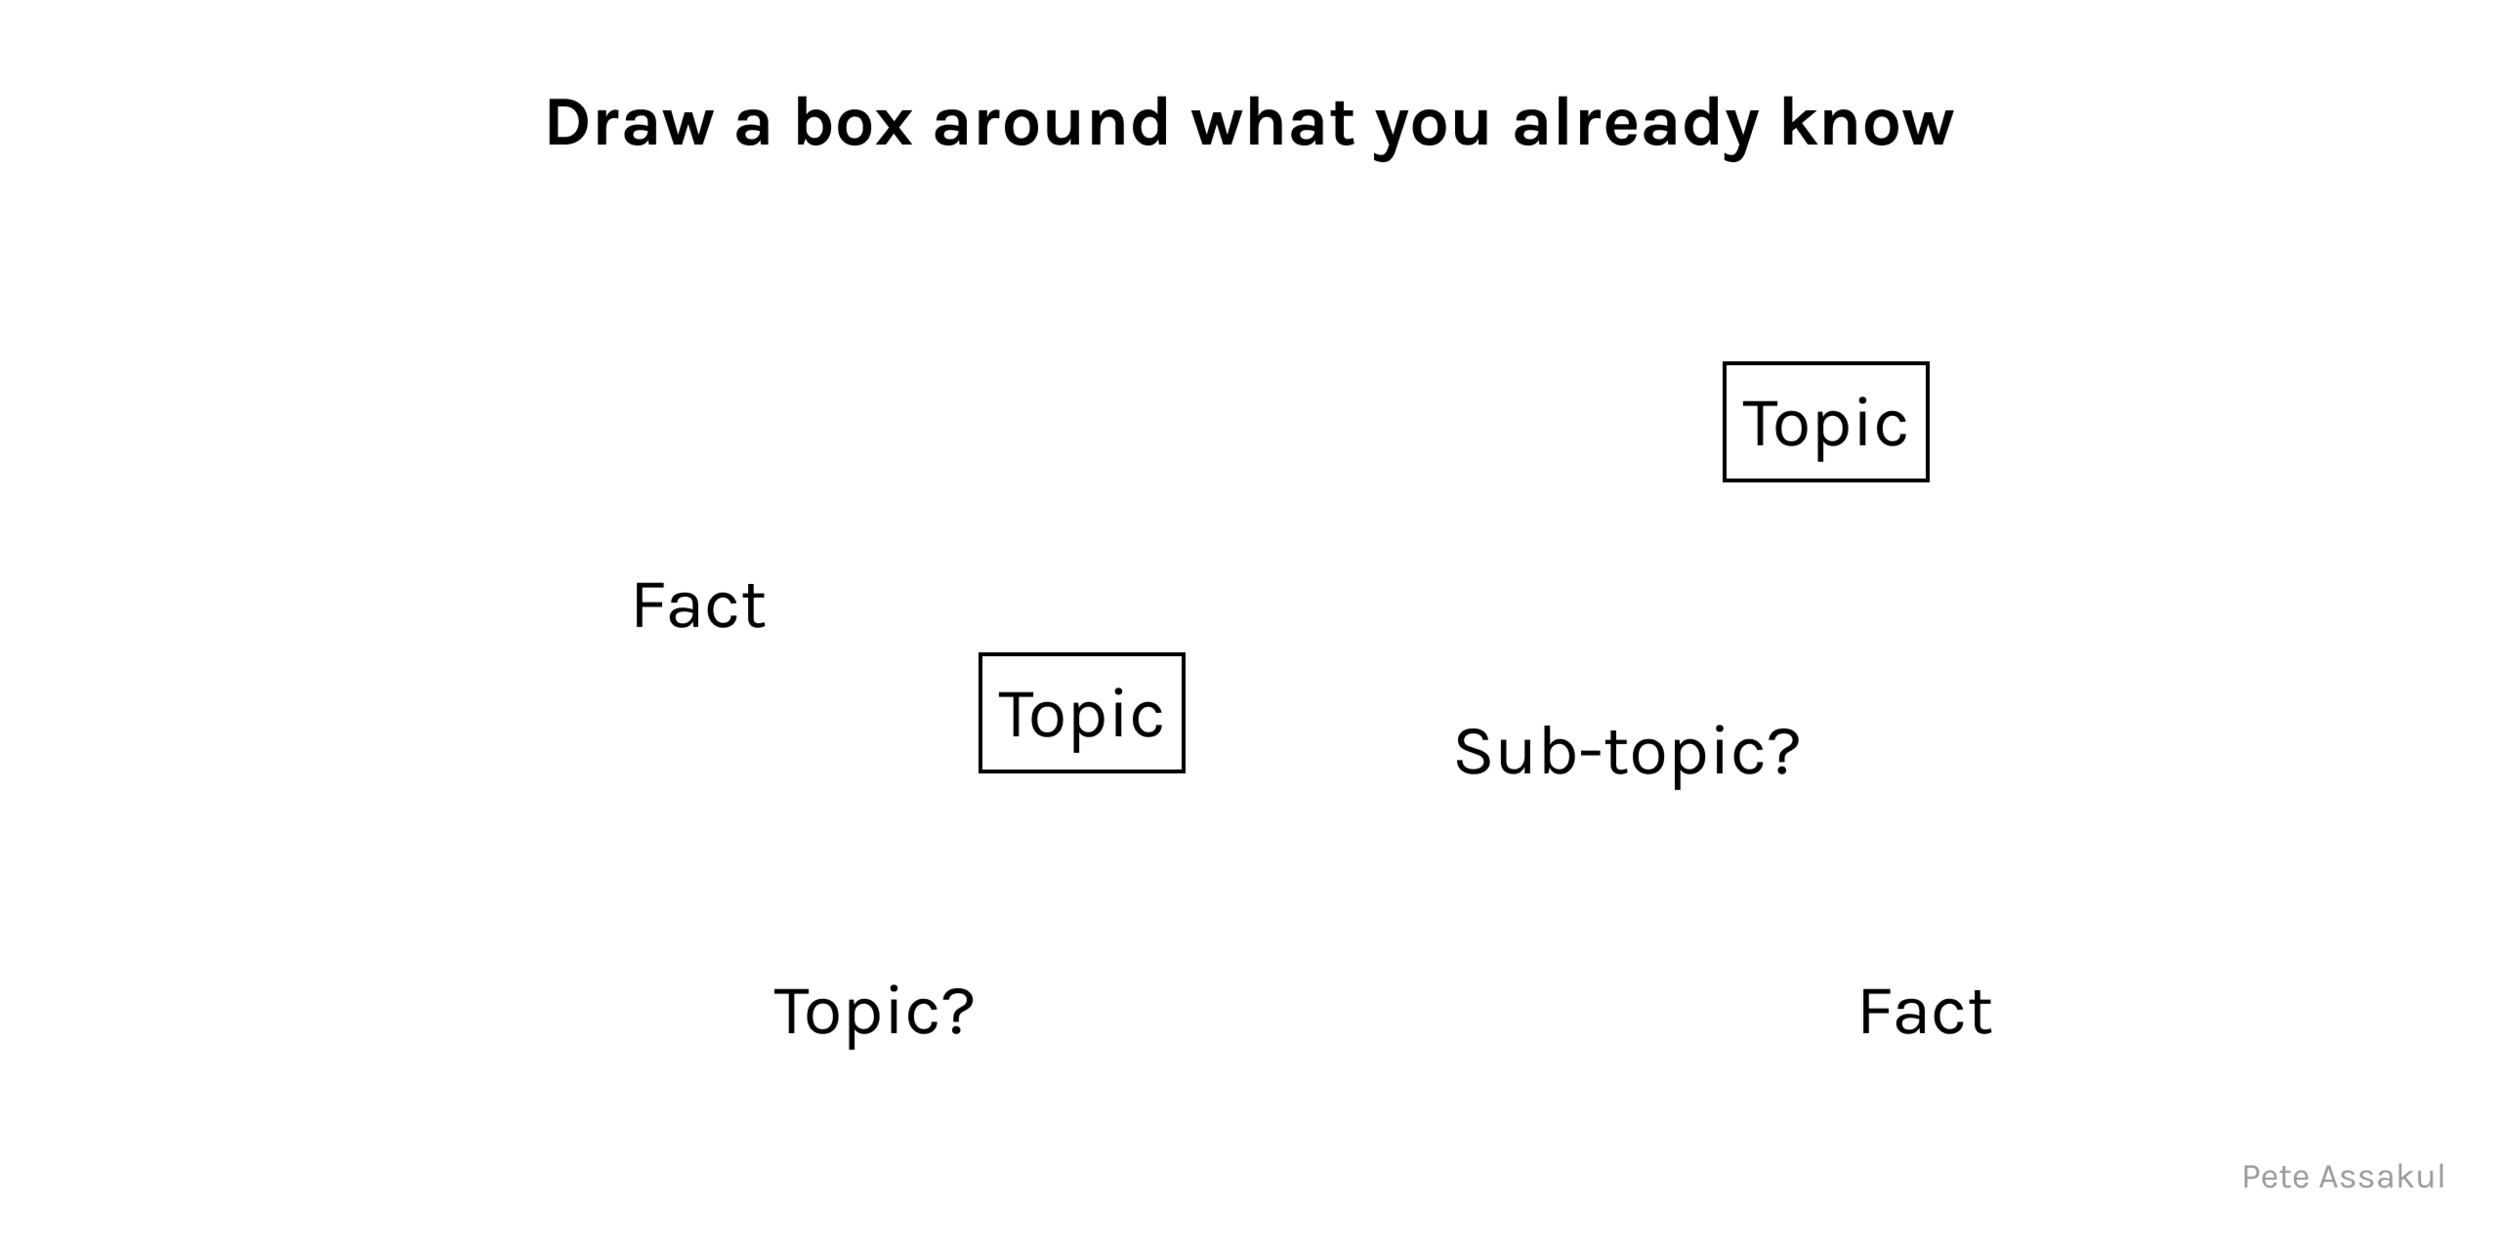
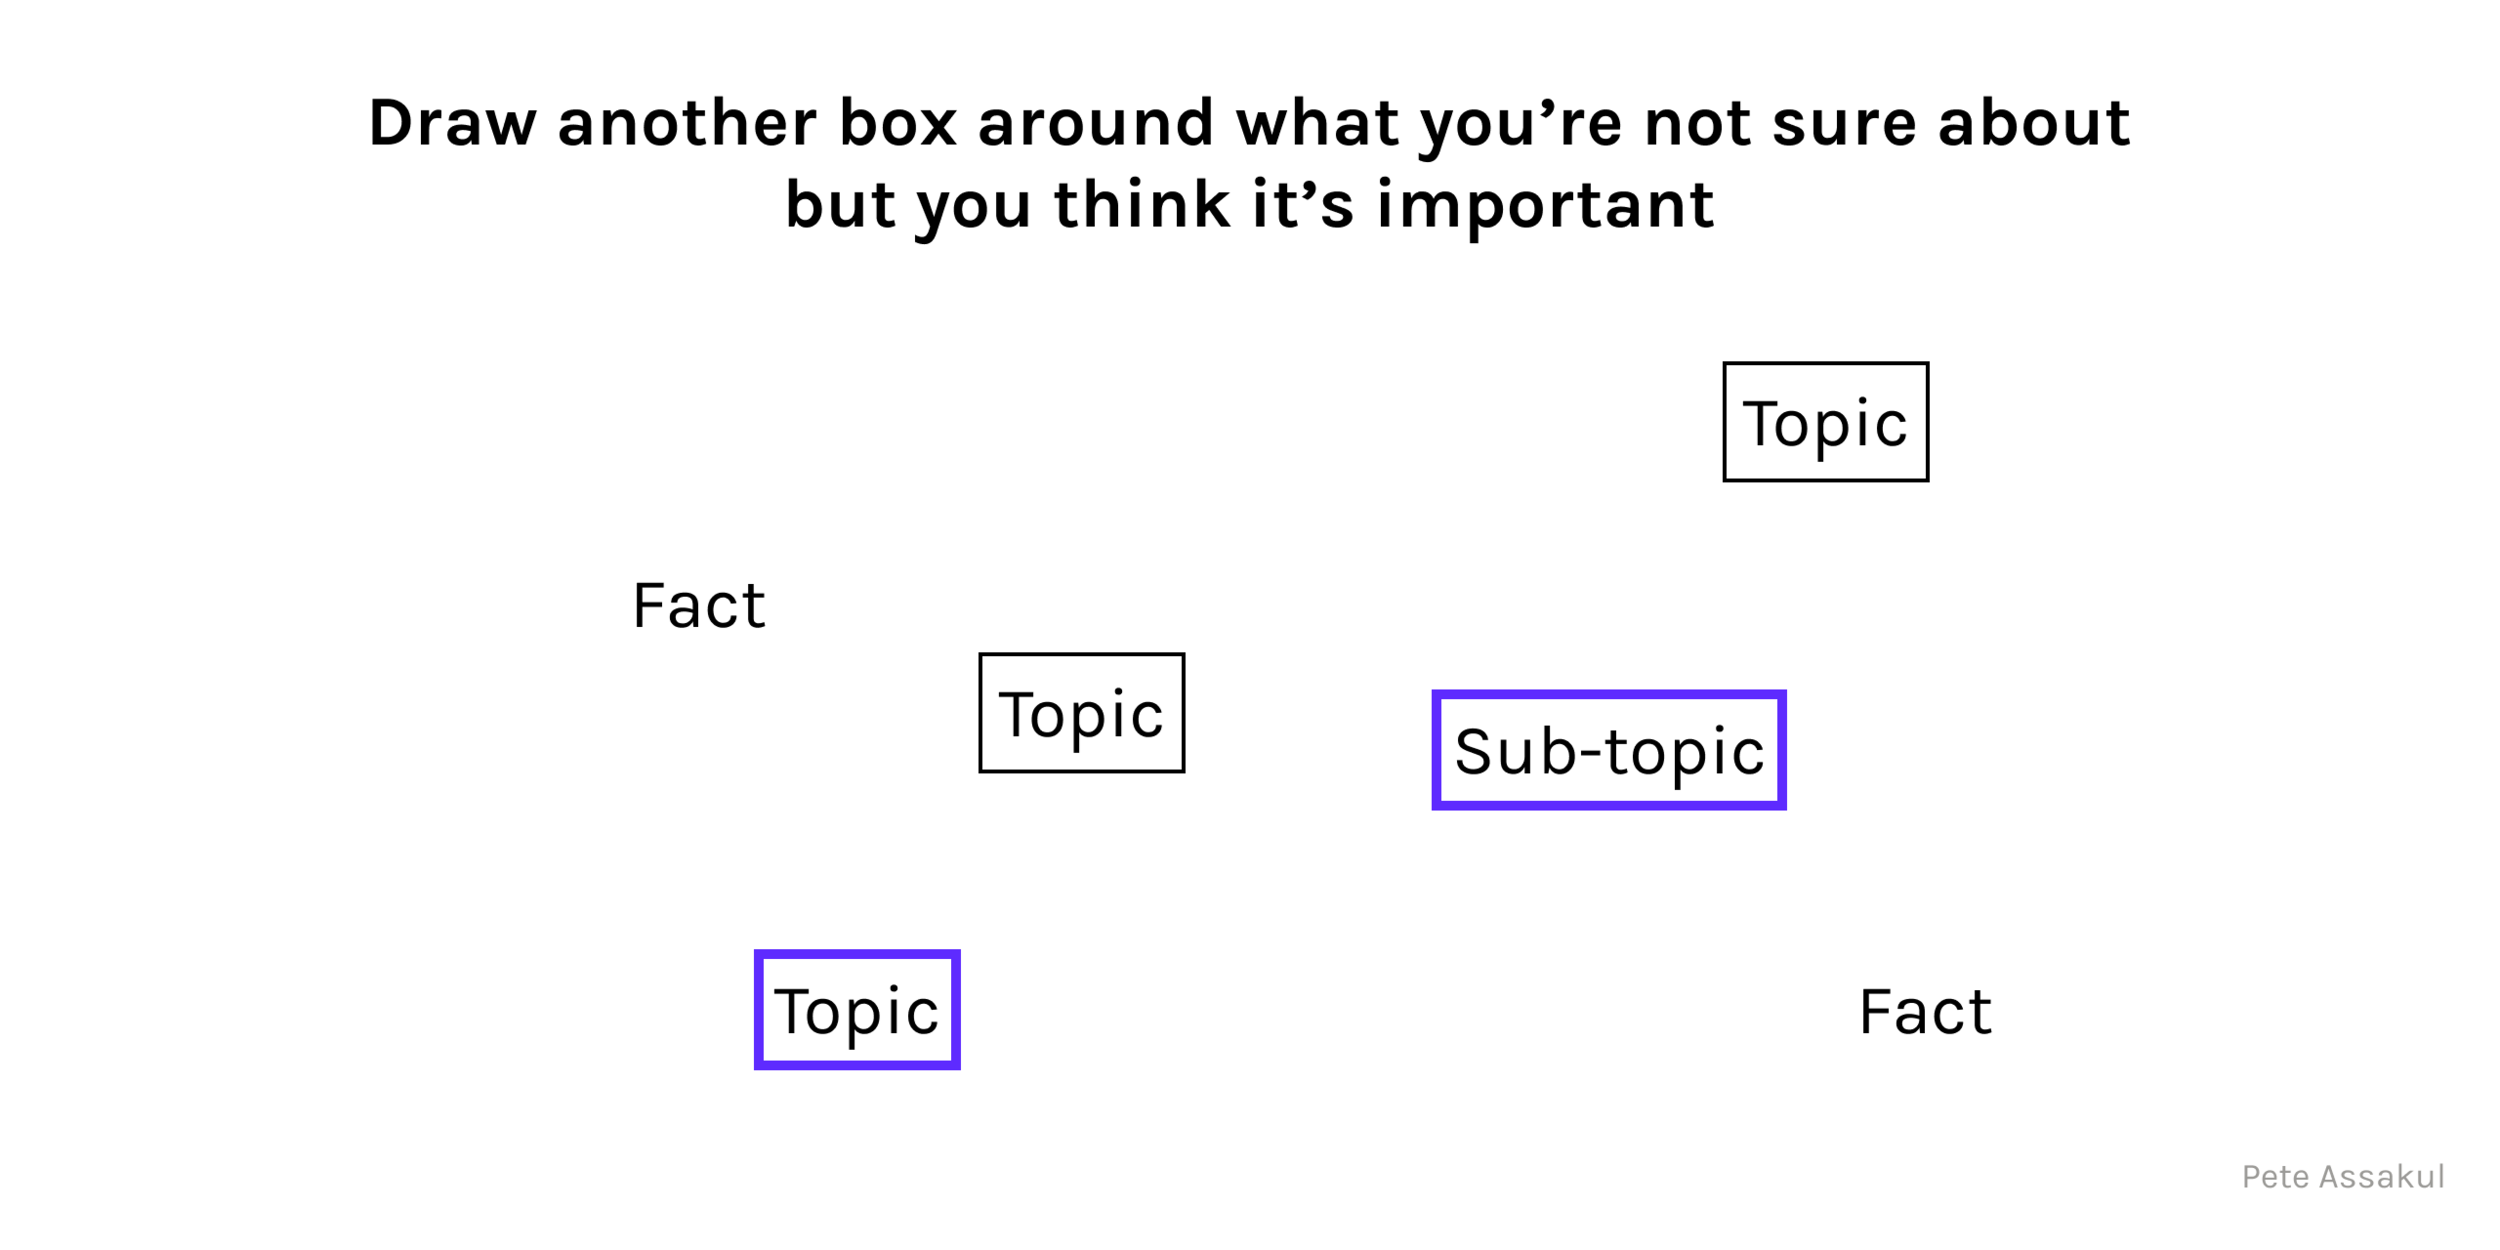
Technique 16: Mind Mapping
Write down everything you know about the subject.
Highlight or emphasize what you already know by drawing a box around it.
Draw another box around what you’re not sure about but you think it’s important. Search them up to clarify
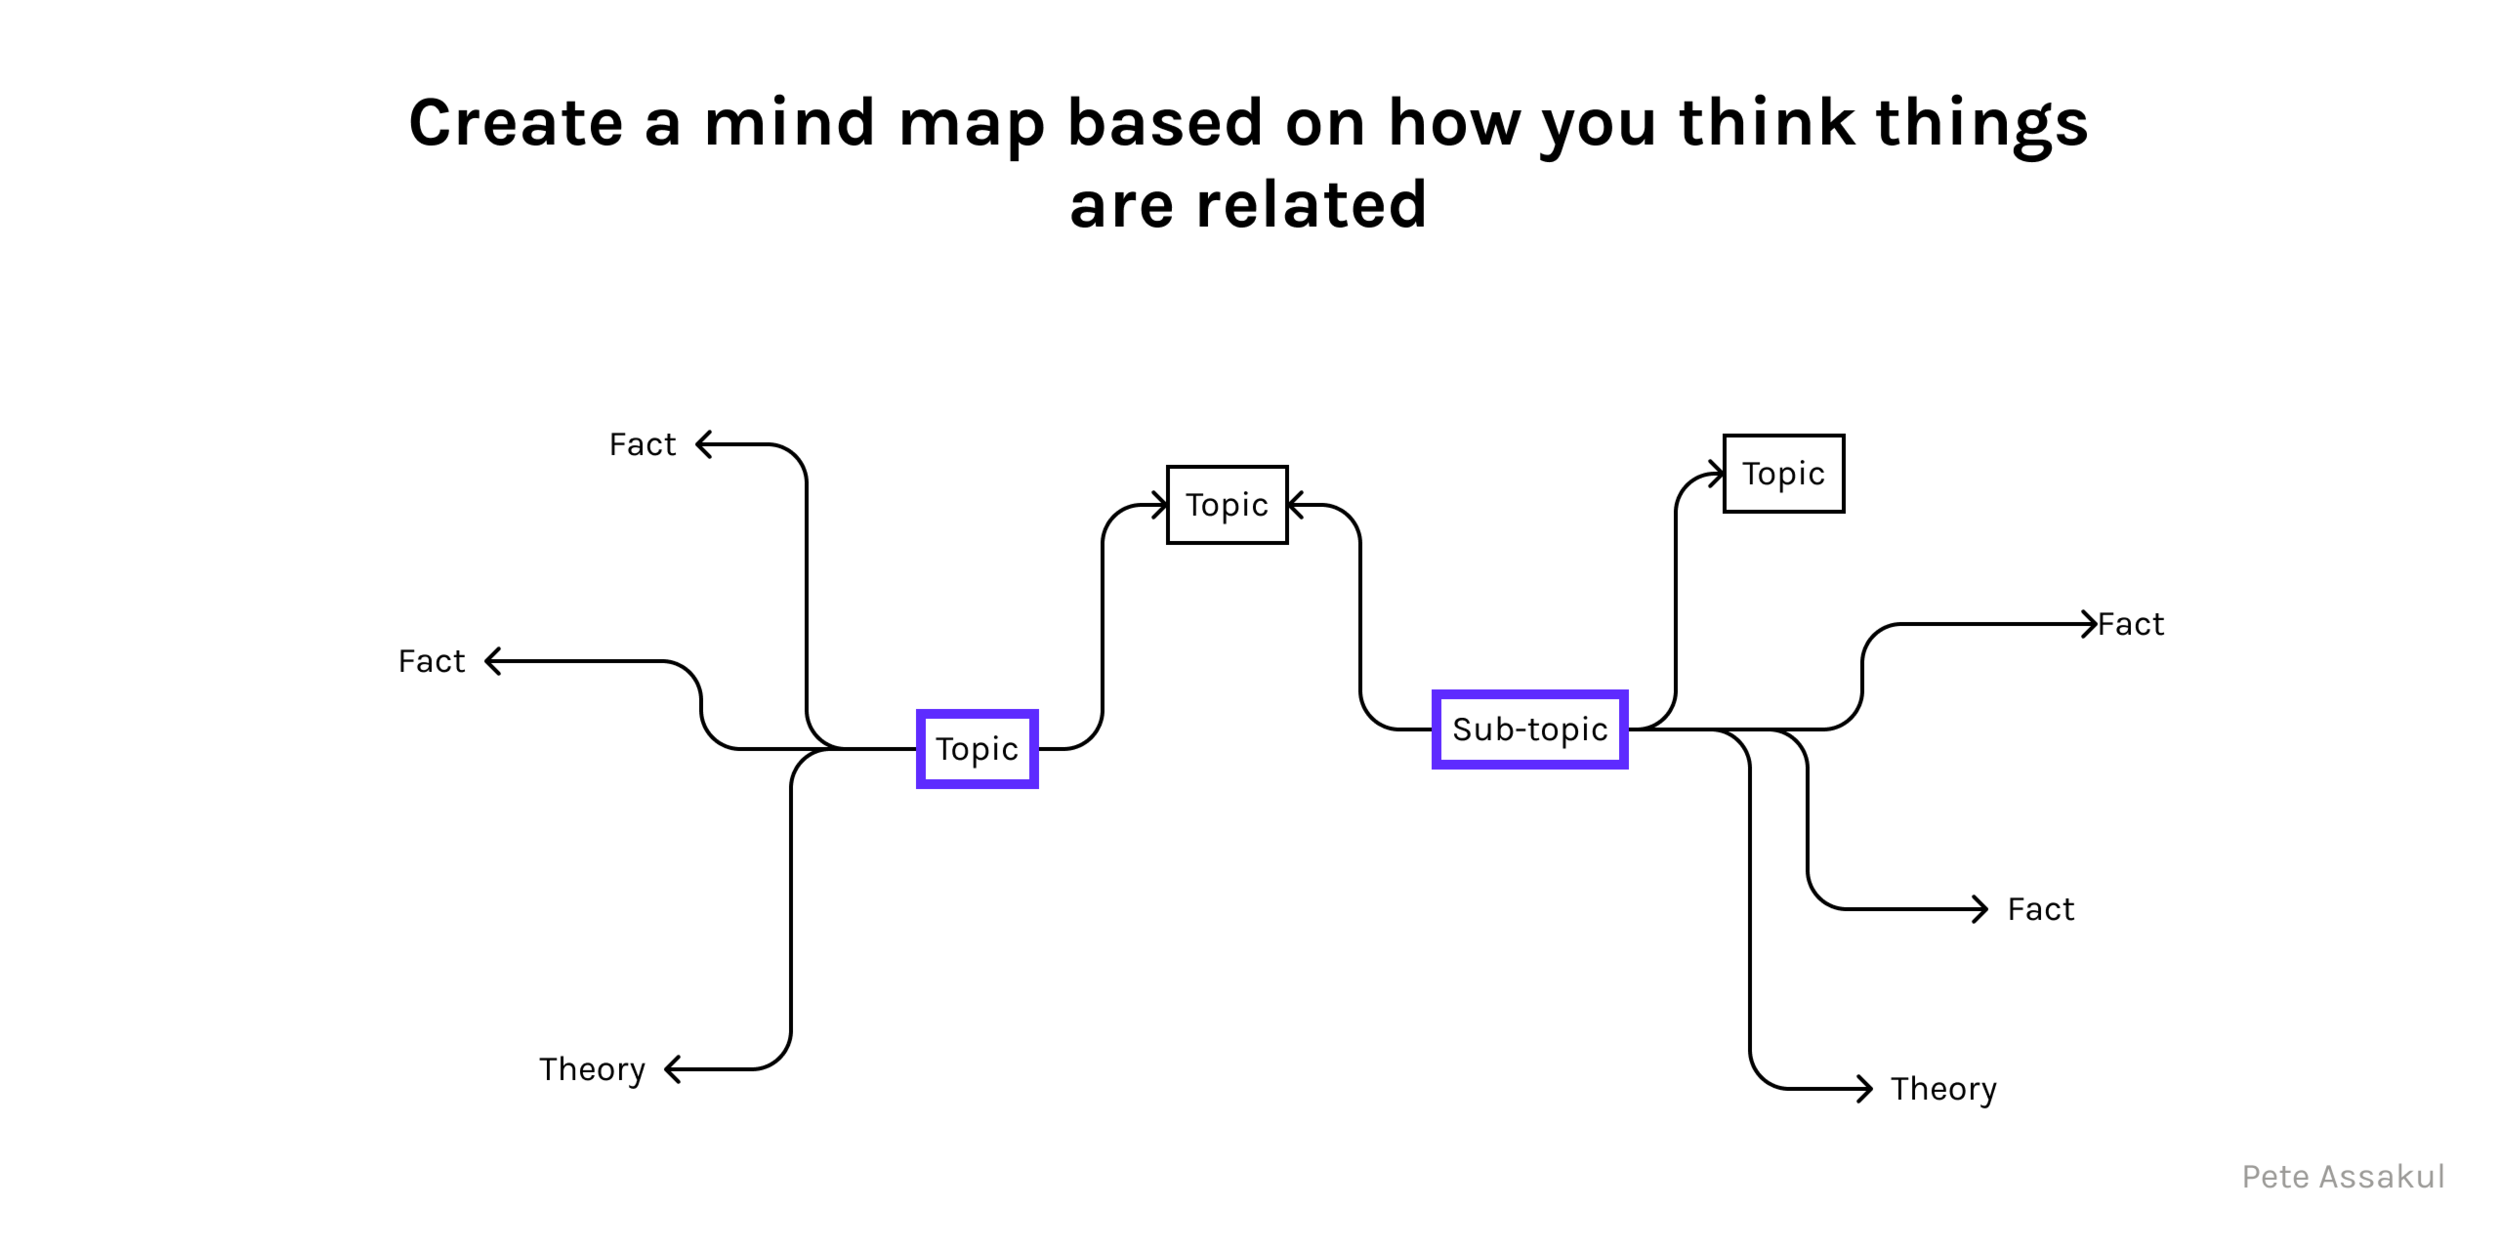
Create a mind map based on how you think things are related.
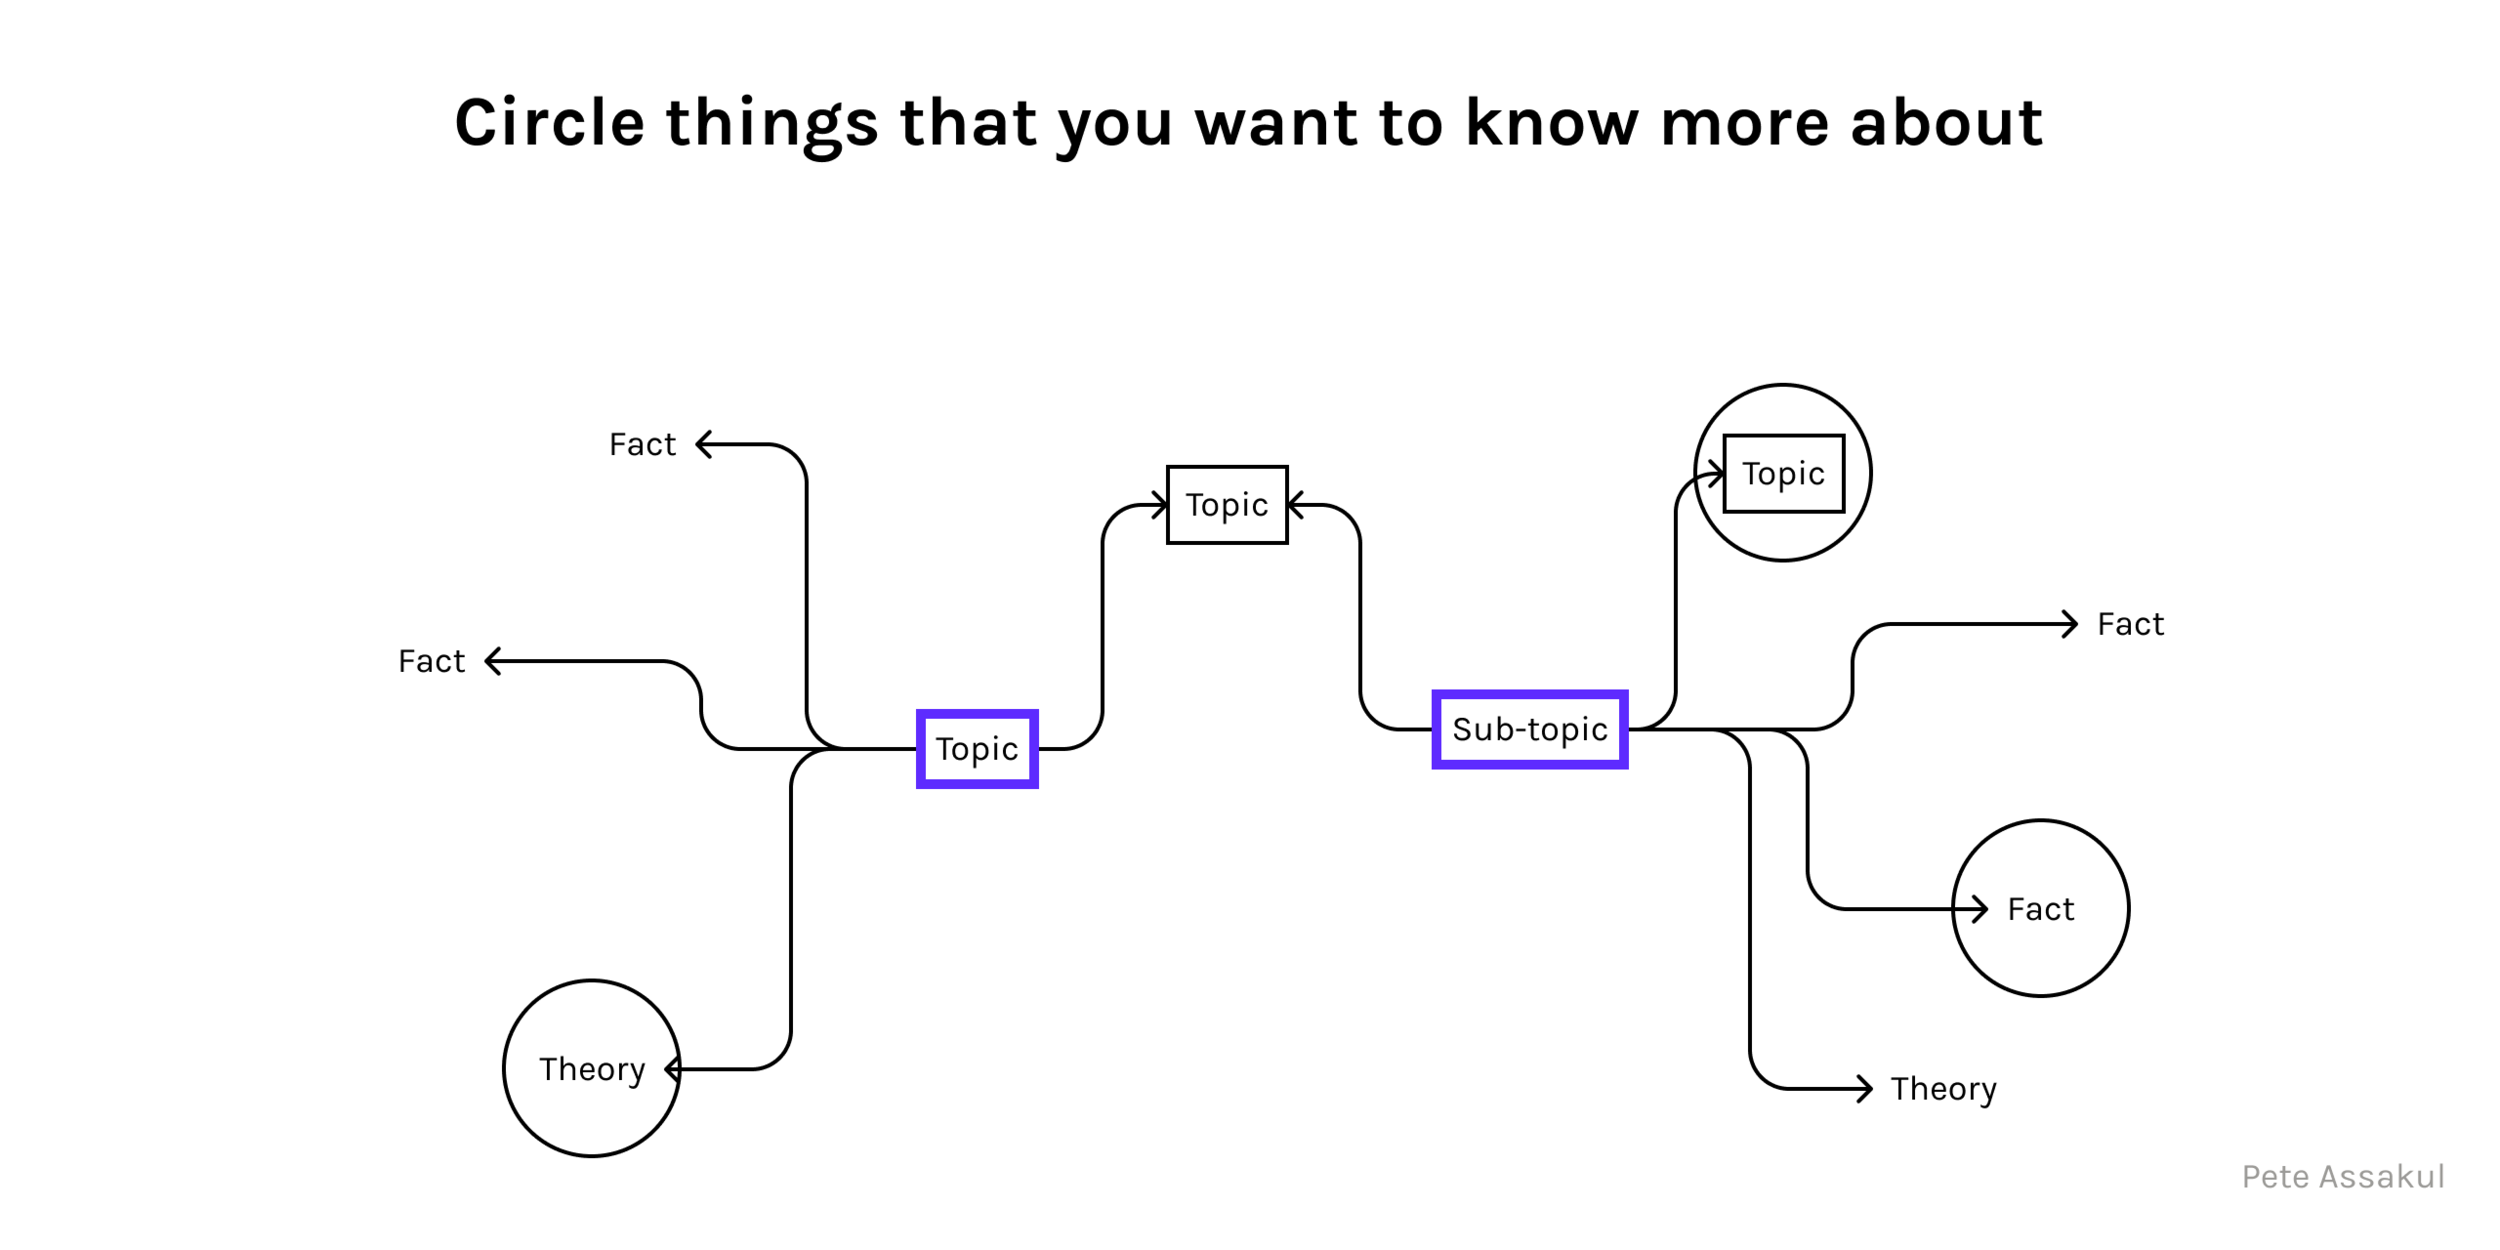
Circle things that you want to know more about.
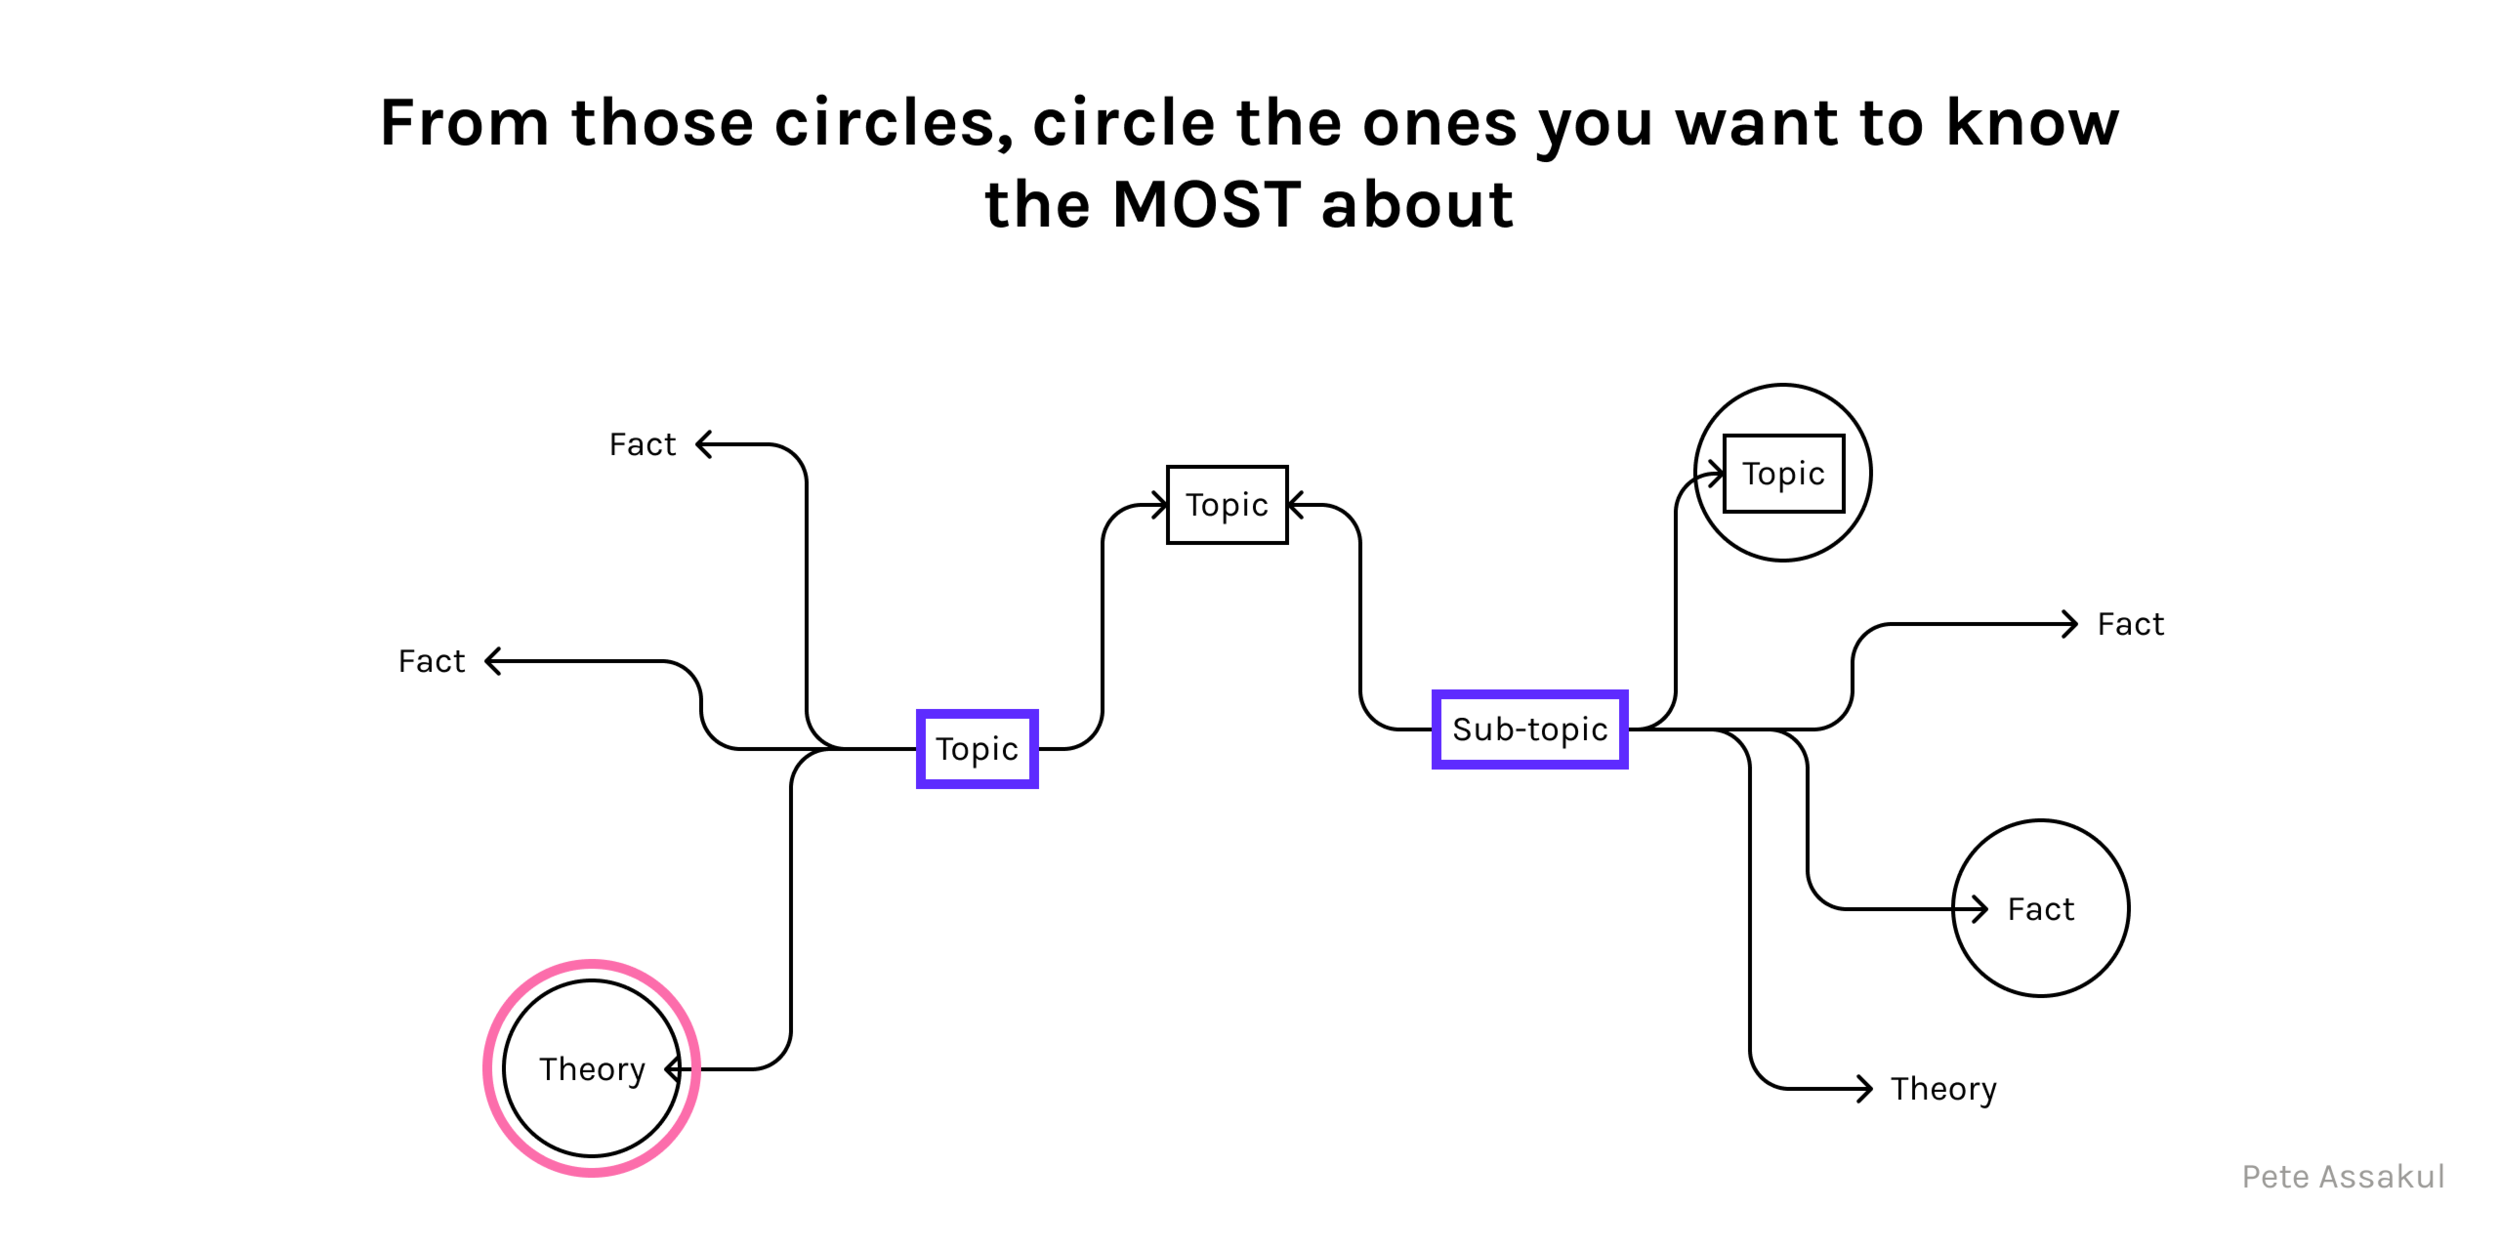
From those circles, circle the ones you want to know the MOST about. This will be your research theme.
Technique 17: Lamy’s Topos
This chart helps you answer and clarify concepts that you are learning about. It originated from Bernard Lamy, a French mathematician.

Chapter 8: Searching for Materials
Technique 22: Research Log
The log is divided into two parts. The first part are things you have to answer before starting your research. The second part is things you answer after your research.
Before you research:
What are things you already know?
What do you want to know out of the research?
How should you research?
After the research
What did you learn?
What do you still not understand?
Reflect on your research method
What seems to be useful?

Chapter 10: Organizing Collected Materials
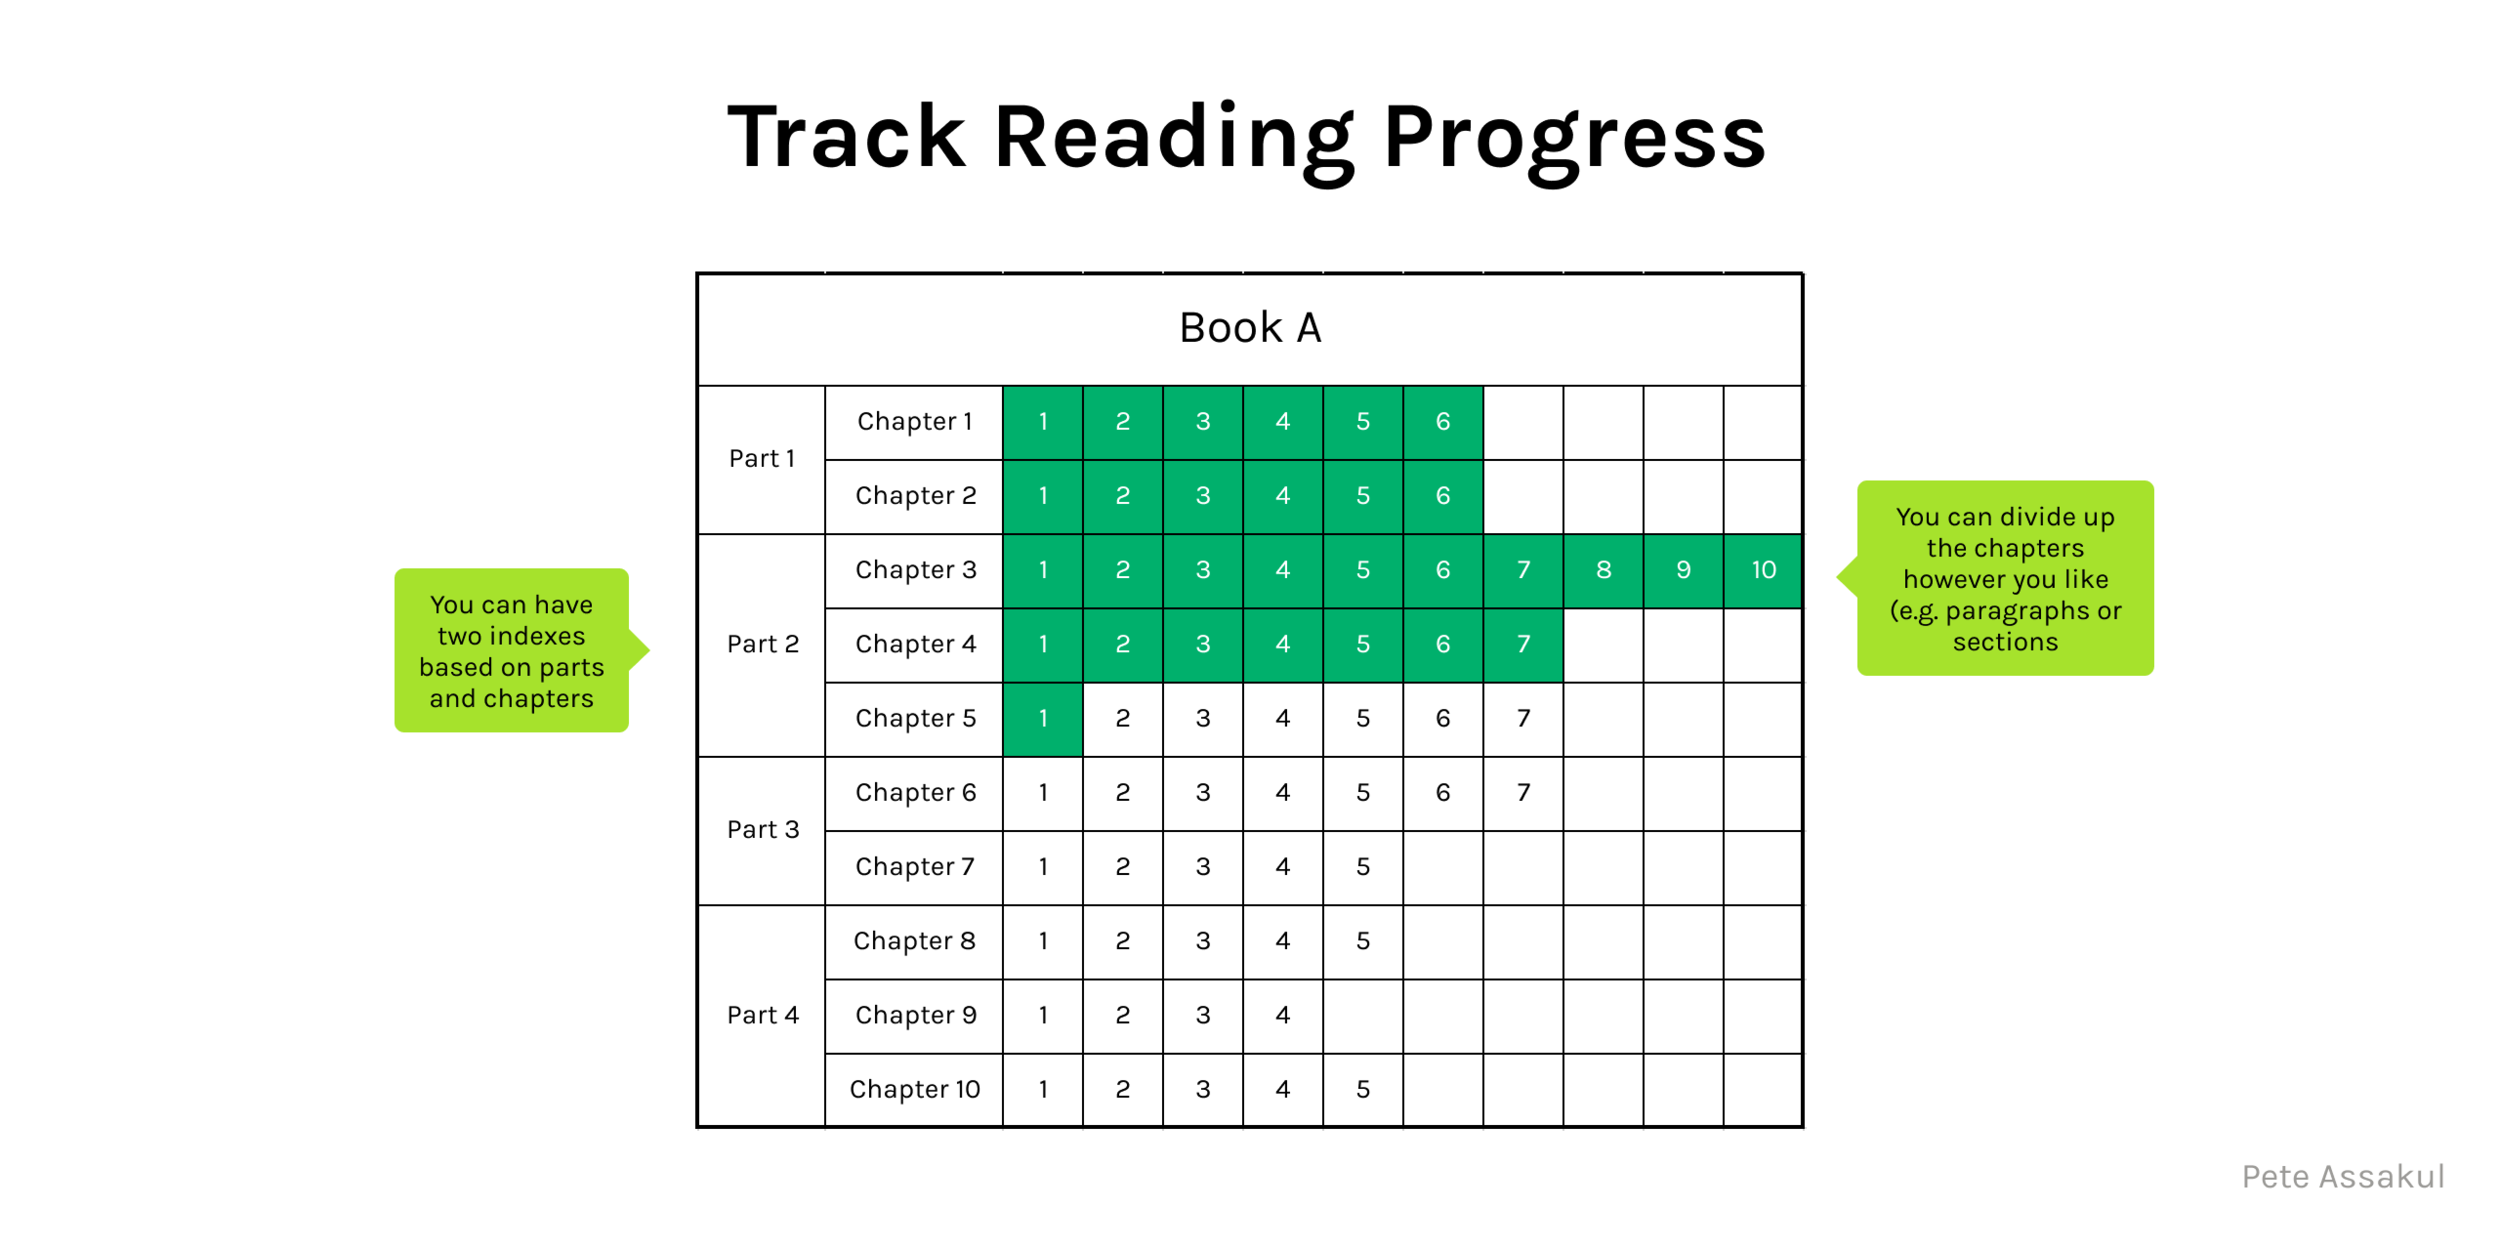
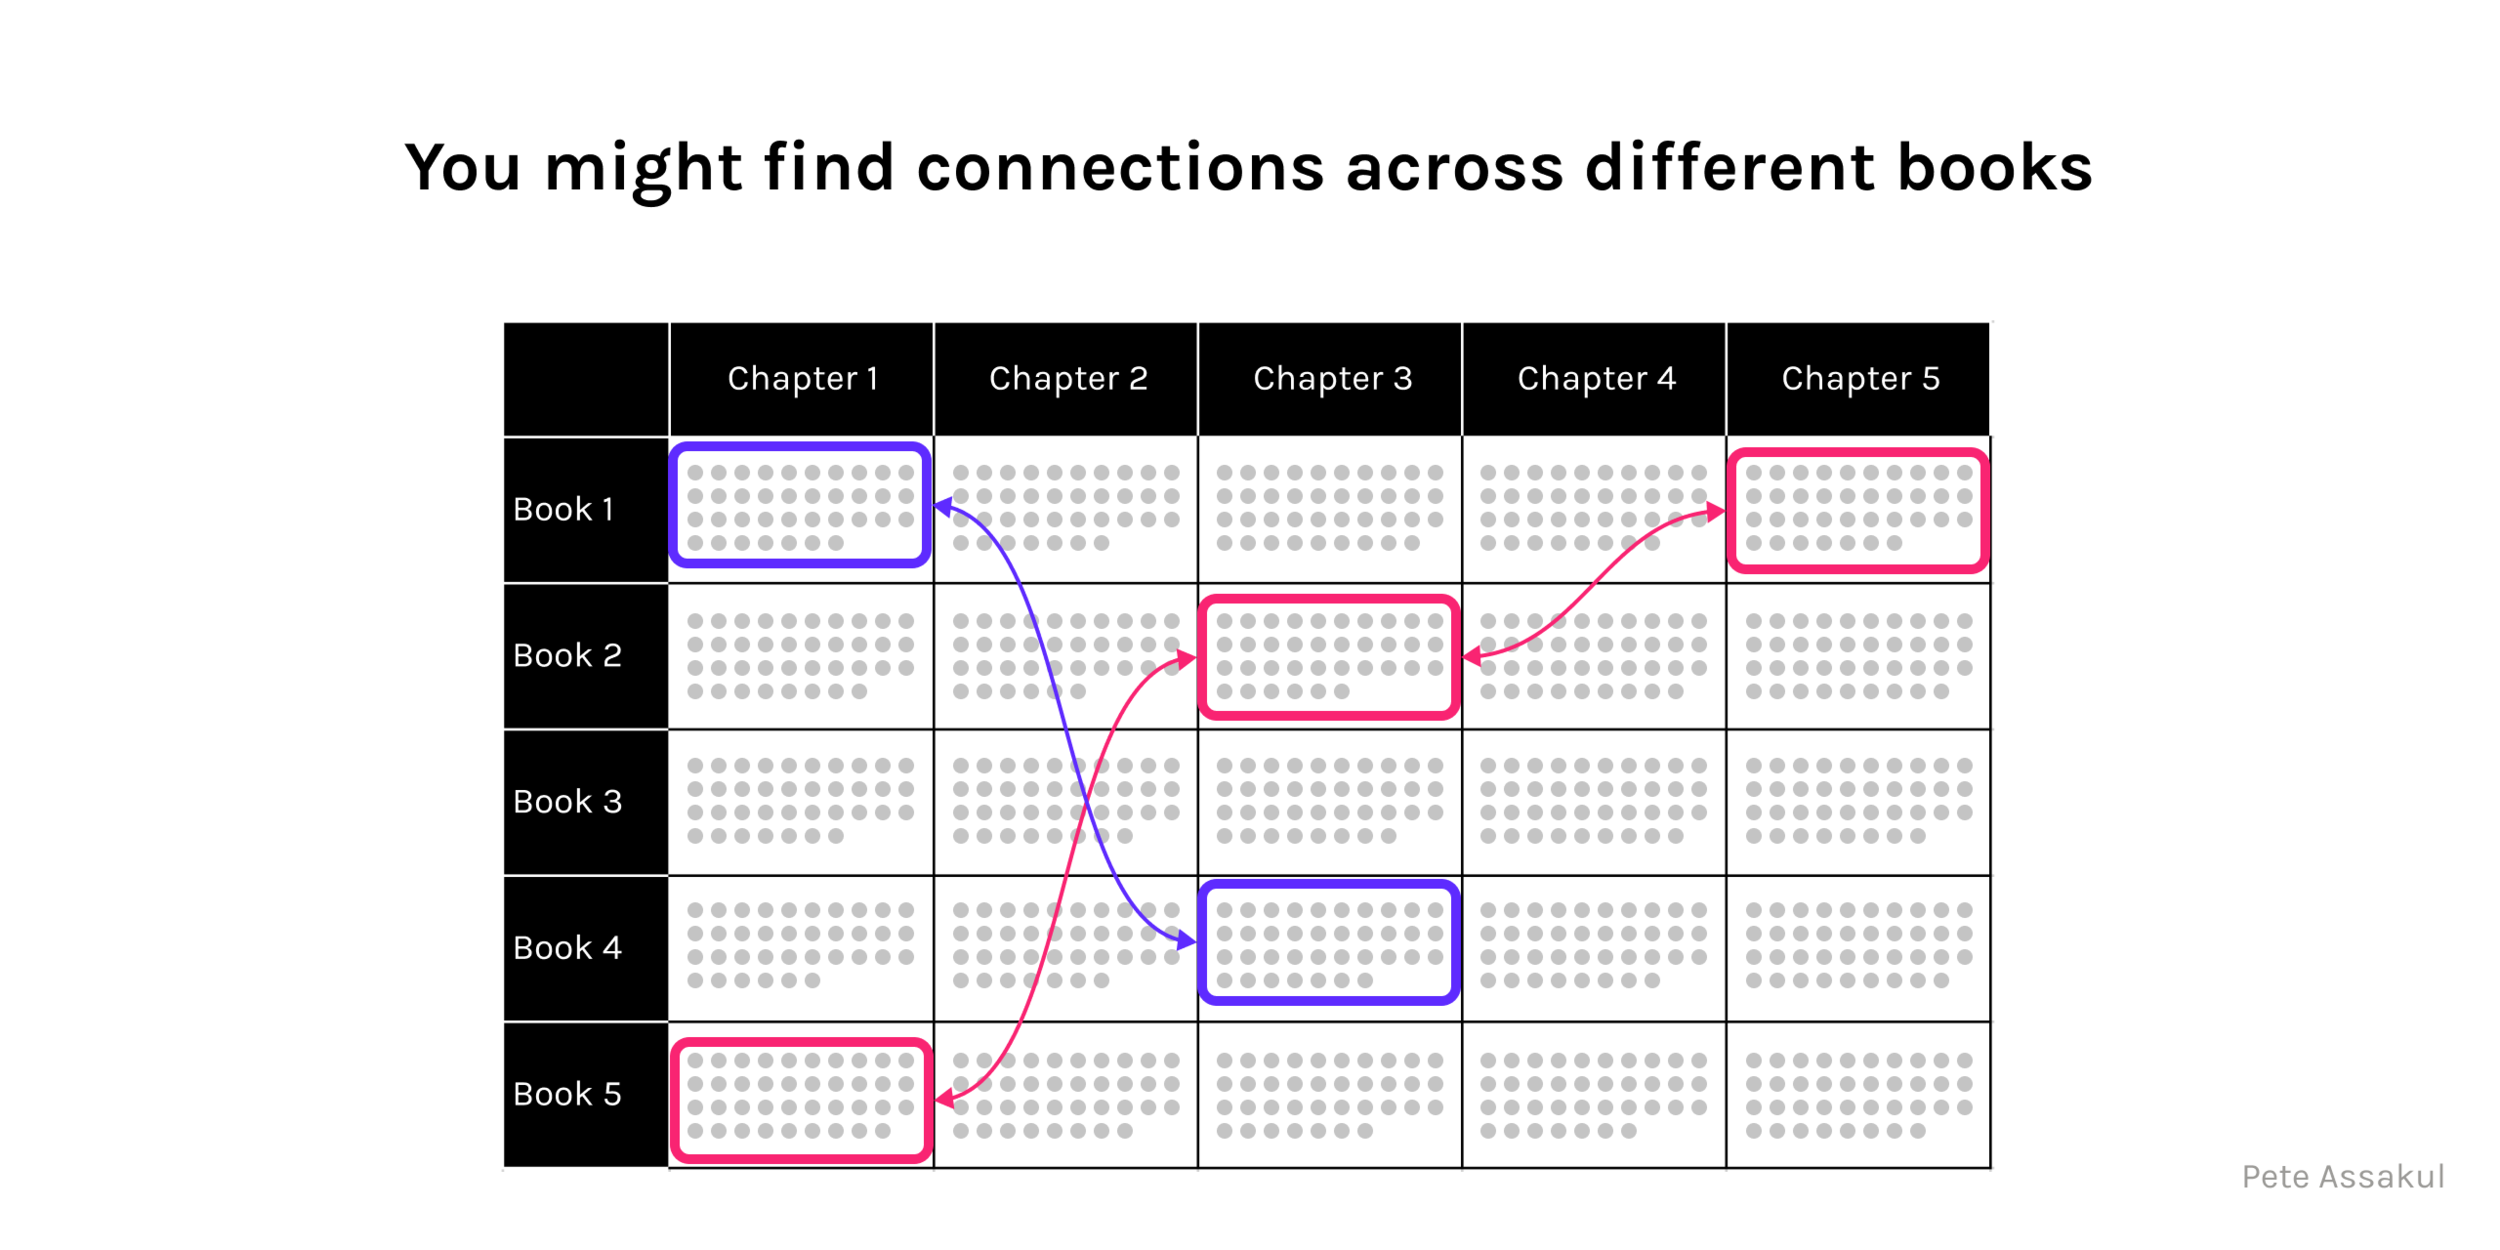
Technique 28: Table of Contents Matrix
Write salient points that you noticed in each chapter. You can use this matrix to see how ideas are connected to each other.

Technique 30: Element Matrix
Arrange the book in chronological order
Determine the element that you want to extract. The sample of elements that you can extract are below
Bibliographic information
Year of issue
Purpose of the research. Research question
Independent variables, dependent variables (What influences the other?)
Study design
Research target
Data set
Data collection method
Indicators and scale
Statistical method and assumptions
Importance or significance of the research
Disadvantages
Citations
Funder

Chapter 11: Analyzing Collected Resources
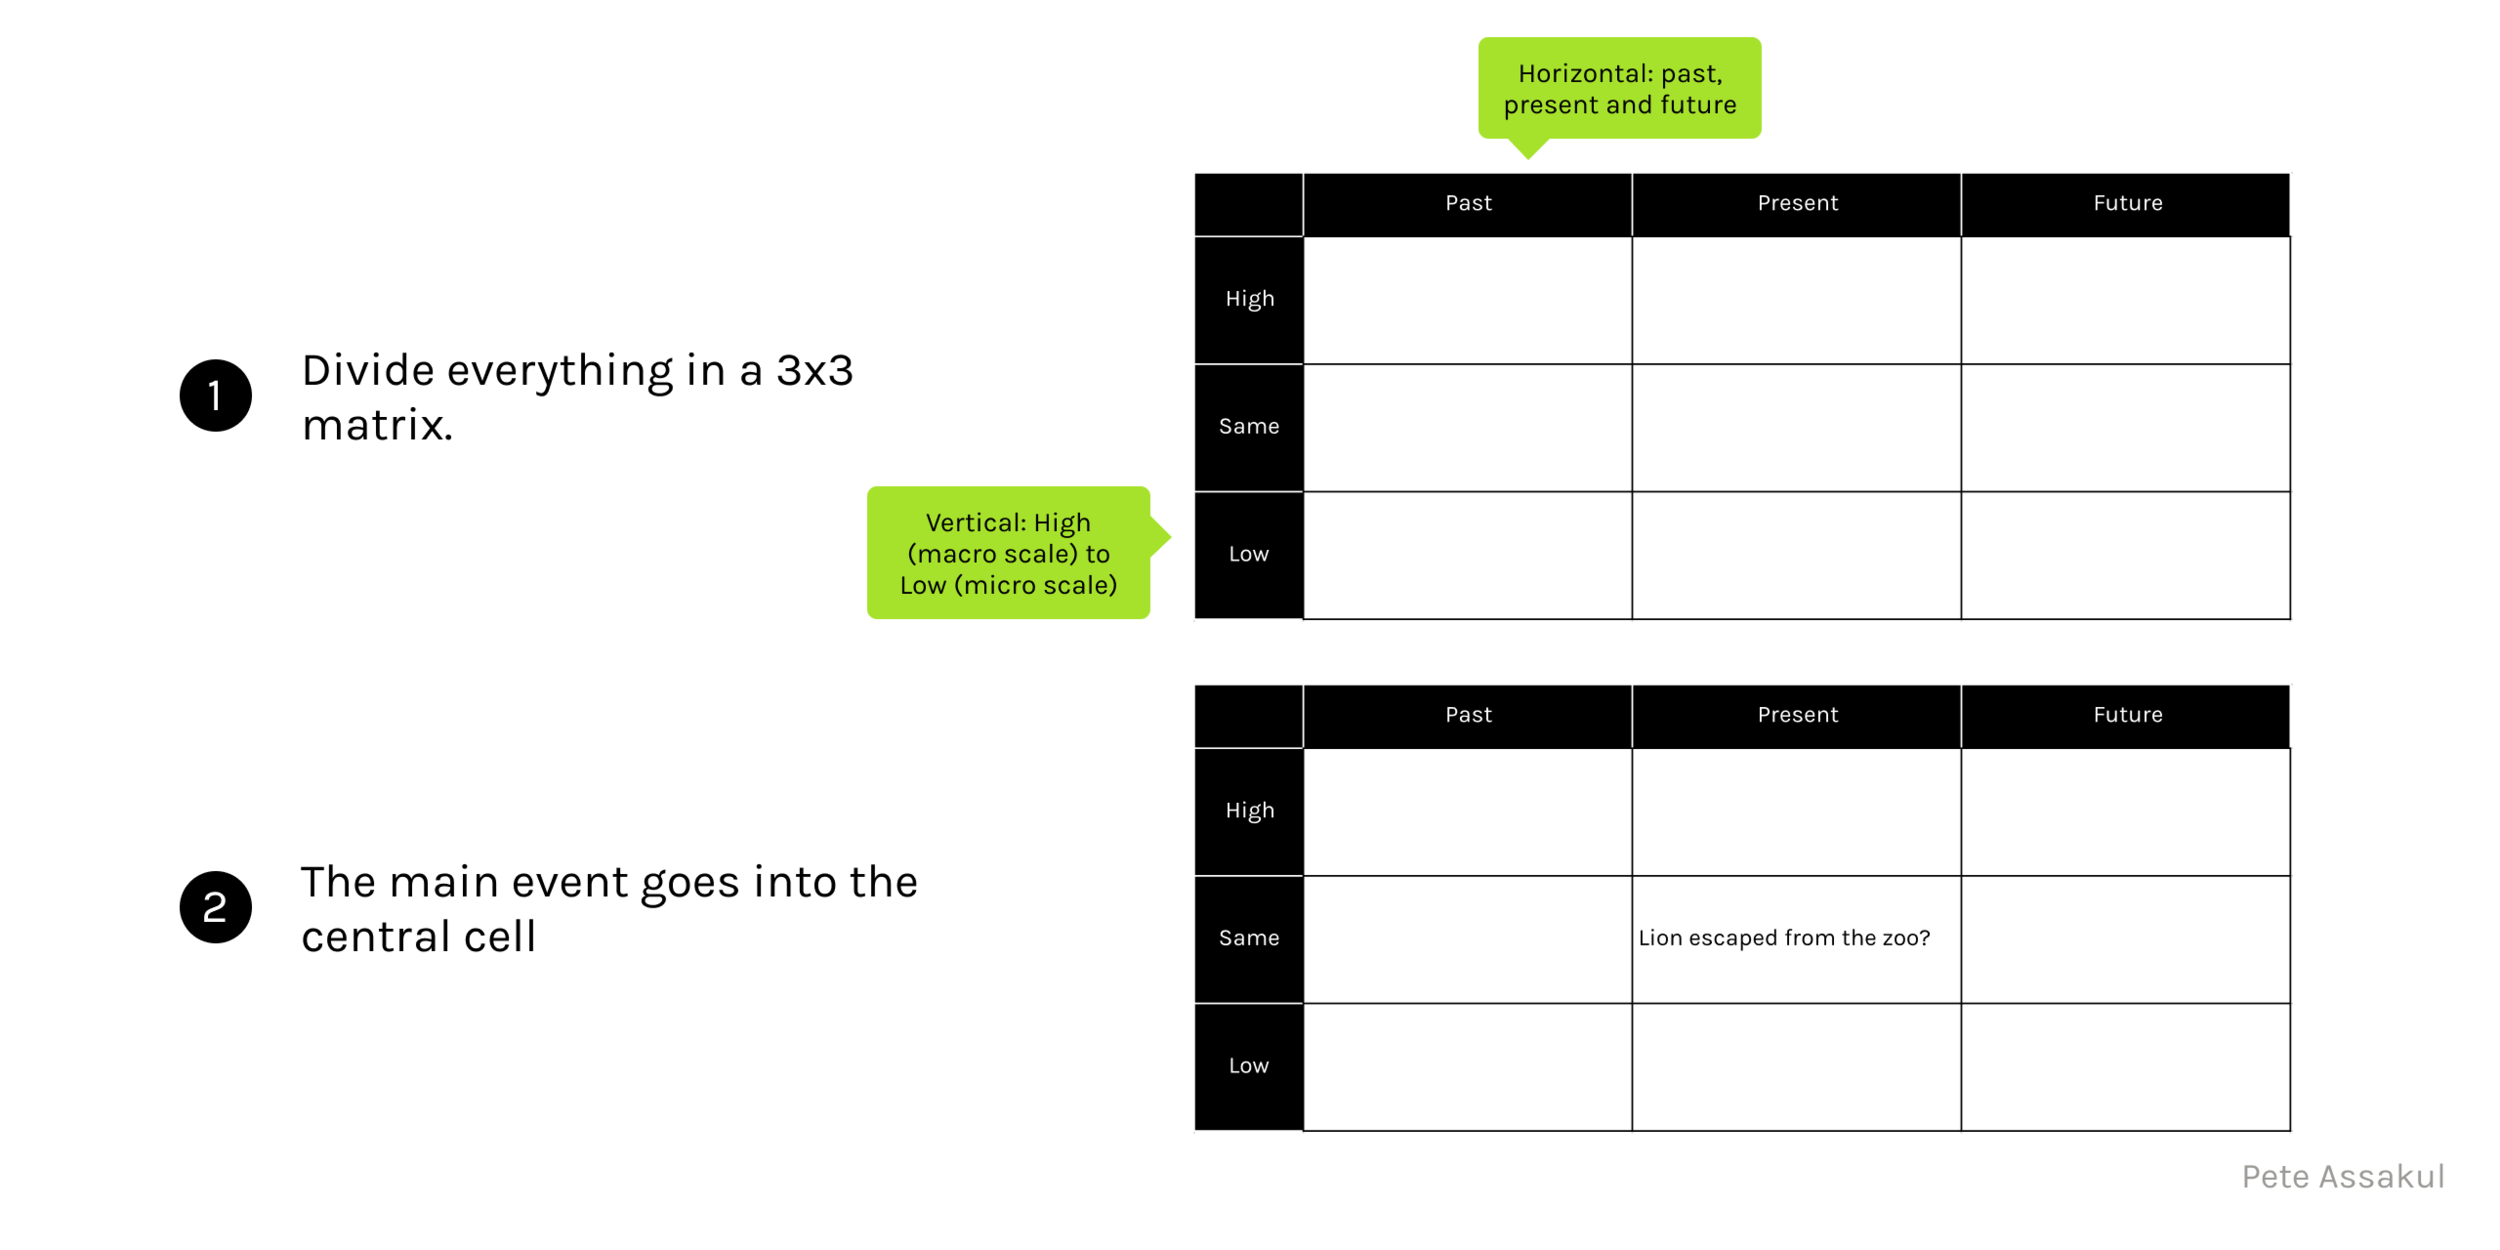
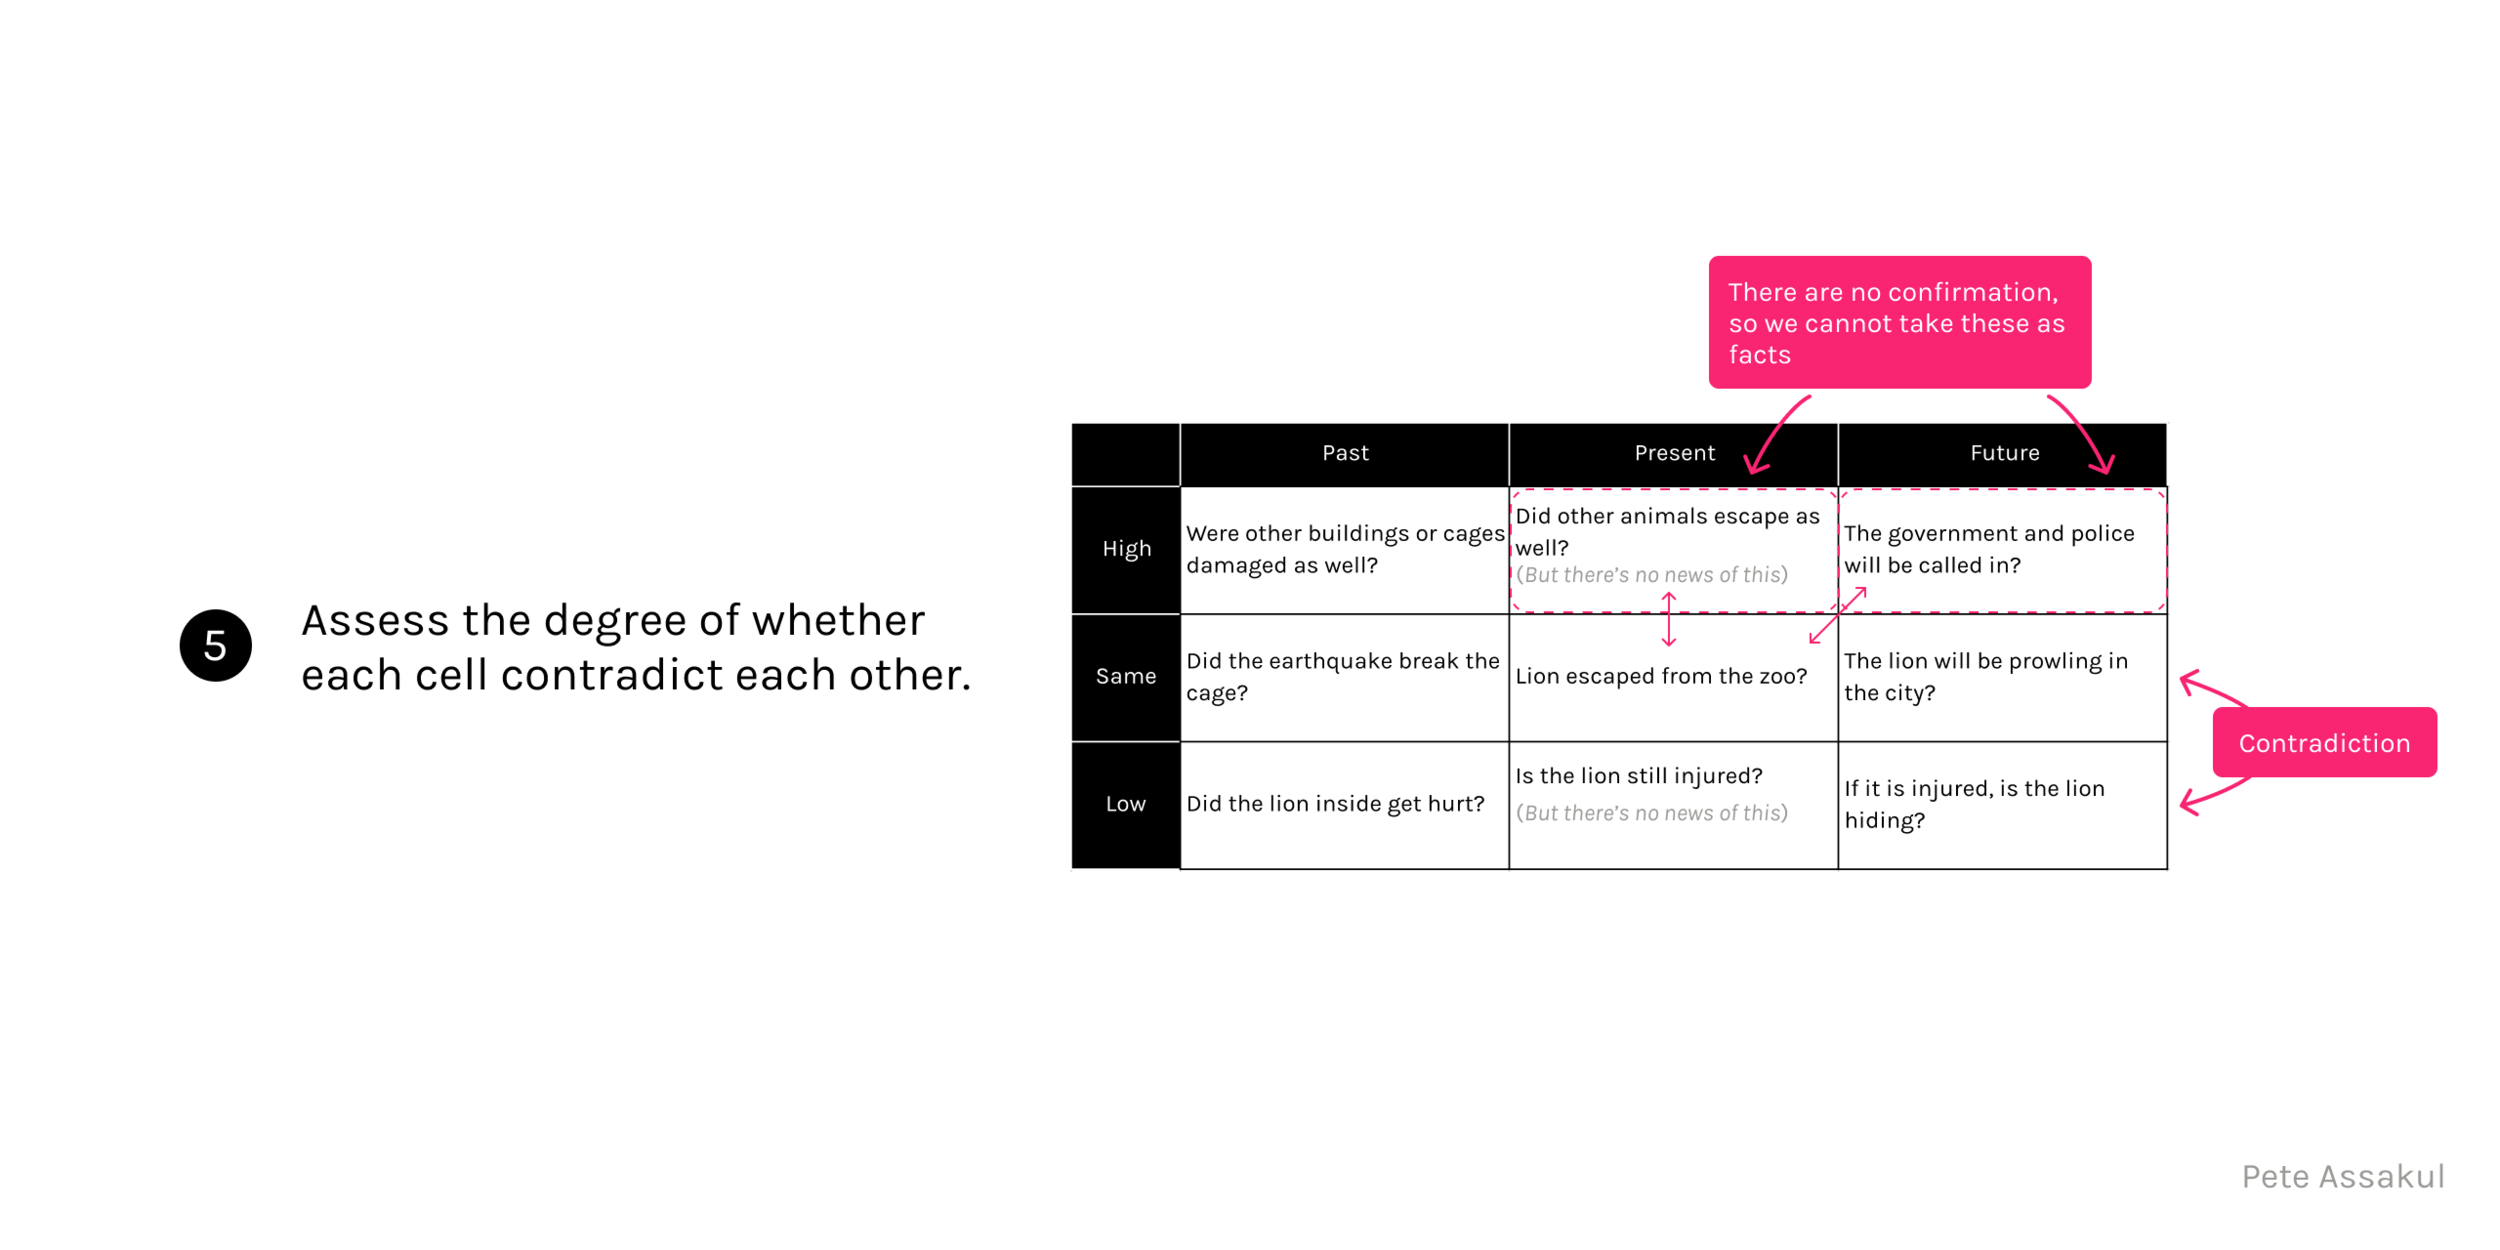
Technique 31: Time Scale Matrix (9-Window Method)
Divide everything in a 3x3 matrix. On the horizontal side, write past, present and future. On the vertical side, write High (macro level), Same and Low (micro level)
The main event goes into the central cell.
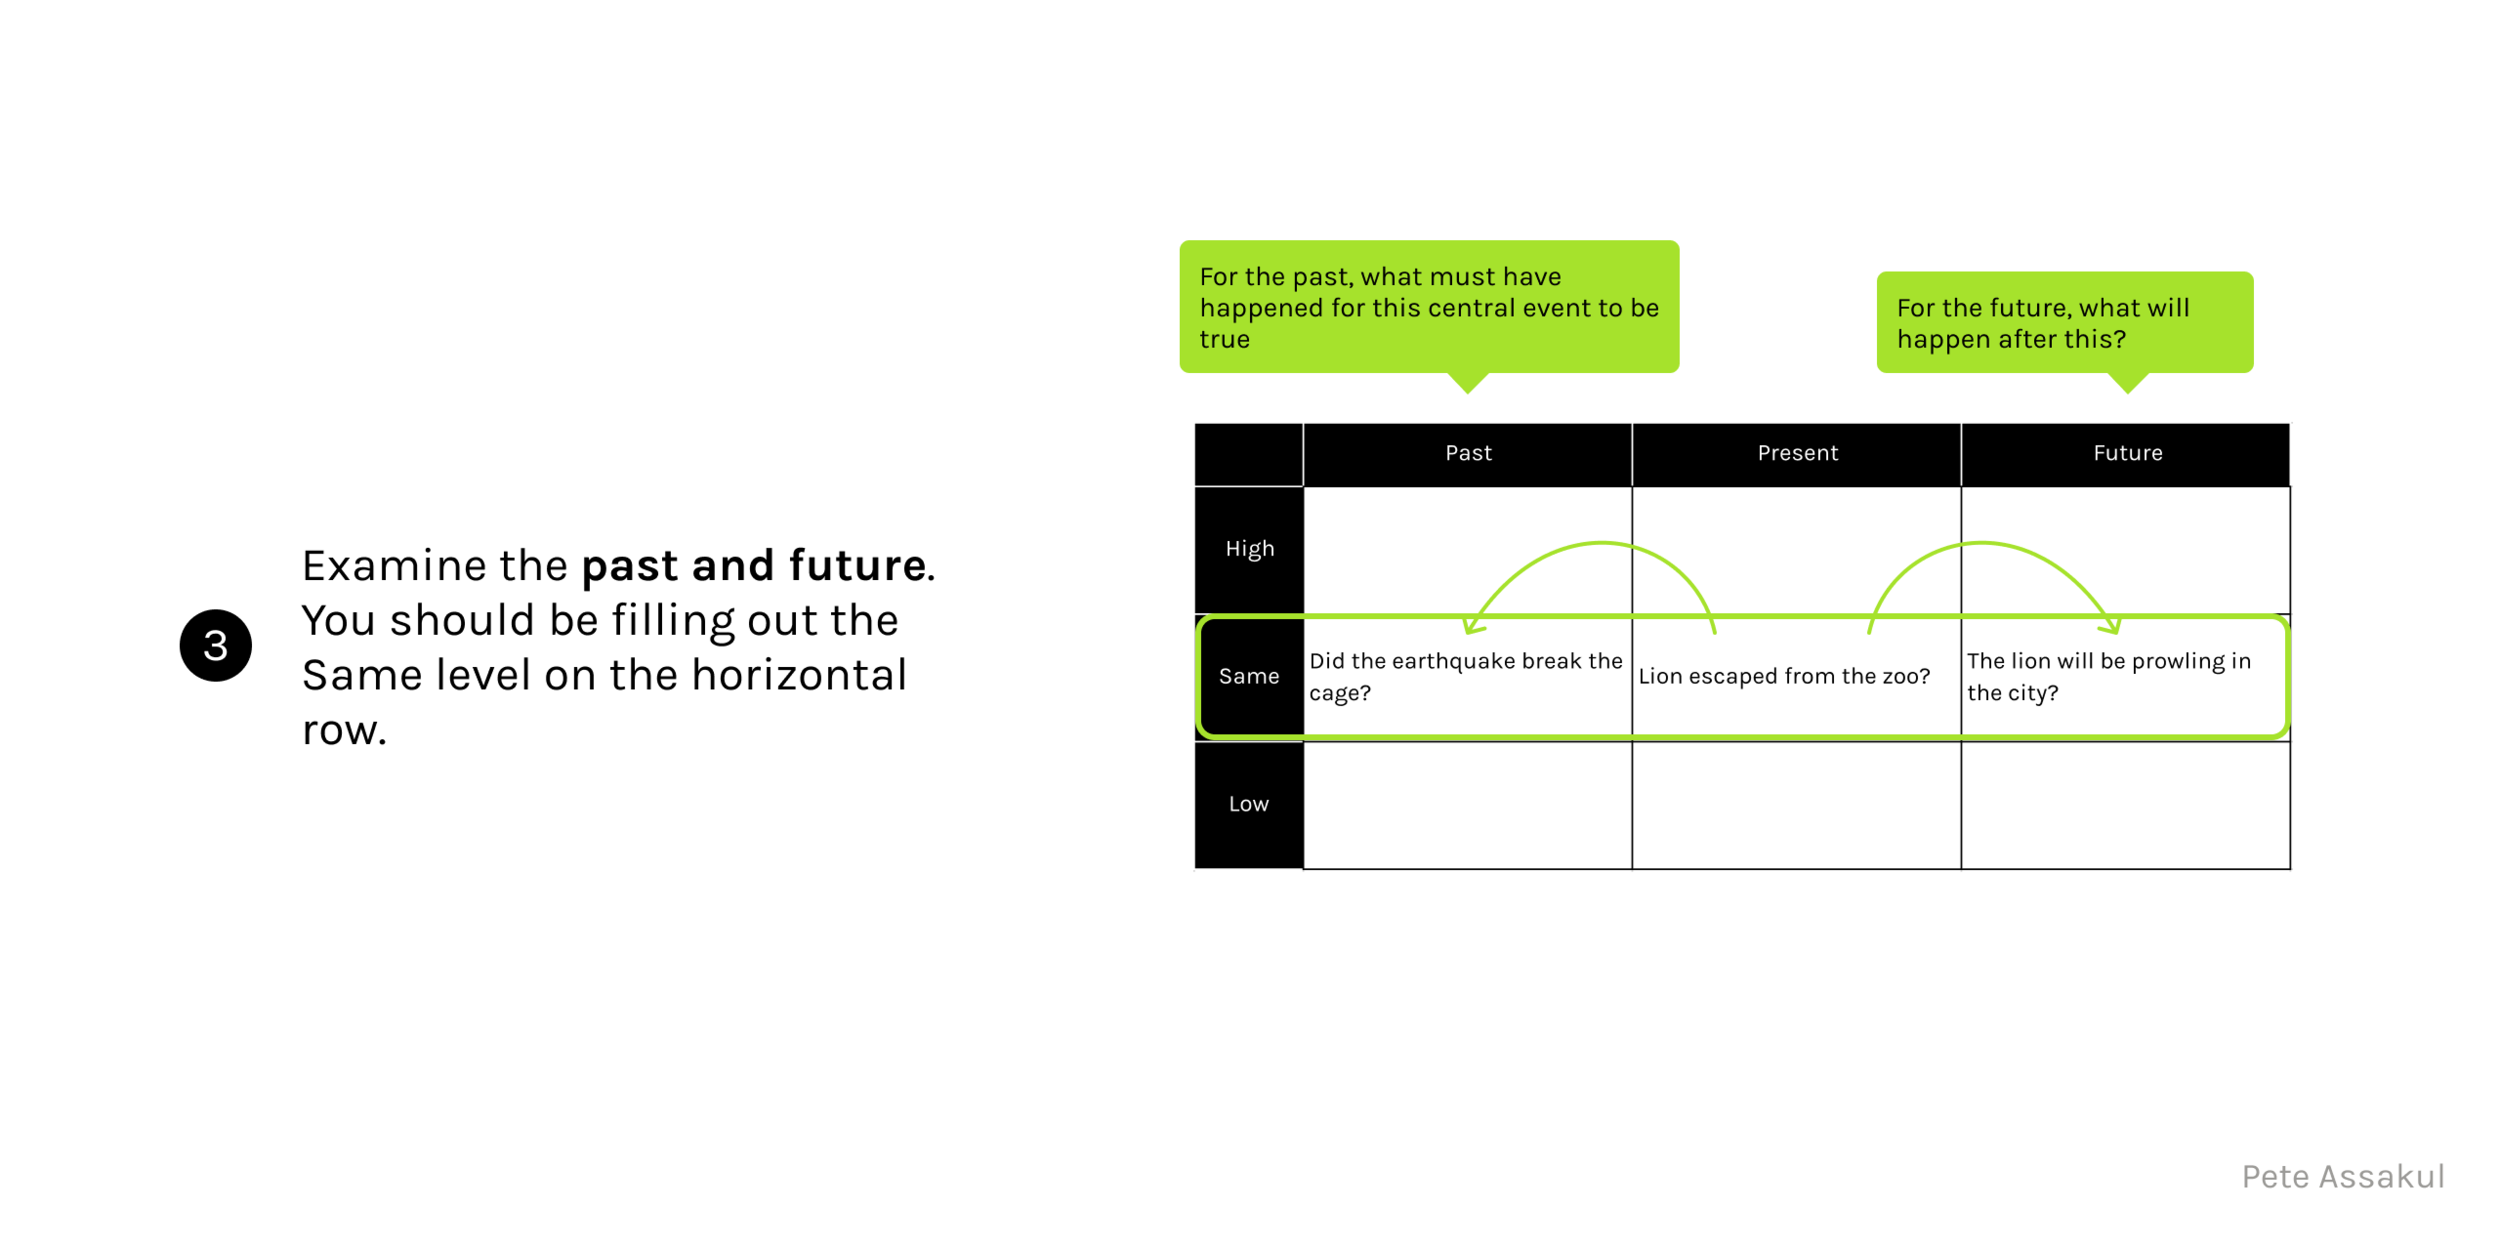
Examine the past and future. For the past, what must have happened for this central event to be true. For the future, what will happen after this? You should be filling out the Same level on the horizontal row.
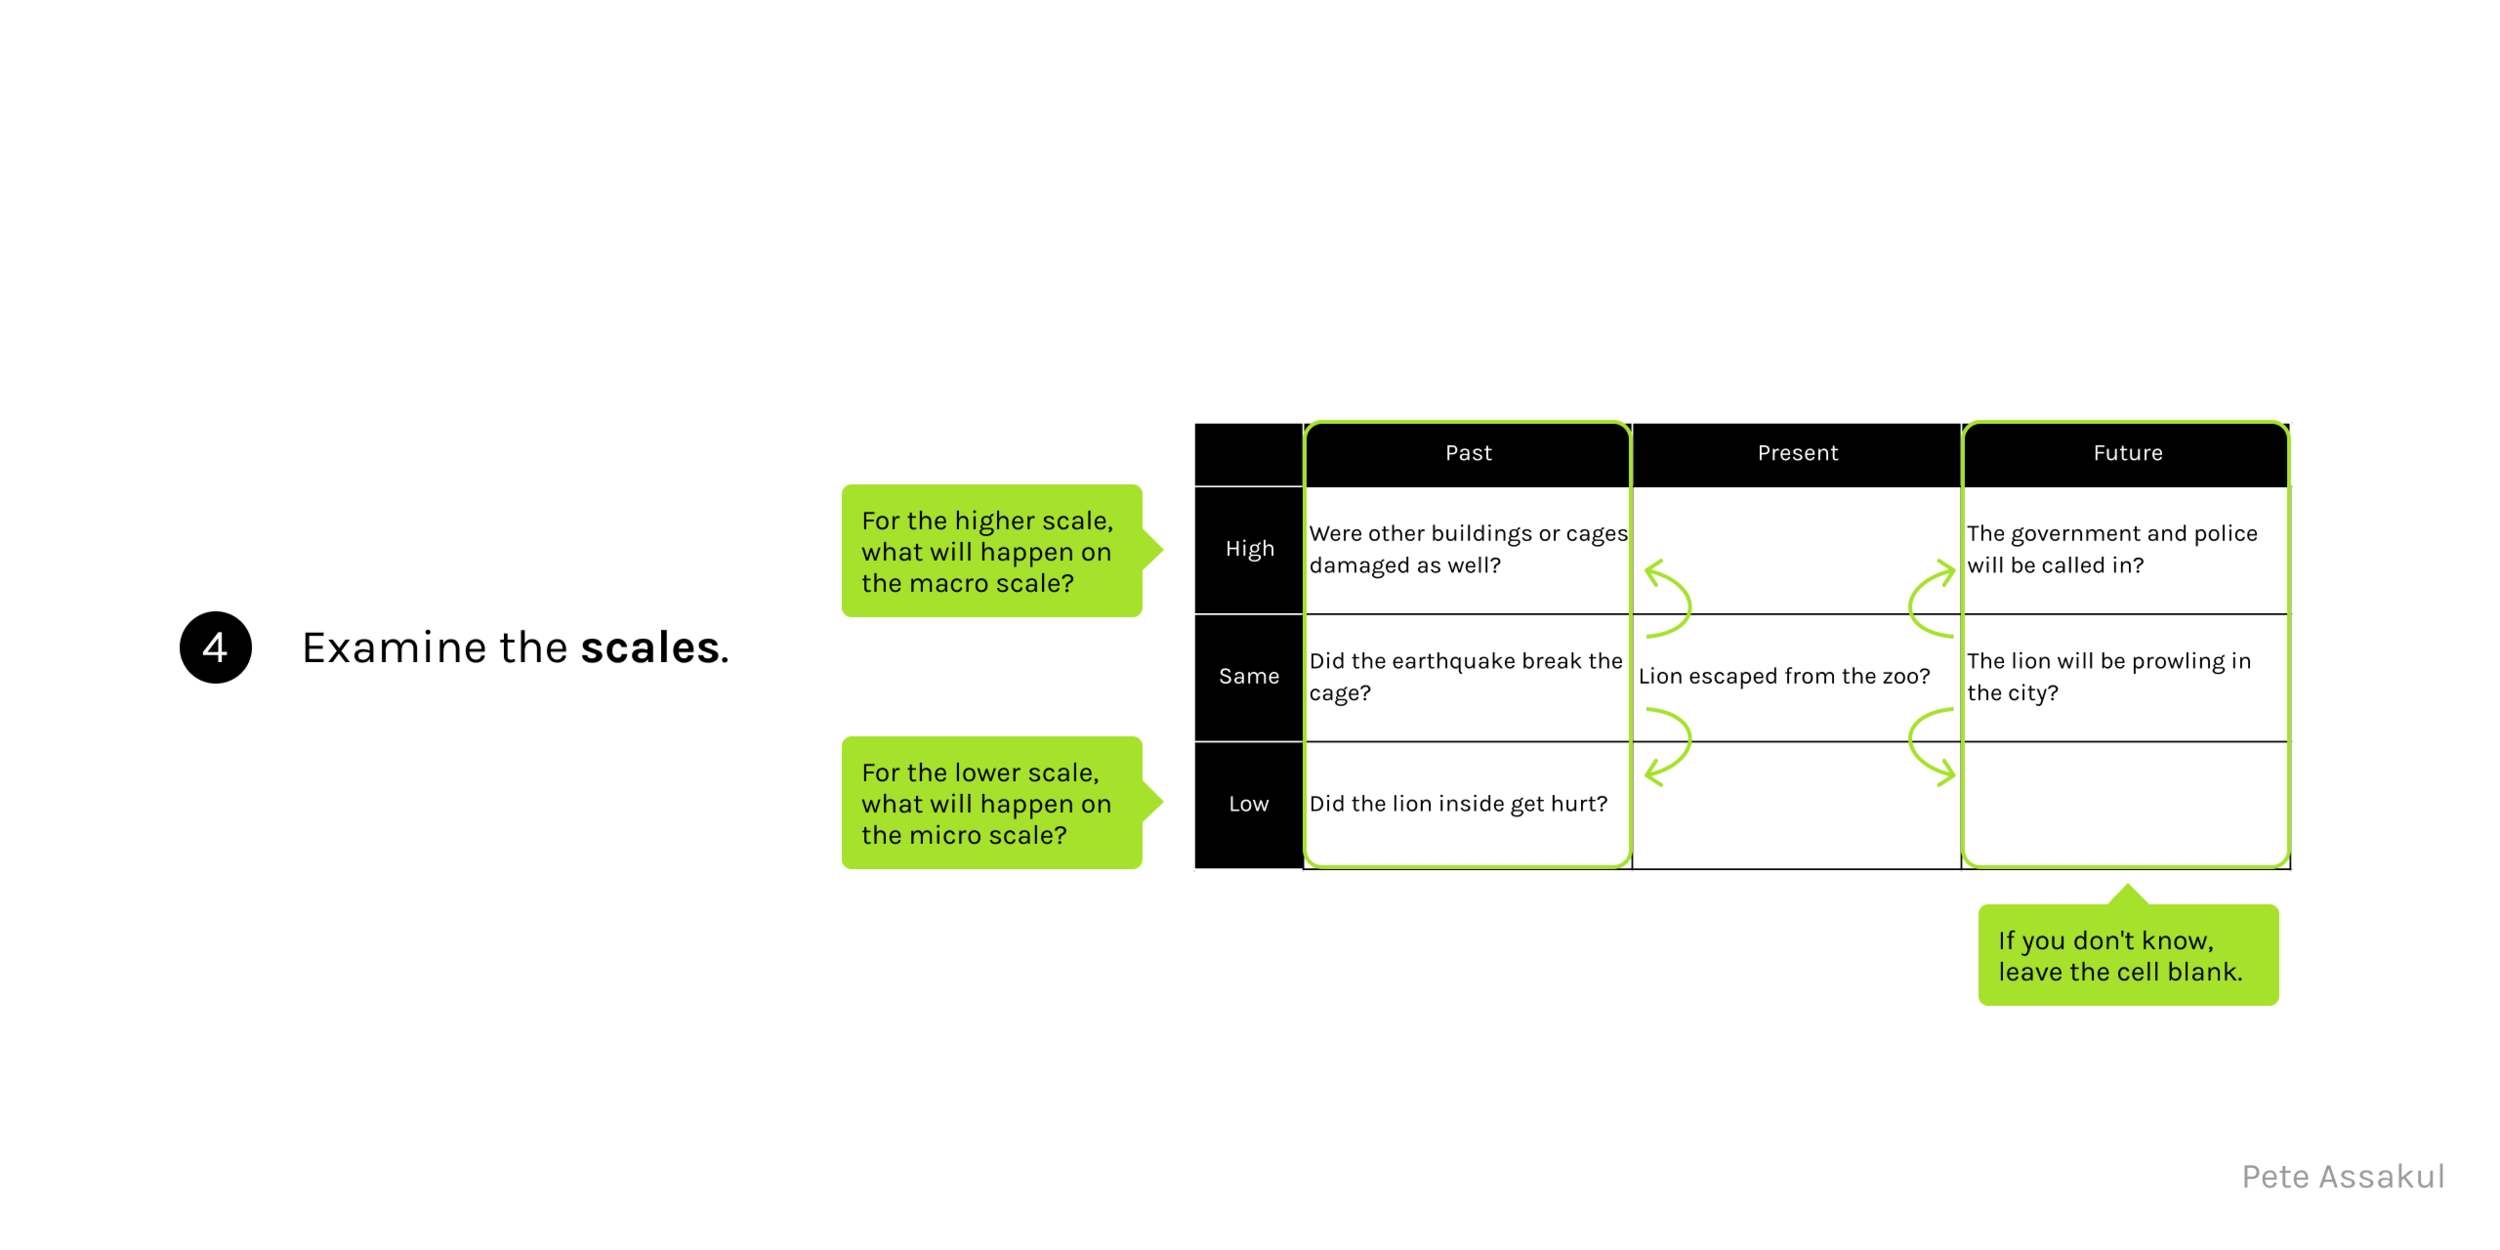
Examine the scales. For the higher scale, what will happen on the macro scale? For the lower scale, what will happen on the micro scale? If you don't know, leave the cell blank.
Check the consistency between what you wrote down. Fill in the blank area given what you already wrote. Consider whether there are contradictions.
Assess the degree of whether each cell contradicts each other.
Part 3: How Should I learn?
Chapter 12: Reading Methods
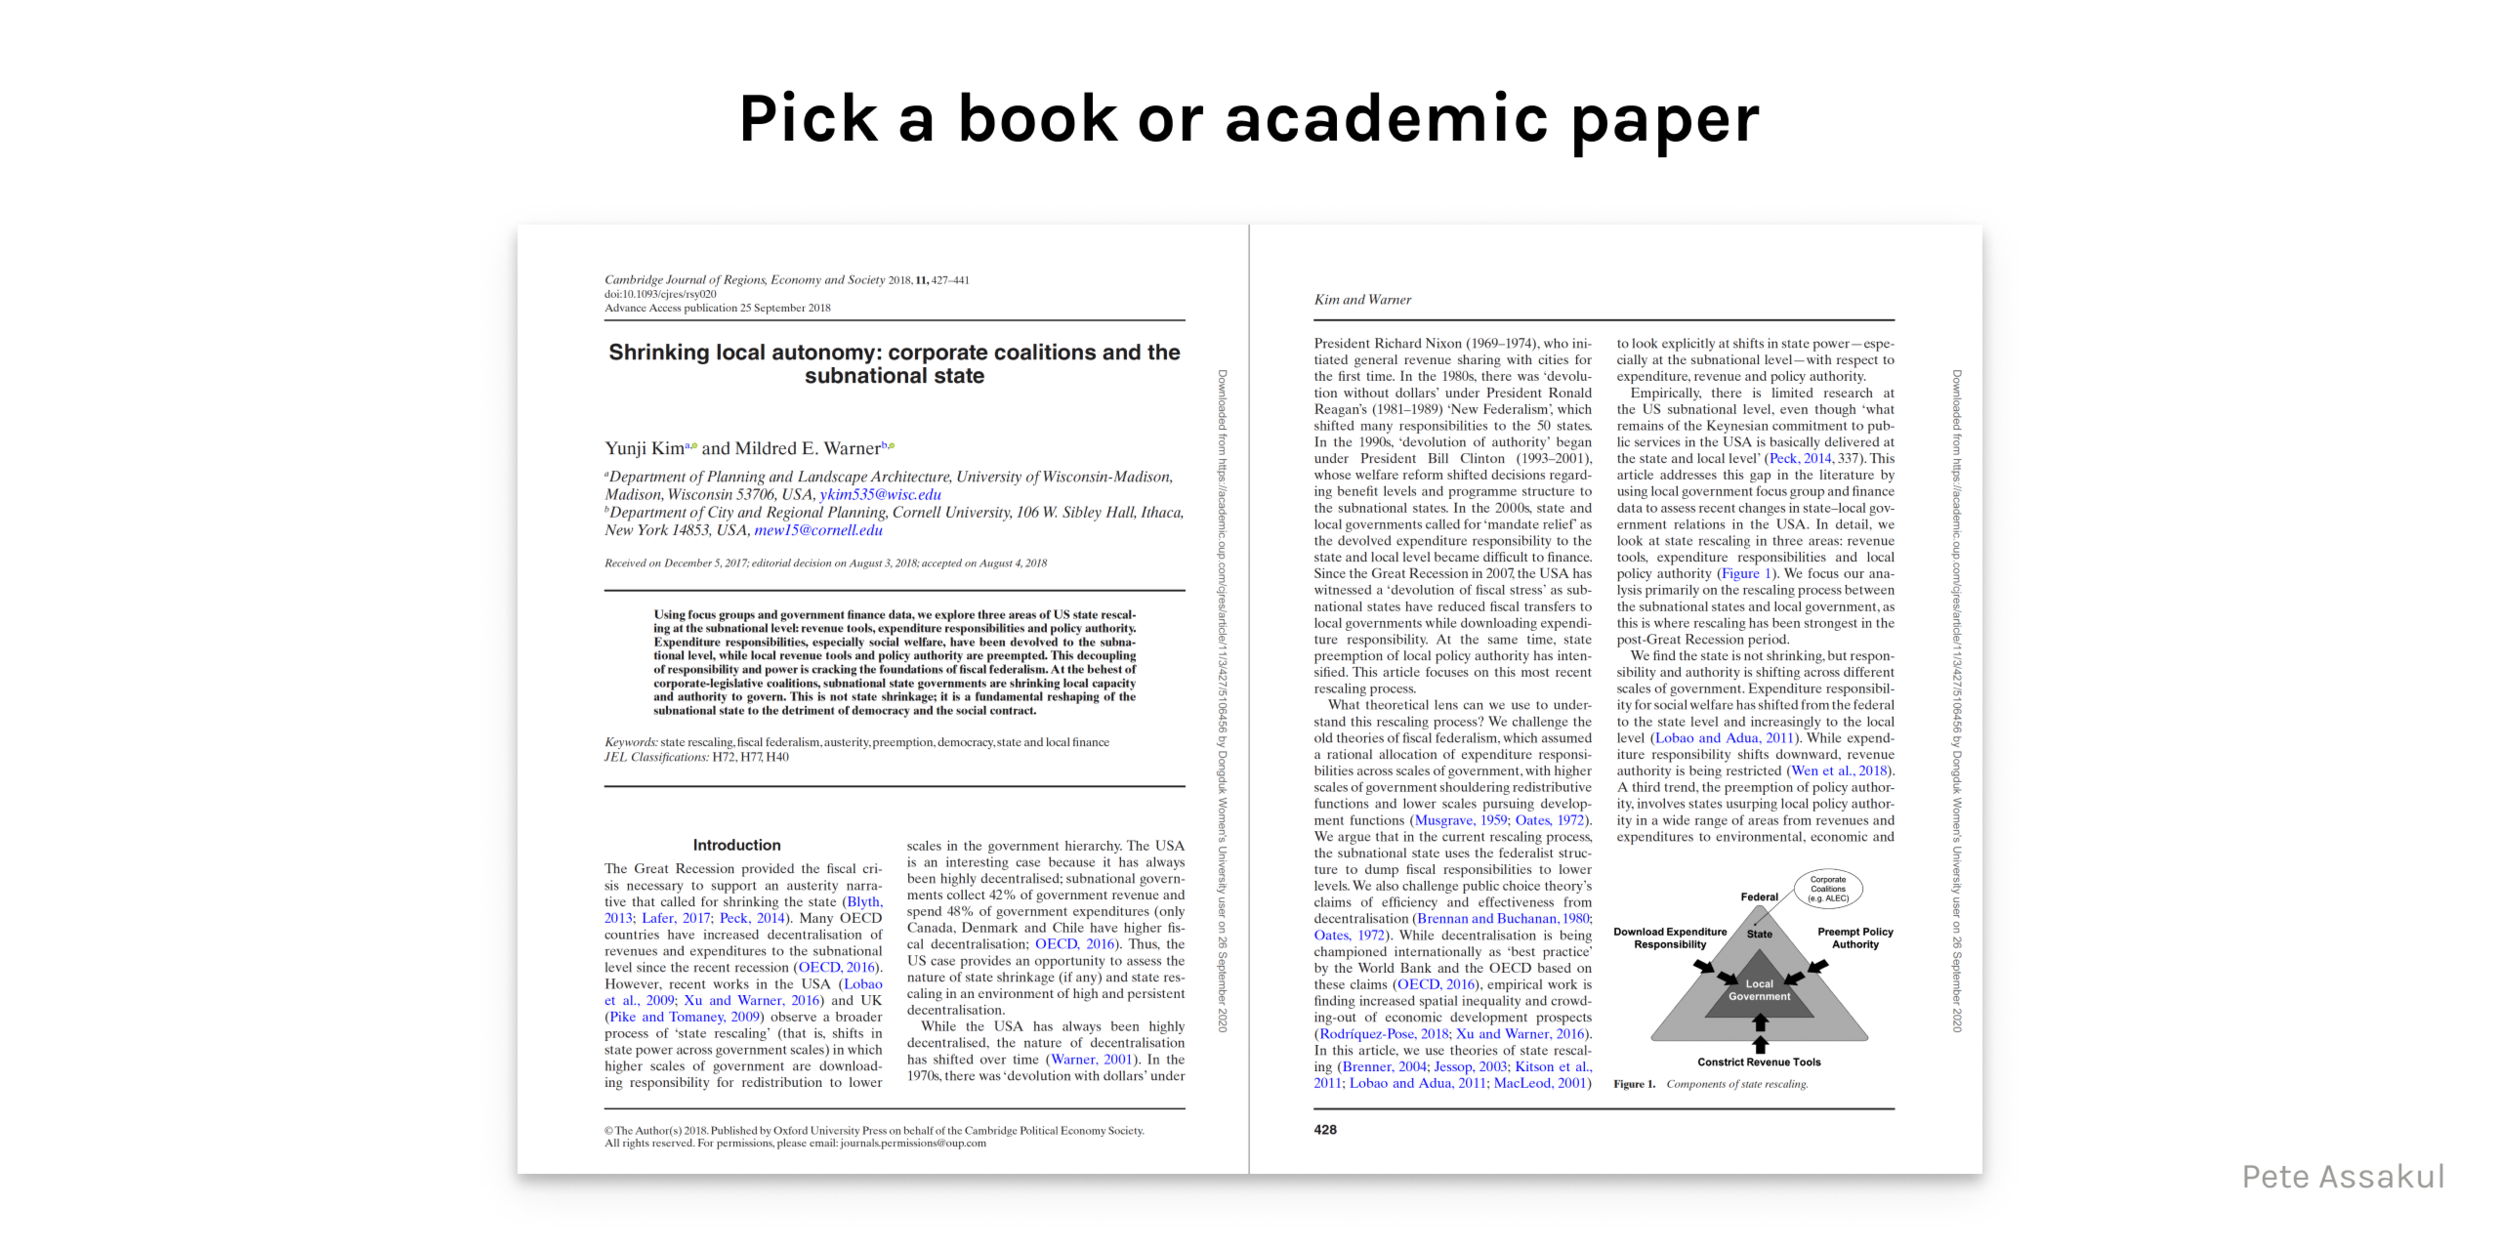
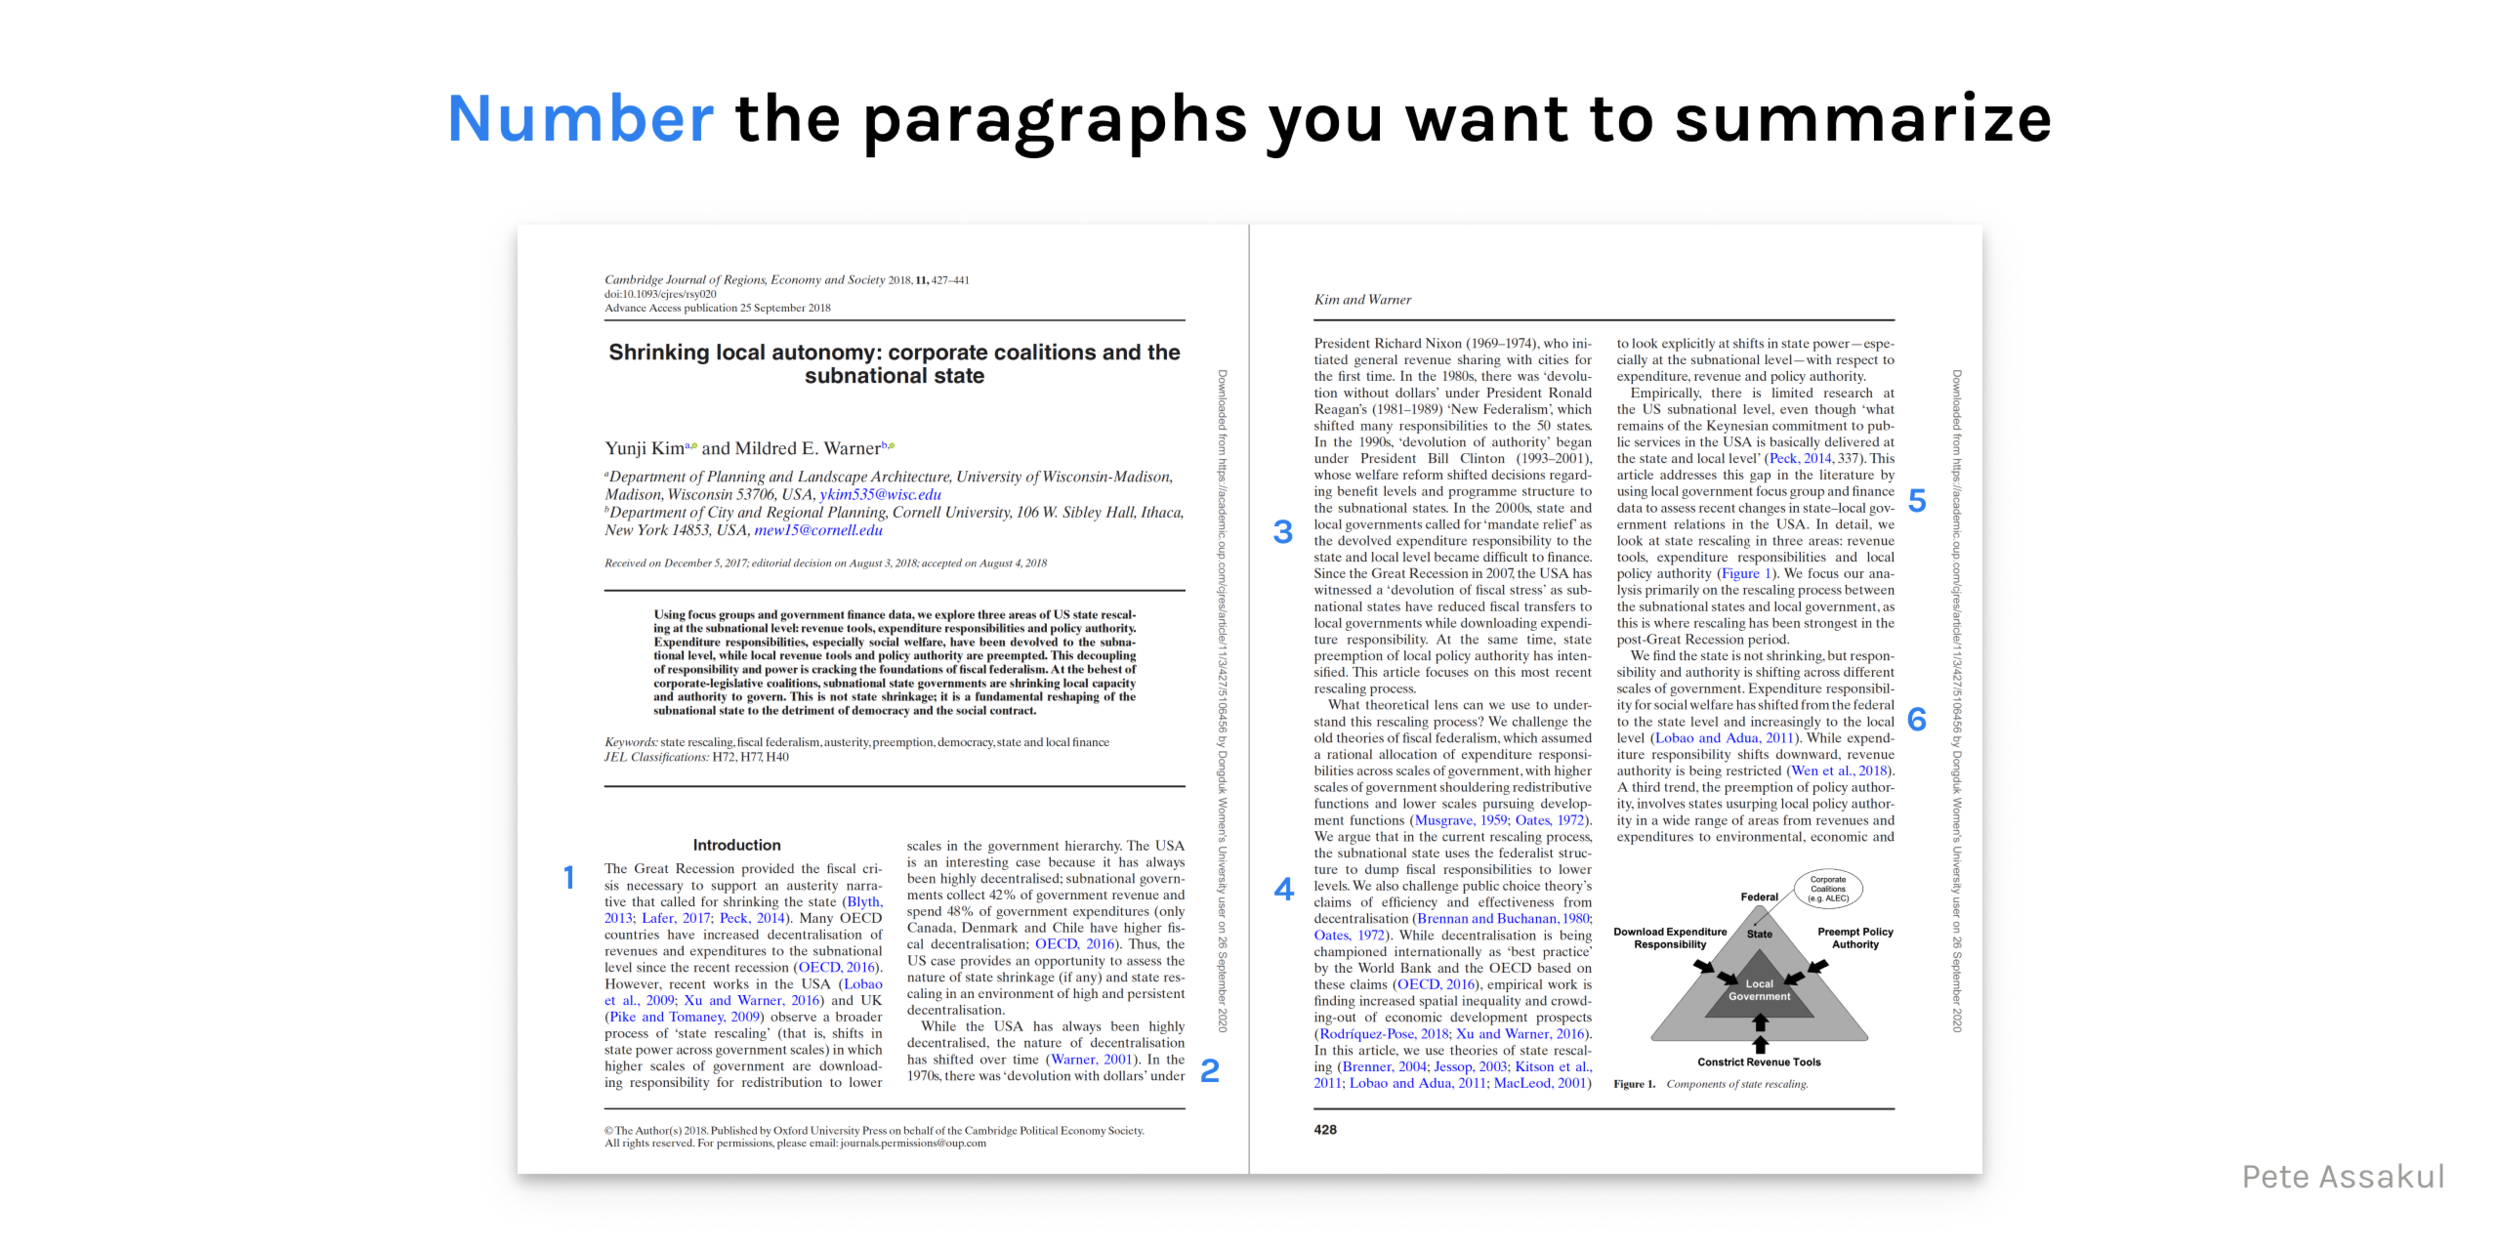
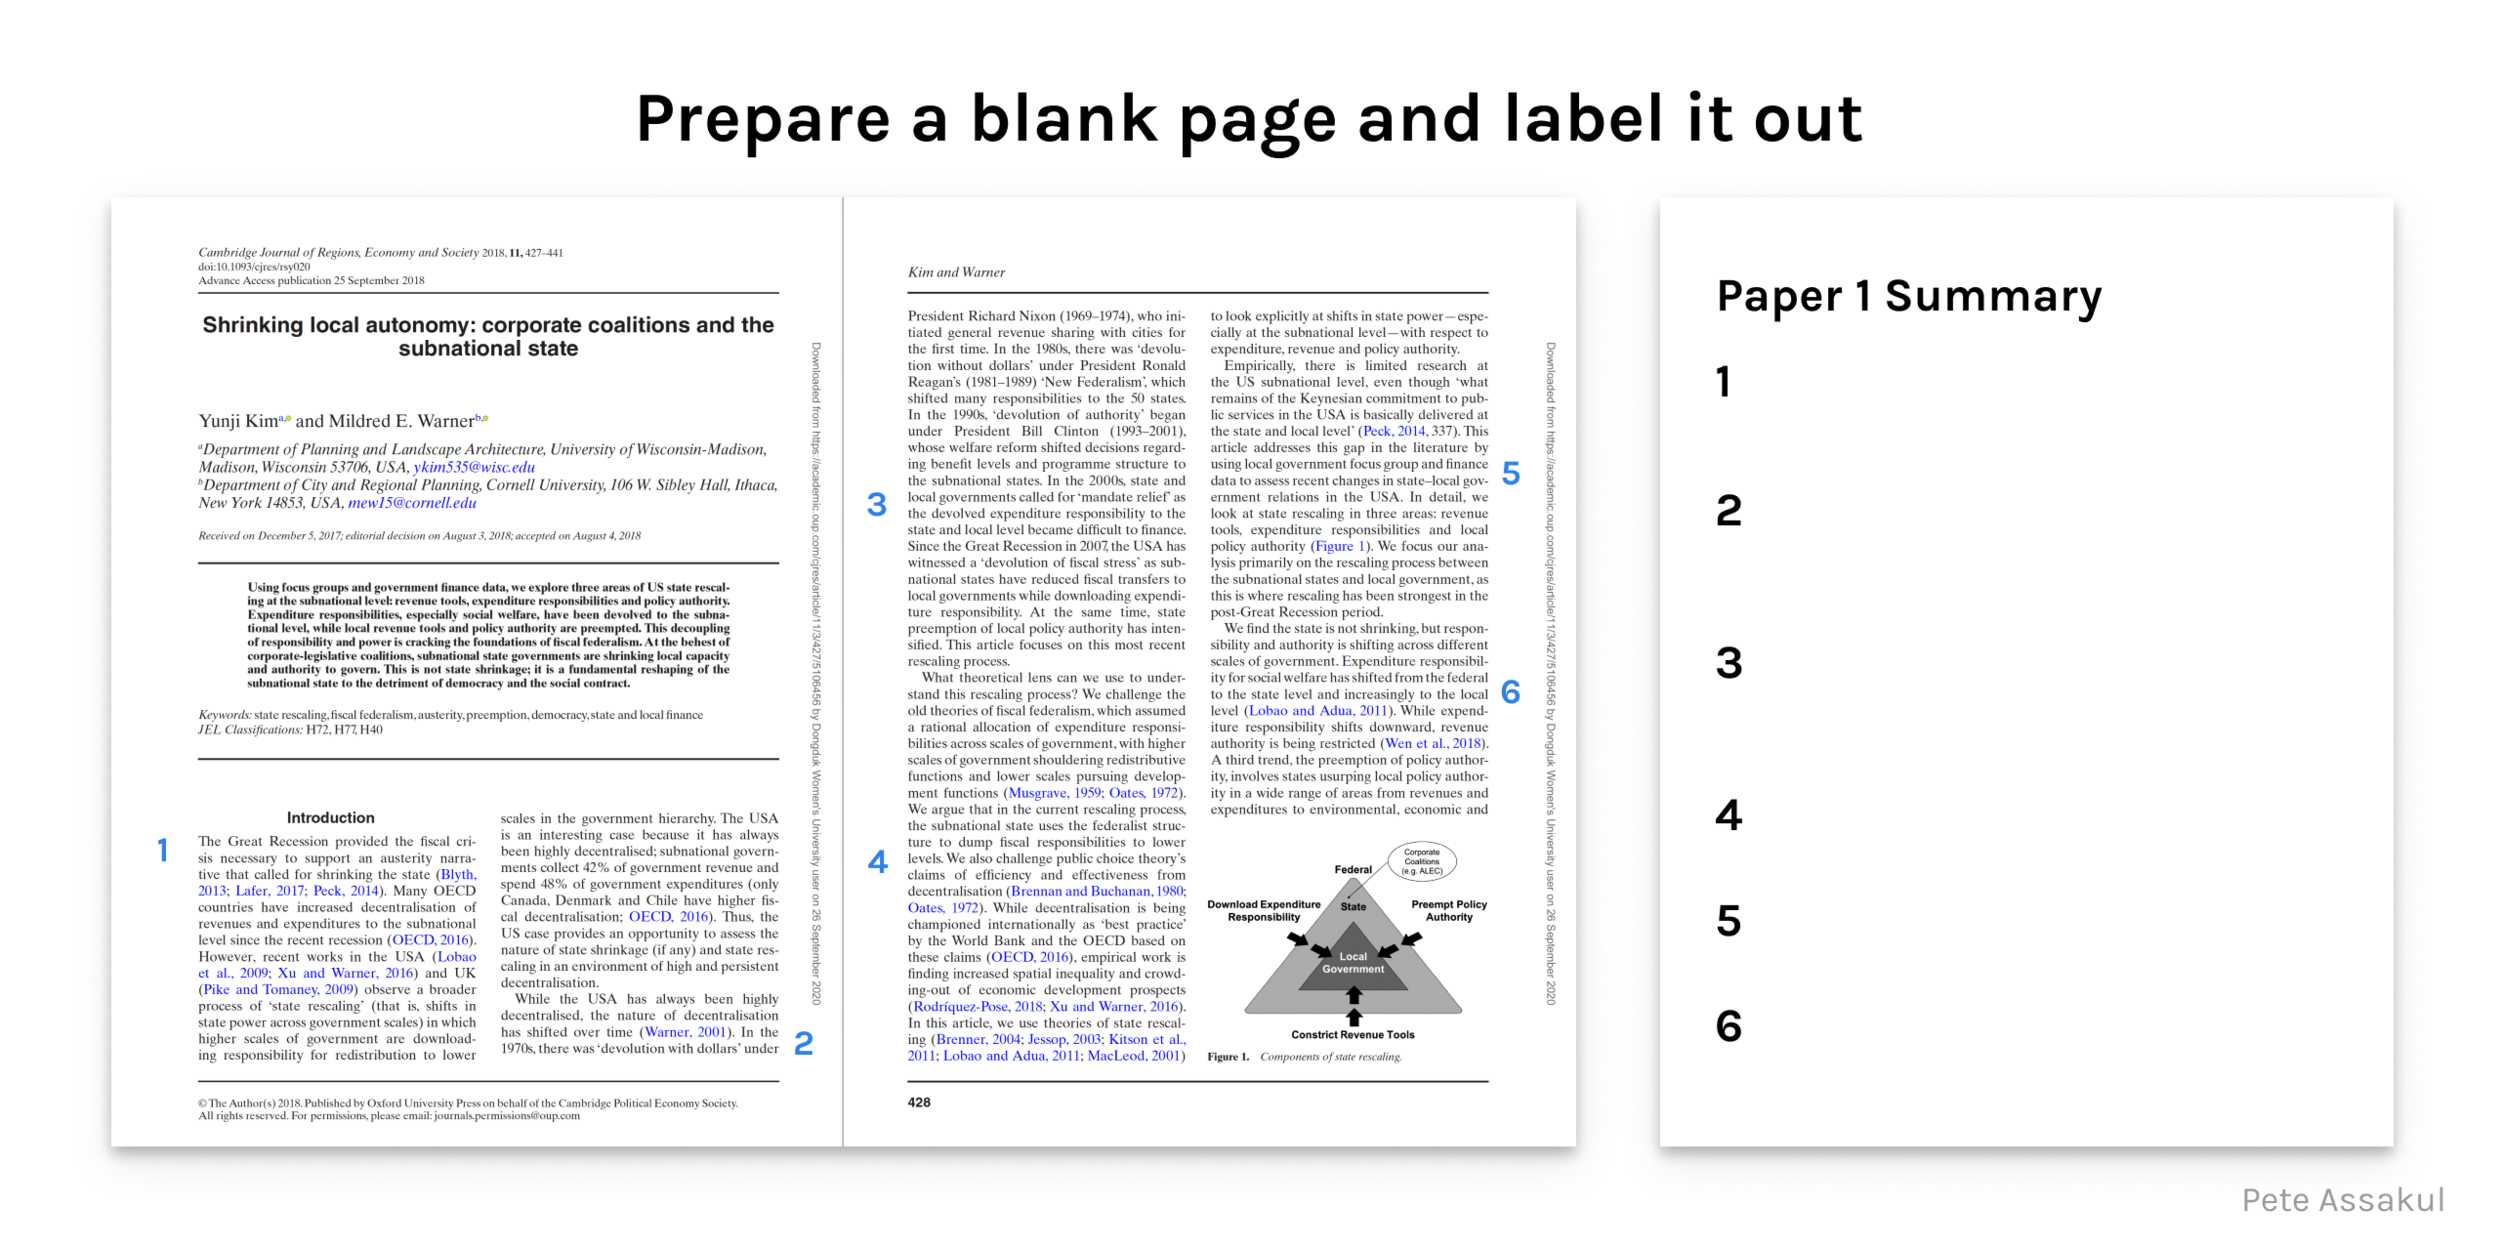
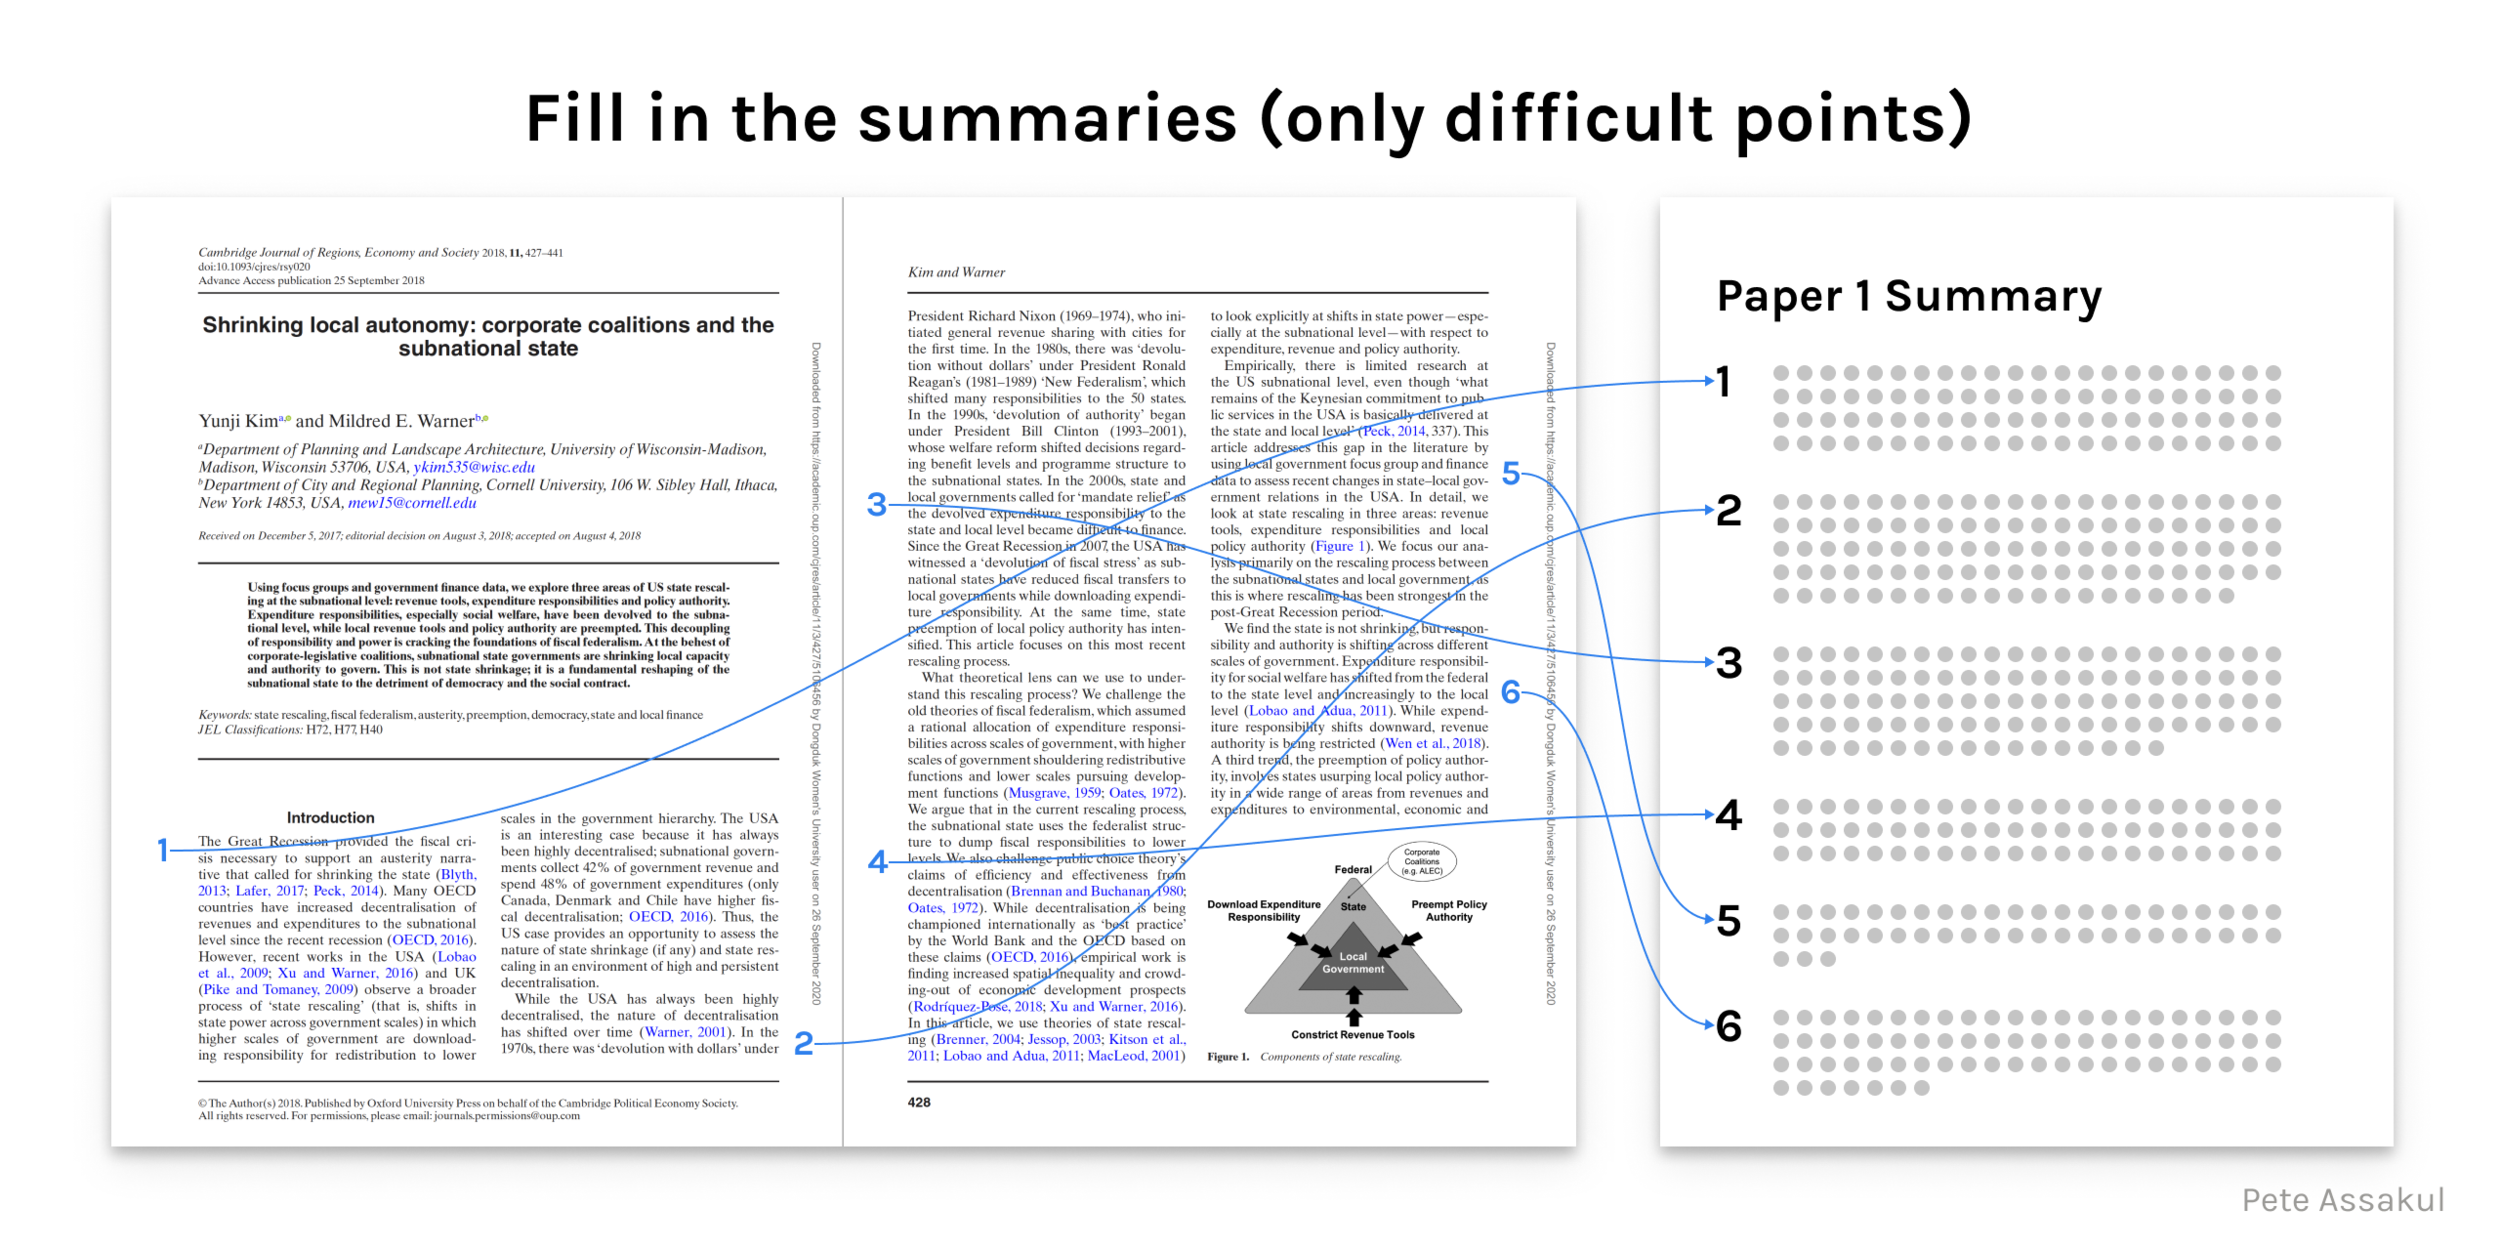
Technique 42: Paragraph Summarizing
Choose a book
Number the paragraphs you want to summarize
Prepare a blank page and label it out
Fill in the summaries (only difficult points)
Other notes:
You are not required to understand everything corner to corner.
But you do need to force yourself to tackle an essential difficult topic. If you don't understand it, you should stay on it and work it out until you do.
You shouldn't skip these fundamental parts.
It is desirable to return and read it over again until you understand.
Overall, try to get the foundational idea of the book.
You don't need to write what you already know.
Summary Matrix
From what you have summarized, you can construct a summary matrix:
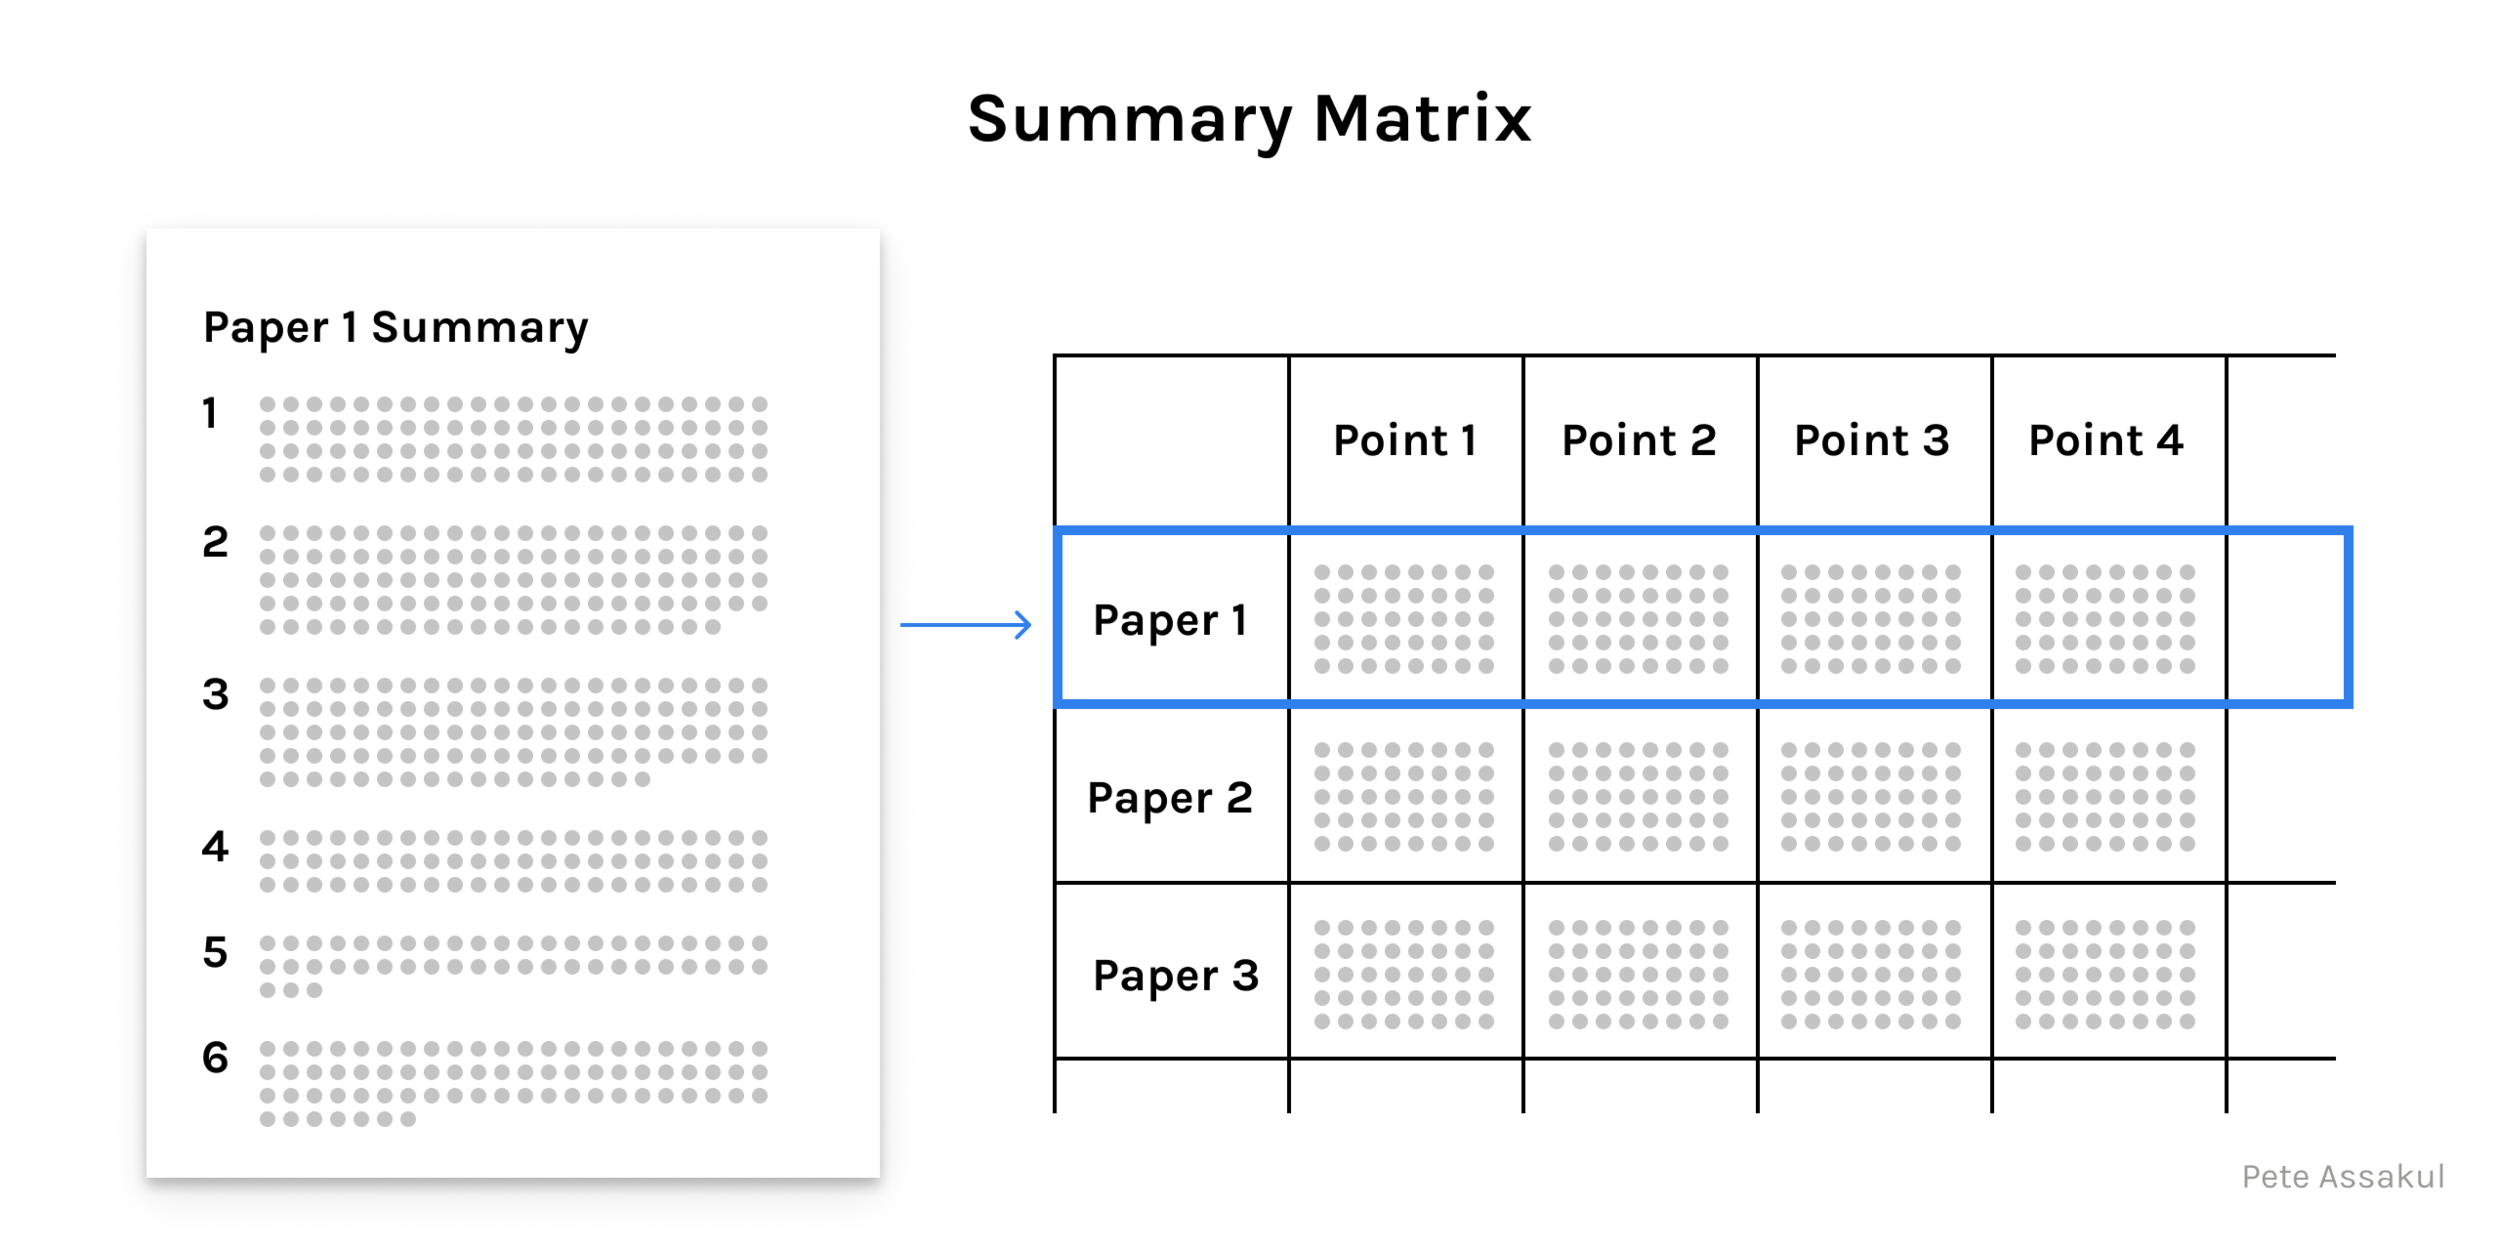
You can also create a table to differentiate the different methods you learned (I should do one for this book).
Technique 45: Suzuki’s 6-Pane Method

This method is mostly used for studying foreign languages. It breaks down a single paragraph or sentence to its most atomic level, so it will definitely take time. The panes are divided into 6 cells:
Original Text
Technical Vocab
Things you searched up about the text
Questions and thought process
Dive into what you don't understand
Try to summarize in your own words
Translation
Copy the text word by word
Suzuki's Background
Suzuki was a Japanese researcher who works with French literature. During his student years, he was disappointed that he would write what the professor translated for him and just memorize that. There was no time to listen and take notes at the same time. He cannot explain what he just copied himself. That was why he developed this technique to go deeper into the text himself.
Churchill's success as a writer
Churchill barely made it through Harrow. He was one of the worst students in class. However, his books became best-sellers in their own right.
Taking a closer look, he was mostly regarded as a failure in Latin and Greek. However, he excelled in English. That was because his English teacher drilled him to dissect and analyze sentences from the ground up. Because Churchill was forced to do this over and over again, he mastered the English language from the fundamentals up (nouns, verbs, connectors, etc.).
Technique 46: Side Annotation
This is similar to simple annotations you write on the margins of the book. But this time, it would be on a spreadsheet.

Extra: Methodology Documentation
Write down things that are hard to memorize or that you want to memorize
Write:
Penalties of not knowing
Merits of remembering

Chapter 13: Remembering
Technique 47: Determining the Merits of Memorization
Write down things that are hard to memorize or that you want to memorize
Write:
Penalties of not knowing
Merits of remembering

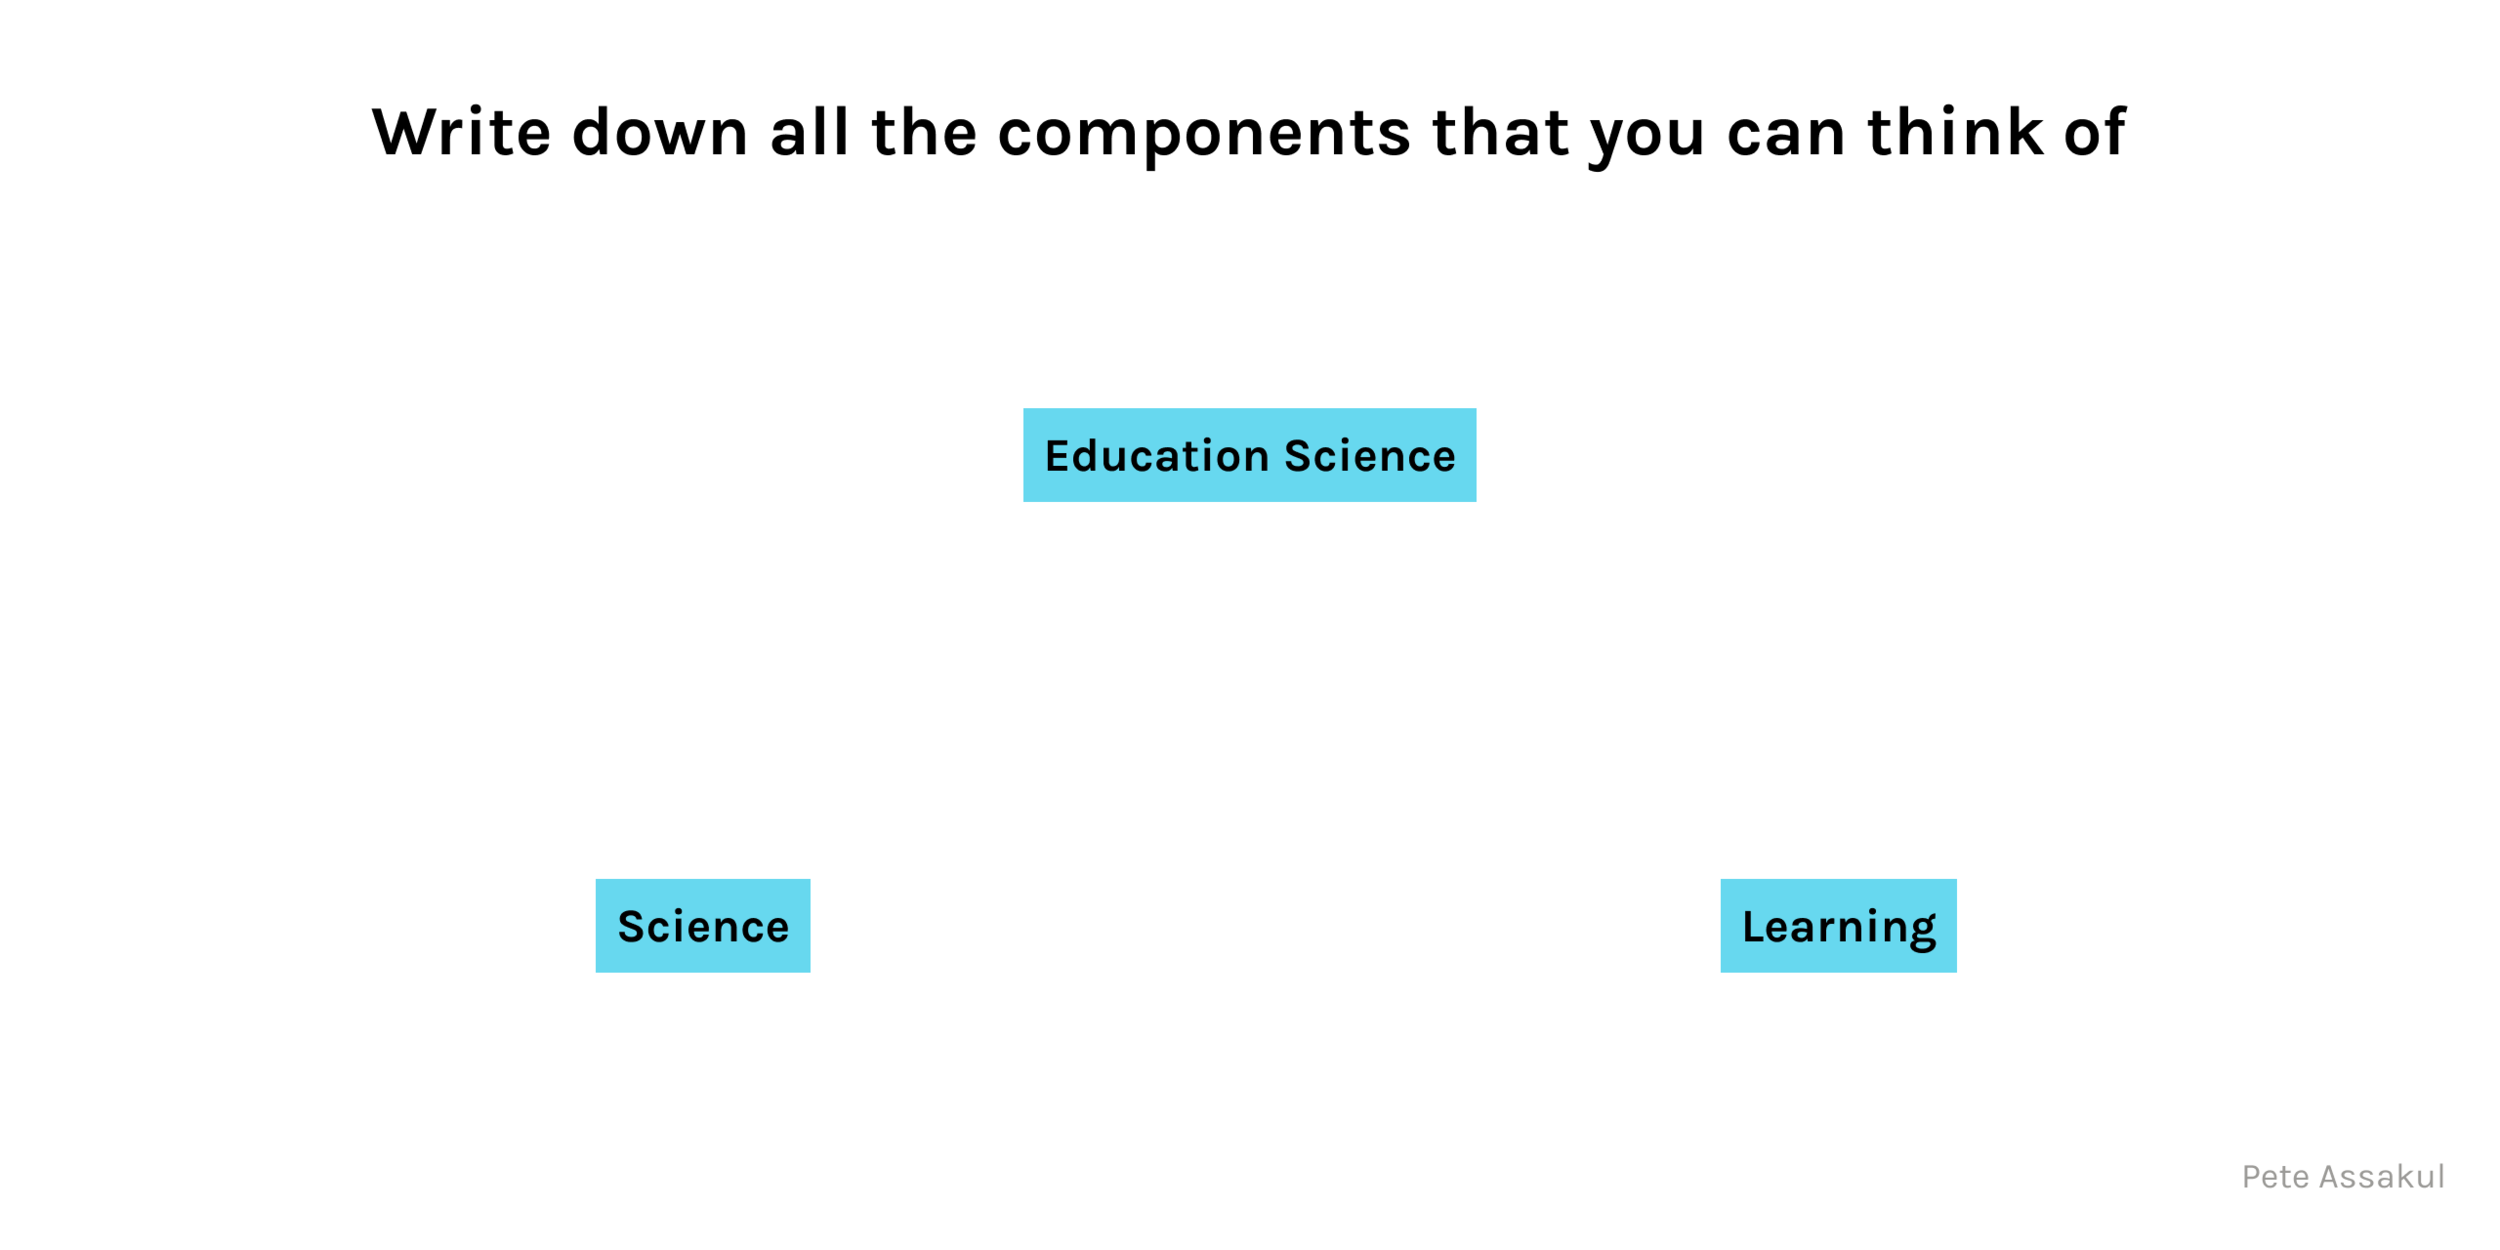
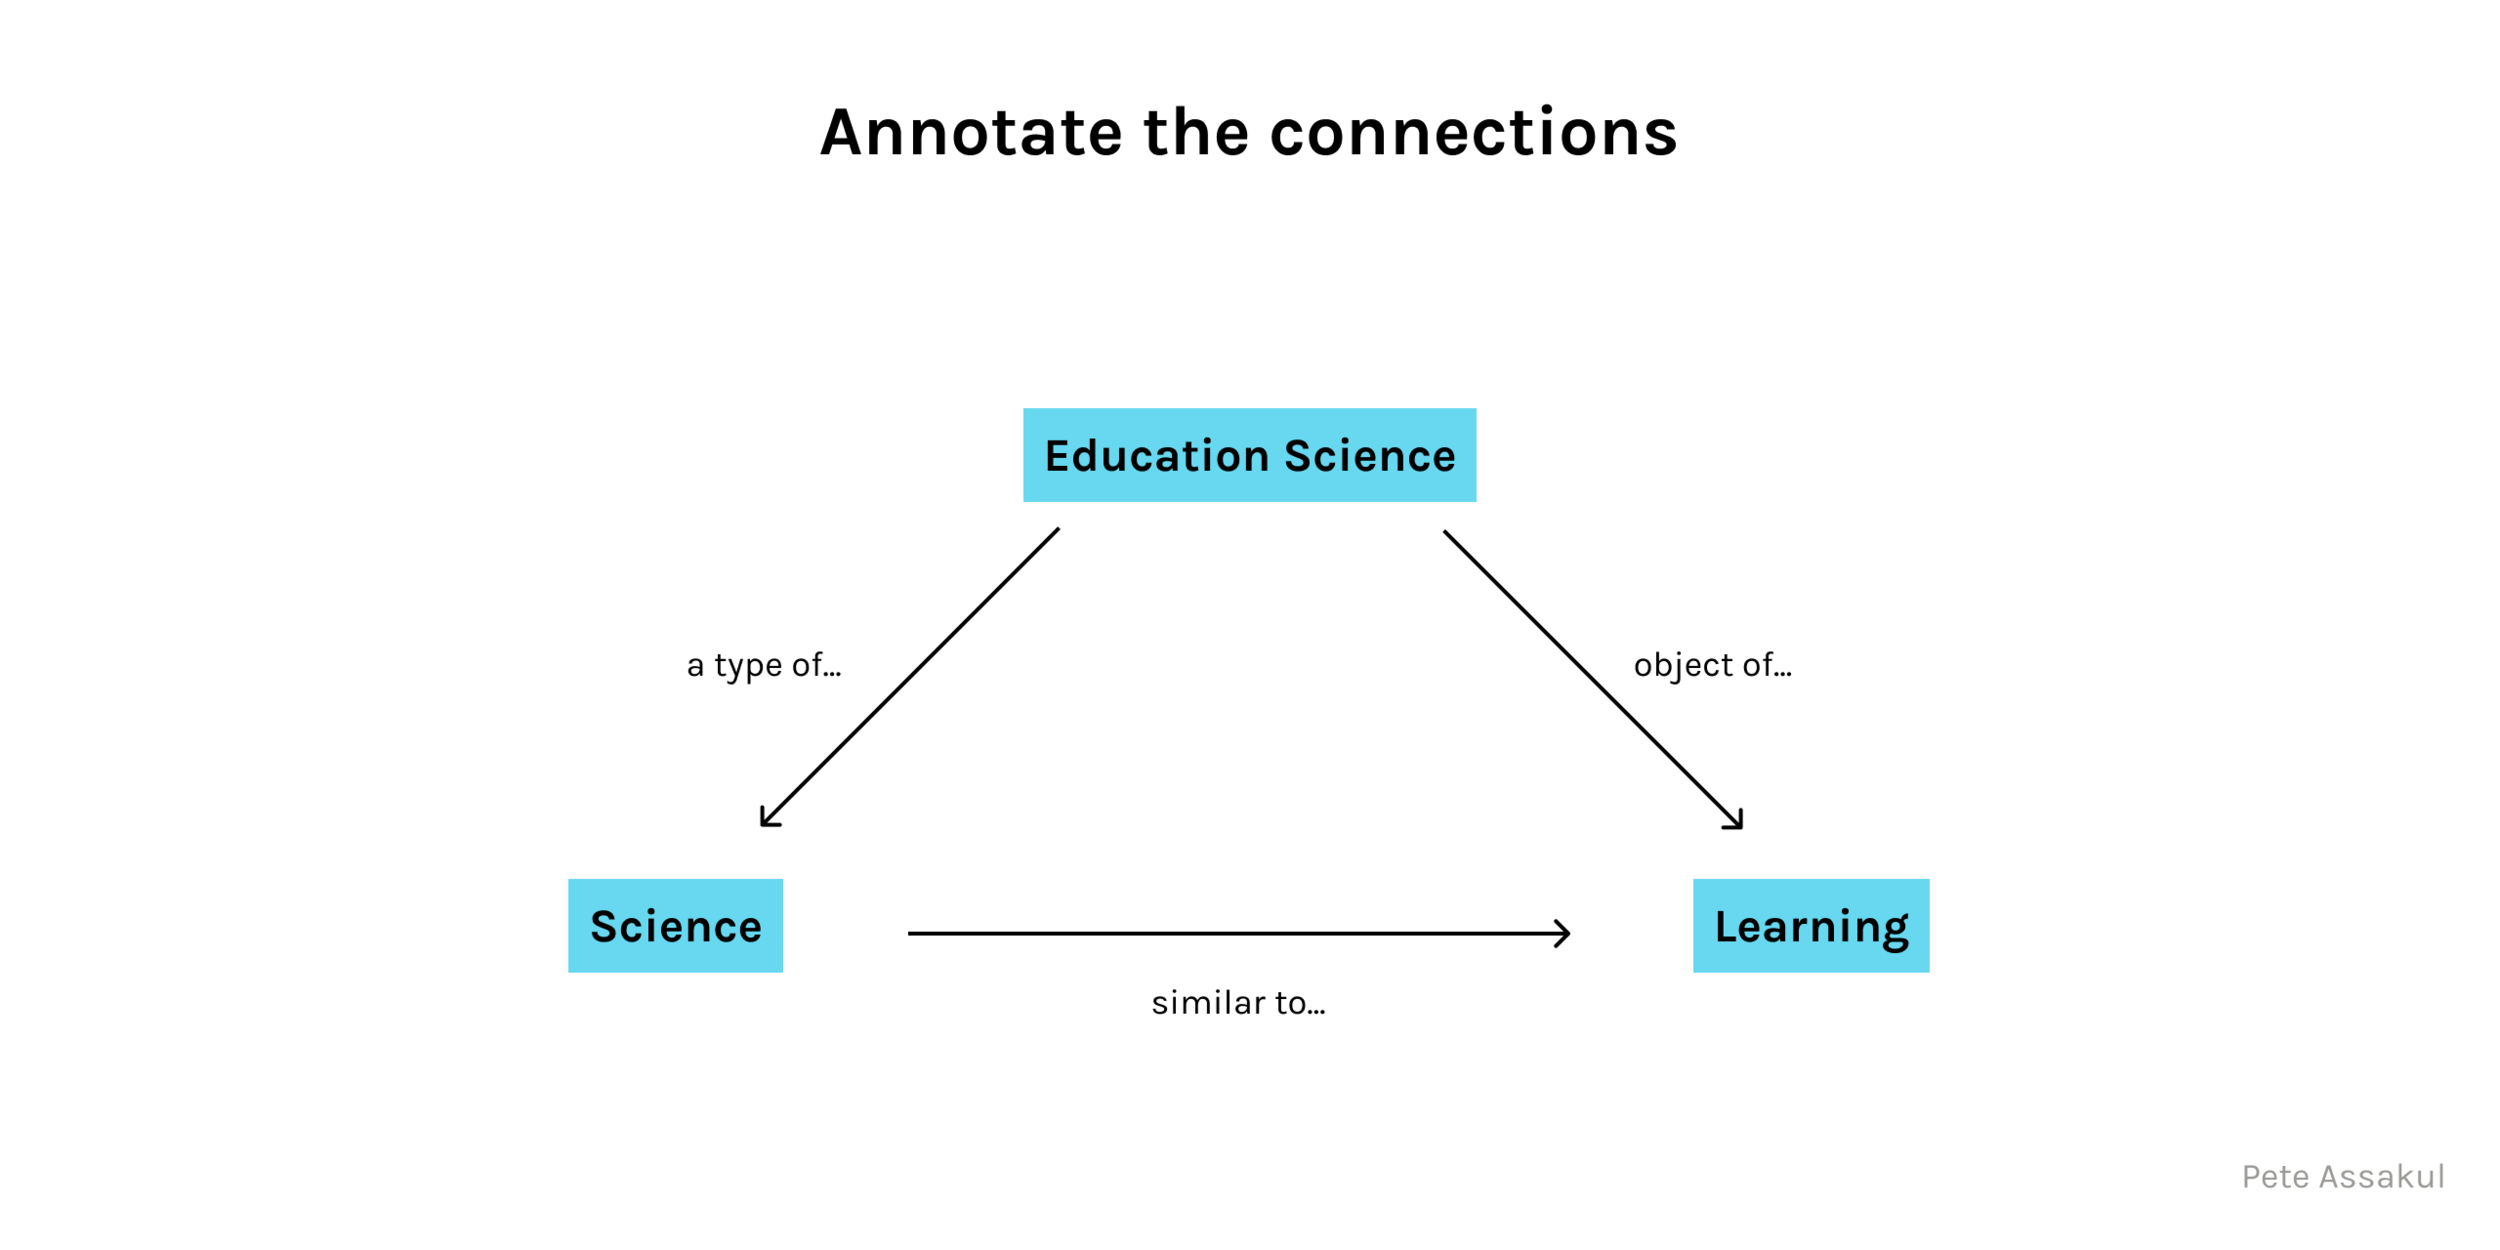
Technique 49: Pre-Map & Post-Map
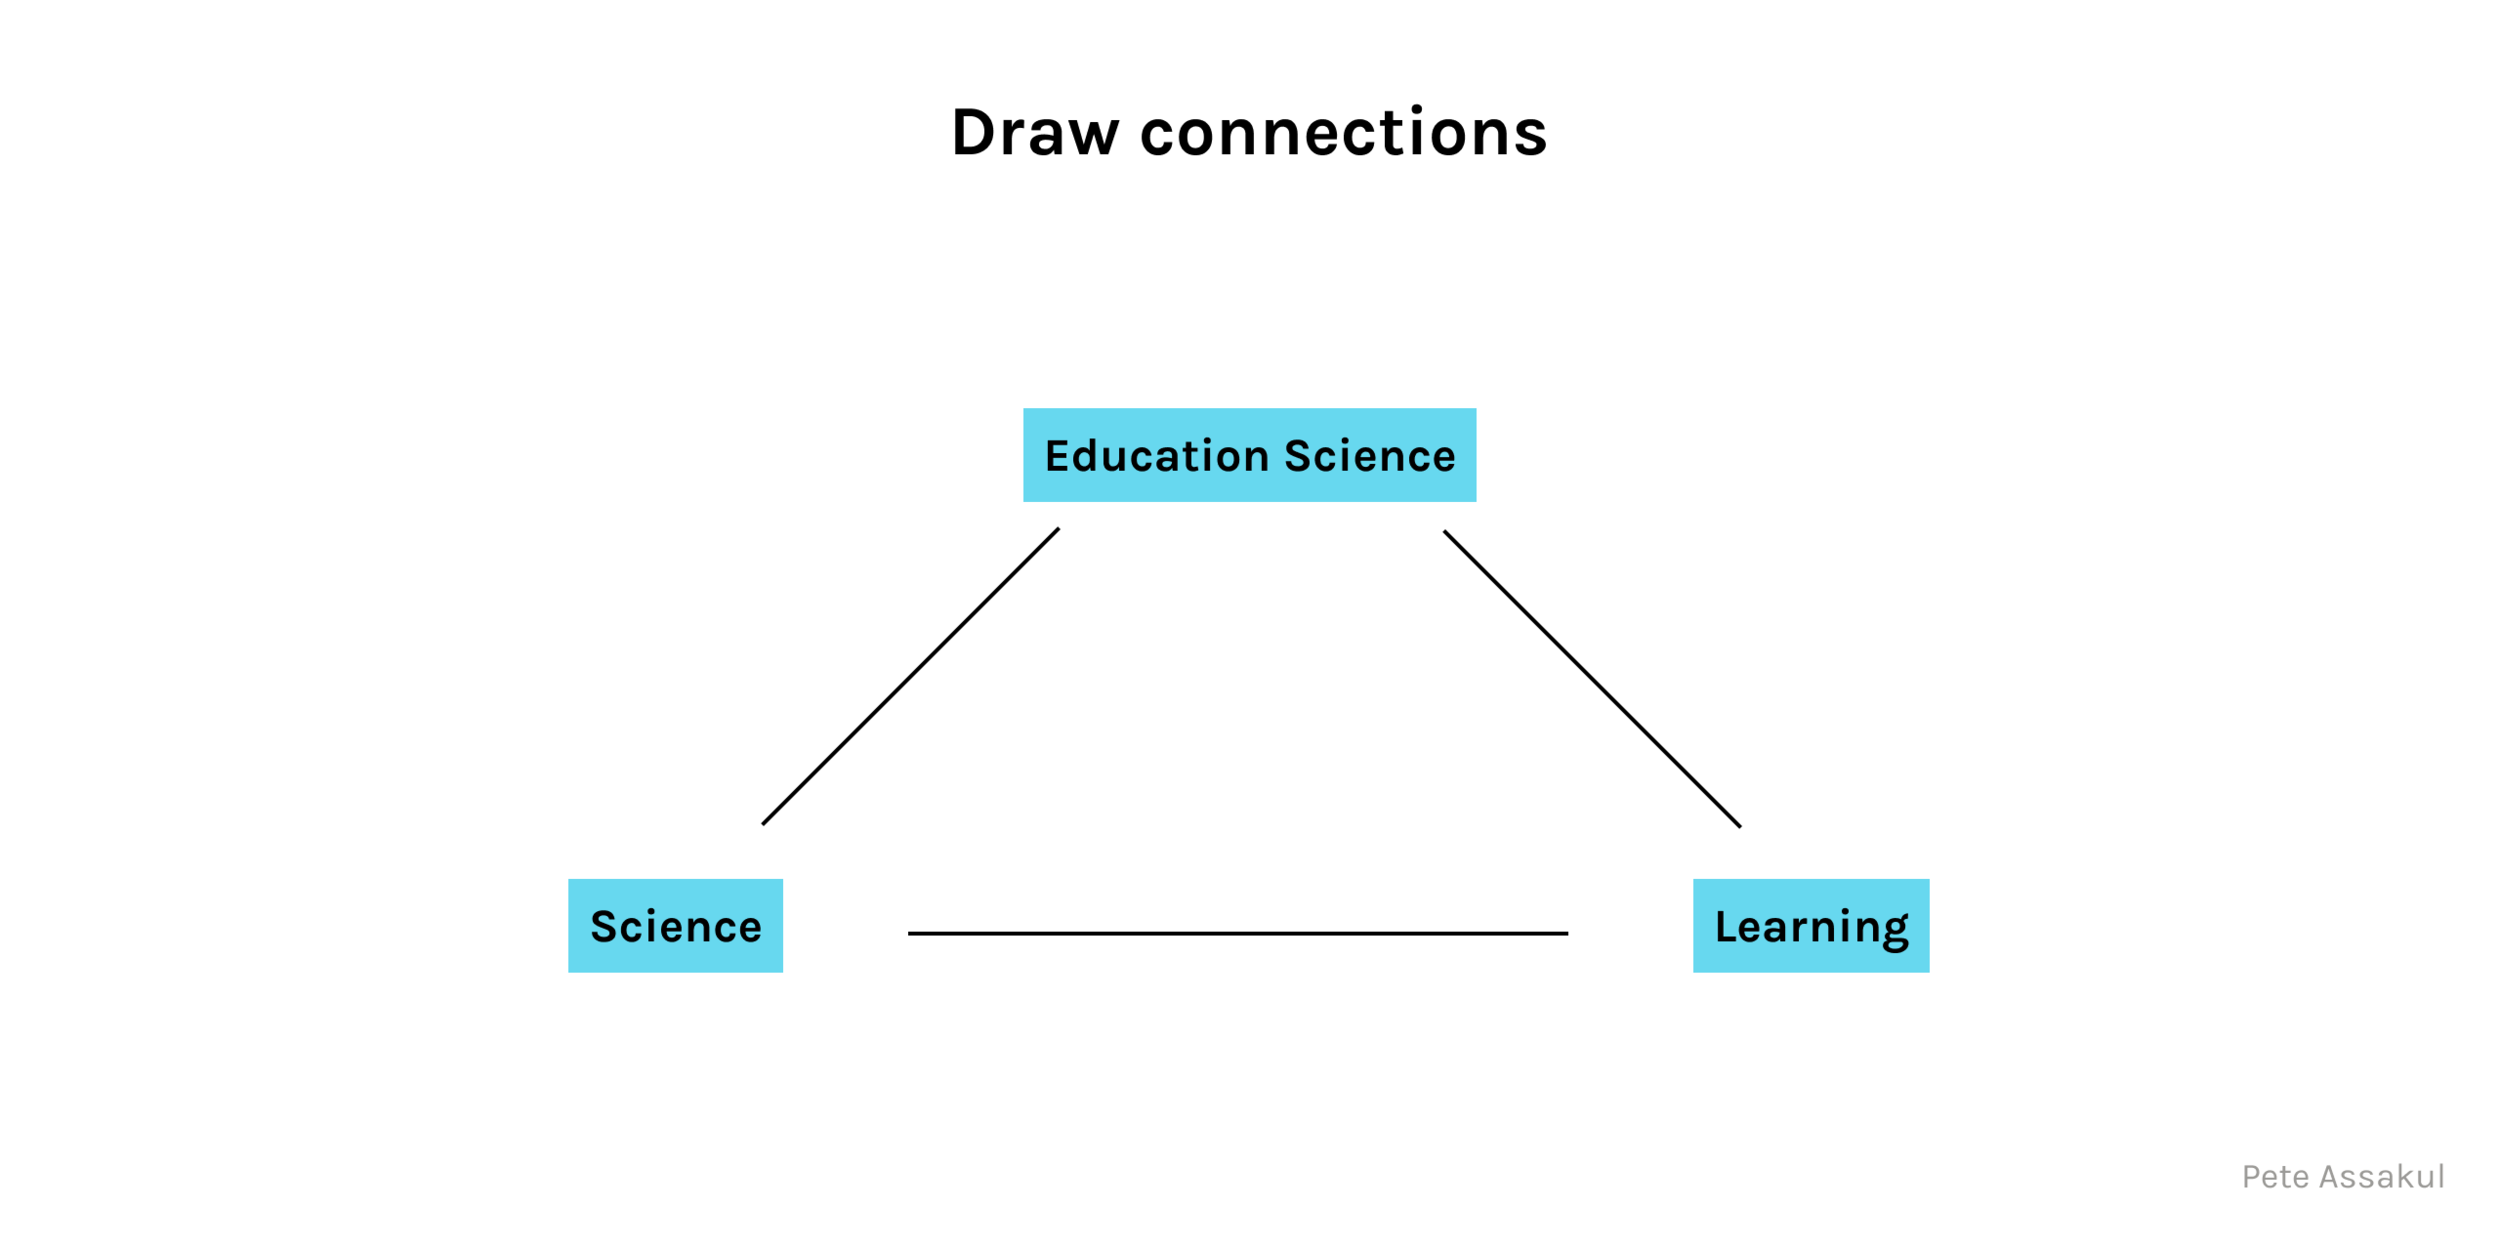
Write all the components that you can think of
Draw connections
Annotate the connections
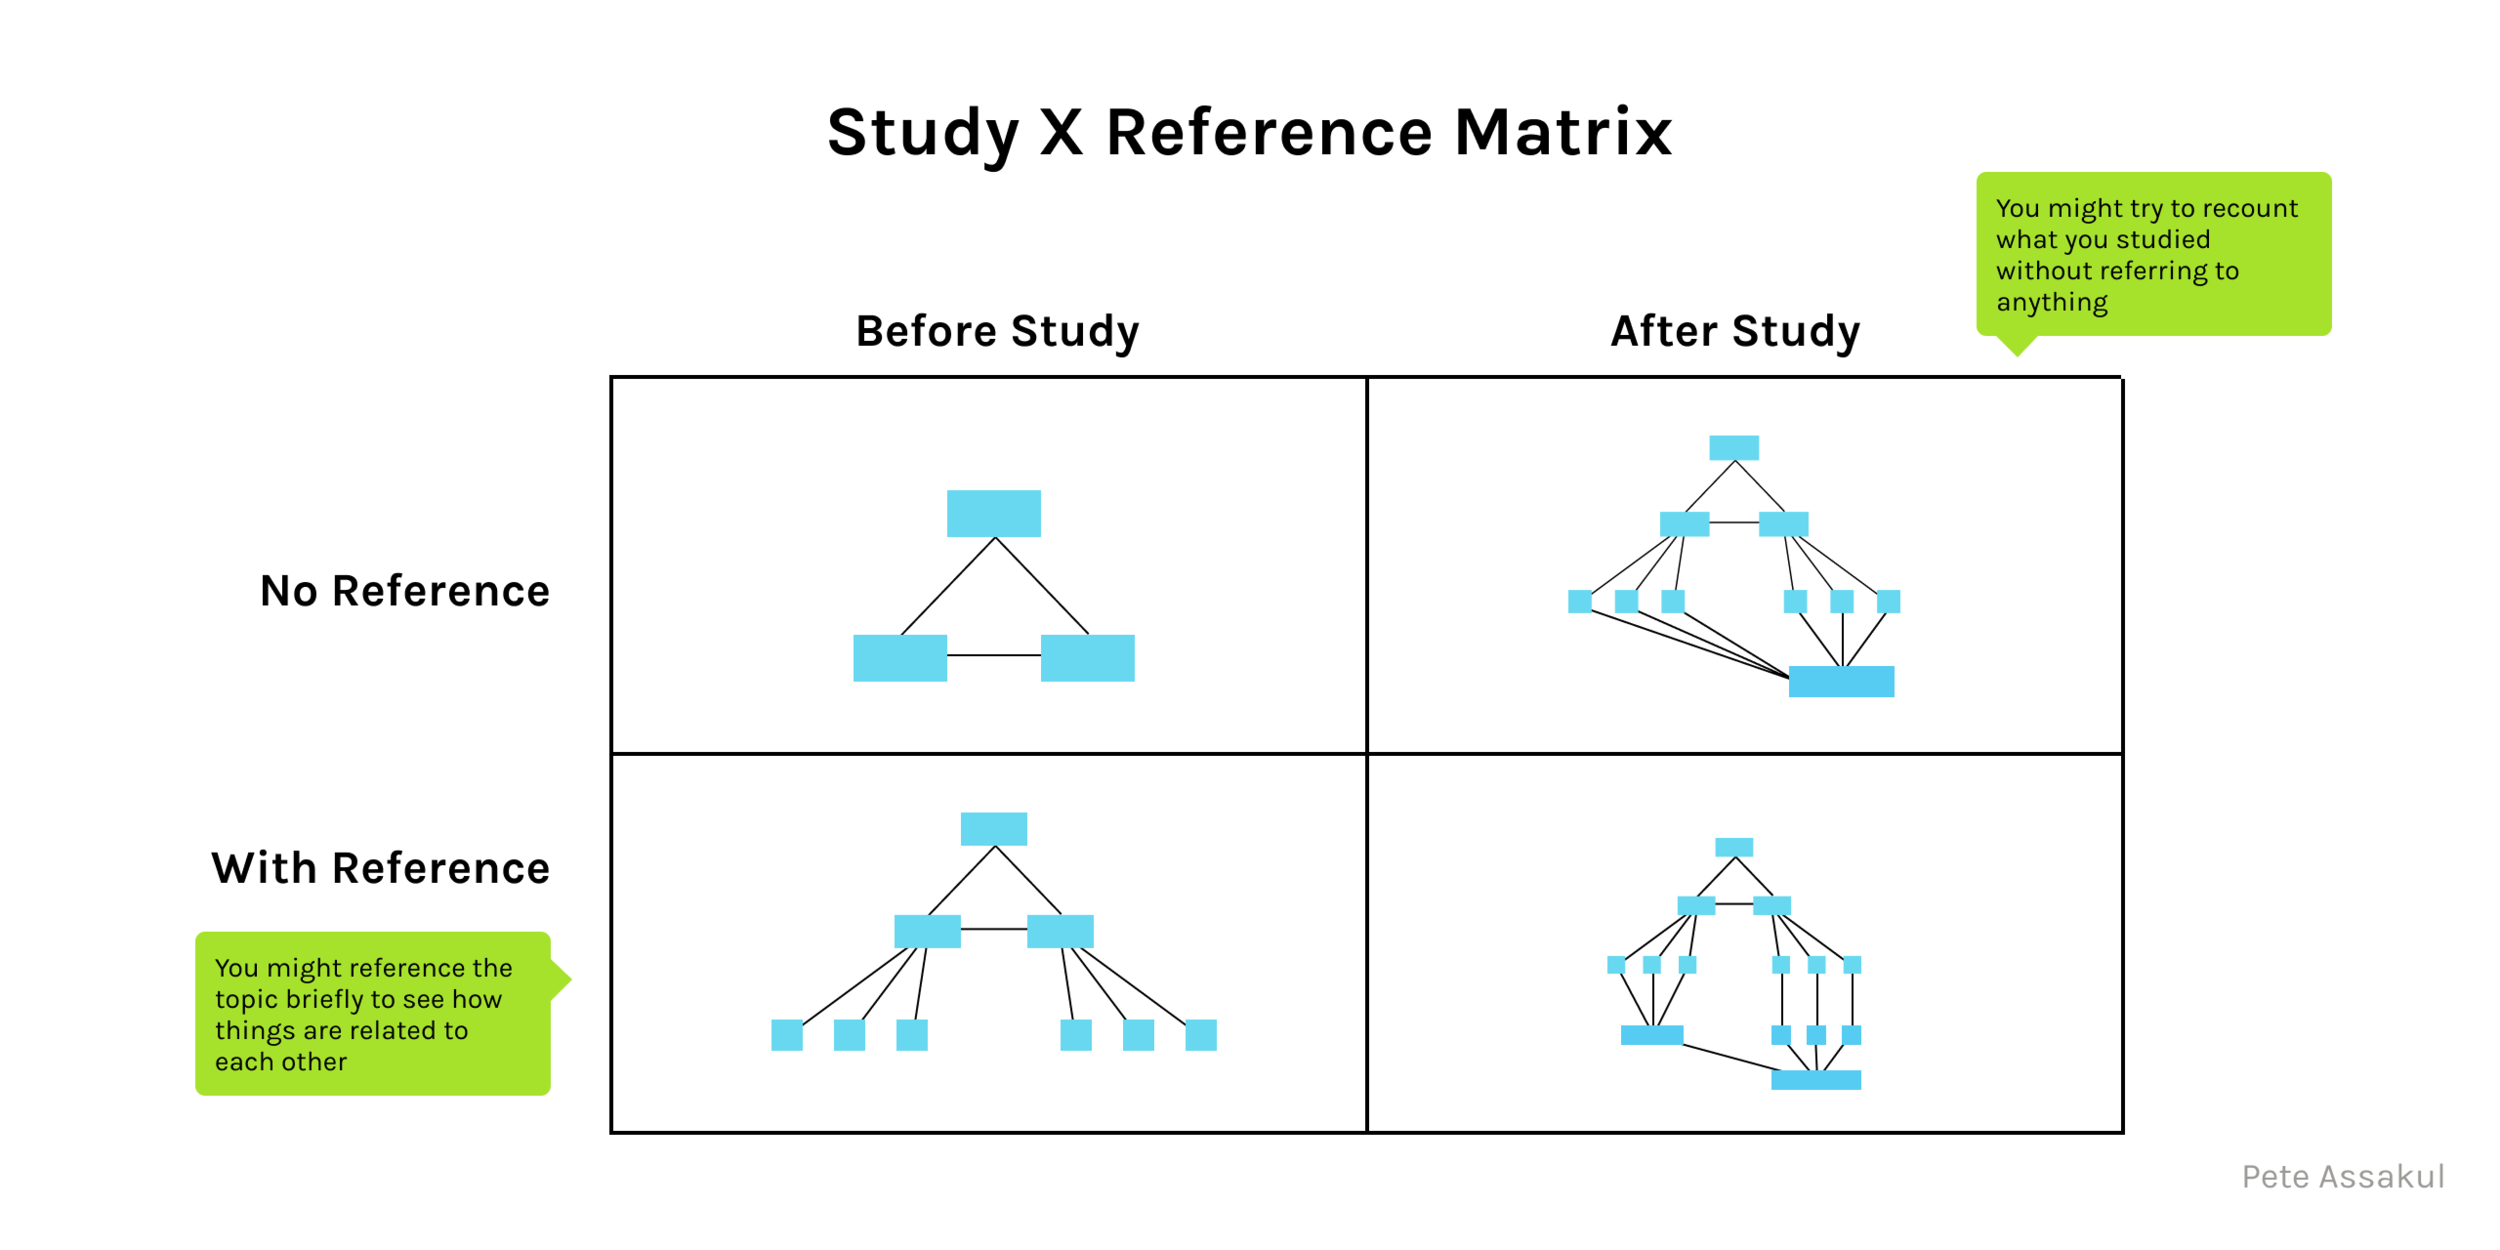
You can create a diagram based on whether you referenced something else to construct that diagram or not. Think of it like a 2x2 matrix. There are two dimensions: whether you referenced something while making the matrix and whether you studied it before. I'm guessing that, to the authors, not referencing anything meant that one creates the diagram from memory.
Technique 51: Minute Module
Coming Soon…
